
Posted 5/20/2015 on www.shutterbug.com.
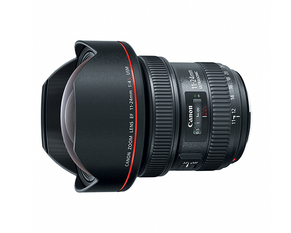
There was a time when I’d avoid a zoom lens as much as I’d avoid a swarm of midges. But in the digital age, the zoom lens has taken on new purpose, at least for me. Midges, however, are still a pest that is best avoided—especially when you’re changing lenses. And if you’re out in a marsh shooting spectacular scenic views, the Canon EF 11-24mm f/4L USM lens gives you the needed range of focal lengths so you can reign supreme over any landscape, as you avoid changing lenses while sidestepping concern that those midges will infiltrate your camera. READ THE ENTIRE REVIEW.
There was a time when I’d avoid a zoom lens as much as I’d avoid a swarm of midges. But in the digital age, the zoom lens has taken on new purpose, at least for me. Midges, however, are still a pest that is best avoided—especially when you’re changing lenses. And if you’re out in a marsh shooting spectacular scenic views, the Canon EF 11-24mm f/4L USM lens gives you the needed range of focal lengths so you can reign supreme over any landscape, as you avoid changing lenses while sidestepping concern that those midges will infiltrate your camera. READ THE ENTIRE REVIEW.


 RSS Feed