
Not long ago, I reviewed the Airport Security V3.0 rolling camera case from Think Tank. I couldn’t sing its praises loud enough.
Well, the TakeOff V2.0 may unseat the Security as my favorite roller, and here’s why. (For reasons why you should use a roller for your camera gear in the first place, I direct you to that earlier review.)
At the outset we should point out that all of Think Tank’s Airport-series rollers are what we’d consider “soft-sided” luggage. That means it's fabric-covered and pliable yet quite rigid.
Airport TakeOff V2.0 vs the Original Airport TakeOff
On the surface, they appear to be very similar. You’d be hard pressed to tell the difference. However, there are a few noteworthy design changes, from what I can discern in the specifications.
To begin, the new bag uses a 1680D nylon shell, which is better quality, higher density, and more abrasion-resistant than the 420D used in the original. Second, whereas both employ user-replaceable in-line skate wheels, V2 uses “high performance, 80mm super-quiet wheels with sealed bearings.” Not having used the original, I can’t speak to a quantifiable difference, but I can say that the new wheels are smooth-rolling and super quiet. The Airport Security uses the same wheels, so there was no need to put them through the same tests. Suffice to say, they pass muster on carpet, cracked pavement, and grass.
Aside from that, the pocket that was originally inside the cover flap has moved to the outside, for faster access, except that it’s fully opaque nylon, not see-through plastic. There are also some cosmetic differences and the included tethered lock has been moved to the side, underneath the side padded handle.
Airport TakeOff V2.0 vs Airport Security V3.0
The TakeOff has a smaller profile than the Security, so it should be a better fit in the overhead on smaller aircraft. That said, you should always check airline allowances before packing your gear and leaving for the airport.
The Security is designed to serve as the name implies. The primary lock is built into the case, with both zipper pulls (the metal tabs) locking in place inside the combination lock – it’s an ingenious design! The tethered lock, however, is a standard combination lock and removable from the tether. Both are TSA-compliant (meaning TSA can easily unlock them if needed).
The TakeOff features only a tethered combination lock, also TSA-compliant, but this lock is permanently attached to the tether. And the tether is much shorter here than on the other bag, if that matters. Also, as mentioned, the tether is found on the side of the bag, in contrast to the top-loading tether on the Security (not sure if that really makes a difference from a practical standpoint). The zippers to the TakeOff’s camera section are interlocking to accept the TSA combination lock.
The front pockets on the two rollers are different, yet similar in some ways. Both will hold a laptop plus tablet. The laptop sleeve on the TakeOff is a smidge larger and appears to have thicker padding in front. The TakeOff will hold my 17” Gateway with protruding battery attached. This laptop is quite thick. The fit was snug, and removing the battery would have been a prudent move. The TakeOff features an organizer pocket, whereas, oddly, this feature is missing on the other roller.
The biggest difference between the two cases is in how you access the outside compartments. On the Security, everything but the outer mesh front pocket, is zippered, with interlocking zippers – hence, lockable. The TakeOff lacks the large outer mesh pocket, and only the organizer pocket is zippered – but with no way to secure it. The laptop/tablet sleeves are accessible via a snap-closure mechanism – not at all difficult to get into when your back is turned. So you wouldn't want to leave the TakeOff with a stranger while you head to the restroom or while you step away for a quick cup of java.
An even greater overriding concern for some of you: If you work with pro-grip DSLRs, then you'll definitely choose the deeper Security over the TakeOff. A point that should not be overlooked.
The telescoping handle is fully exposed on the Security, whereas on the TakeOff it is hidden beneath a zippered flap, and for good reason. What really sets the TakeOff apart from the Security and other Think Tank Airport rollers is the built-in backpack harness.
Why a Backpack Harness?
Despite the fact that Think Tank does a really nice job with its padded handles, making them ultra-comfy and ultra-strong, there are times when you want to move more quickly and with better balance over uneven, perhaps gravelly, rock-strewn, or muddy terrain, and hand-carrying just won’t cut it.
Carrying a roller by the handle makes you kind of wobbly. Besides, you may need your hands free to carry something else or to help you negotiate stairs or rough terrain. Enter the backpack harness.
Unlike the traditional backpack harness found on rollers equipped with these straps, where you first have to attach the harness or go through some lengthy process of digging them out, using the harness on the TakeOff couldn’t be easier. Unzip a flap on the back, and voila! You’ve unveiled the backpack straps. They slide out and back in effortlessly.
The first thing you’ll notice is that the flap leading to the harness secures to the bottom of the case and out of the way via hook-and-loop material, popularly known as Velcro. What you will notice is that these shoulder straps don’t extend all the way down to the bottom edge of the case – at least not from the outside. That means there’s no waist belt, which is unnecessary in this kind of arrangement. There is, however, a sternum (chest) strap to help secure the bag so it doesn’t shift weight as you’re trekking over rocky areas.
Granted, this is a heavier setup than a traditional soft-sided backpack alone without wheels or cart handle. But you won’t be going on long hikes. You’re just donning the harness to negotiate a short stretch of difficult terrain, or to climb the stairs. (Advisory: never drag the case up stairs or lift it by the telescoping handle. Always hand-carry it in such instances, or use the backpack harness.)
In Use
Rollers traditionally have one failing. To allow for the wheelbase and telescoping handle, sections of the interior are raised, leaving what we might describe as wells or channels. You can simply work around that without it hampering you in the least. I arranged my gear in minutes.
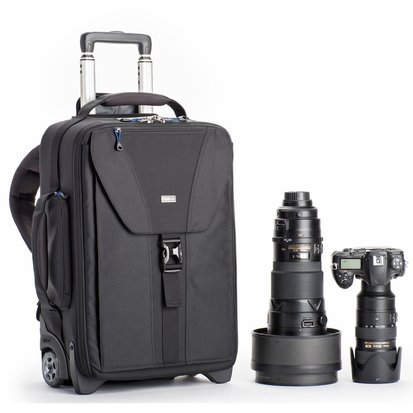
The interior lets you stash two bodies sans pro-grip with attached lenses and a whole slew of additional glass and one or two shoe-mounts besides. There are more than enough padded dividers and many of these are hook-and-loop compatible, letting you configure the interior to your heart’s content.
As for the backpack straps… Well, keep in mind this is not a traditional backpack. Owing to the constricted way the straps extend outside the bag (not as loose as the traditional harness), the straps did pinch a bit under the arms, but not to the point of unbearable discomfort. You should try it out for yourself, as all body types are different. Remember: these straps are just a temporary means of traversing terrain that would prove difficult for wheeled luggage. In the main, wheeling this case along is just a dream.
Rollers traditionally have one failing. To allow for the wheelbase and telescoping handle, sections of the interior are raised, leaving what we might describe as wells or channels. You can simply work around that without it hampering you in the least. I arranged my gear in minutes.
The interior lets you stash two bodies sans pro-grip with attached lenses and a whole slew of additional glass and one or two shoe-mounts besides. There are more than enough padded dividers and many of these are hook-and-loop compatible, letting you configure the interior to your heart’s content.
As for the backpack straps… Well, keep in mind this is not a traditional backpack. Owing to the constricted way the straps extend outside the bag (not as loose as the traditional harness), the straps did pinch a bit under the arms, but not to the point of unbearable discomfort. You should try it out for yourself, as all body types are different. Remember: these straps are just a temporary means of traversing terrain that would prove difficult for wheeled luggage. In the main, wheeling this case along is just a dream.
| Who Should Use This? Commercial and editorial photographers; travel photographers; nature and wildlife photographers (if you plan to backpack for short hops or switch to a traditional photo pack when you arrive at your destination); wedding photographers; location portrait photographers. Capsule Comments Much of what I said about the Airport Security applies here as well: thoughtfully designed; durable; quiet-rolling; holds one or two DSLRs (without pro-grip) with attached lenses plus numerous additional lenses, shoe-mounts, accessories; also holds a 17” laptop, 10” tablet, and tripod; airline-friendly - obviously. Conclusions Frankly, I’m torn between this new Airport TakeOff V2.0 and the Airport Security V3.0. What would sway me one way or the other would be the following: (1) Do I need more security for my gear and my laptop? Answer: Airport Security. (2) Will I be flying in a plane with cramped space? Answer: Airport TakeOff. Do I want faster access to my laptop or tablet while either is in the sleeve? Answer: TakeOff. Will I be carrying a whole lot of gear, including one or two pro-grip cameras attached to lenses? Answer: Security. Will part of my trip involve negotiating rough terrain for short stretches? Answer: TakeOff. Will I be carrying a bulky 17” laptop (I added this because it does apply to some of us)? Answer: TakeOff. Do I want a dedicated roller (answer: Security) or a roller that also works as a backpack (answer: TakeOff)? What if I don’t need to carry a ton of gear or pro-grip bodies? Answer: TakeOff. What if I want to carry a slim laptop and a tablet? Answer: either the Security or TakeOff will do. Other than that, everything about this roller smacks of quality, from the replaceable hardware to the cozy and secure fit of my gear inside to the multiple transport modes outside: roller, soft and sturdy carry handle (x 2), and backpack harness. What Fits? (per Think Tank Photo, with my comments in Italics, in parentheses)
| Key Features (per Think Tank Photo, with my comments in Italics in parentheses)
|
Materials (per Think Tank Photo)
Exterior: For superior water-resistance, all exterior fabric has a durable water repellent (DWR) coating, plus underside of fabric has a polyurethane coating. The roller bags are also constructed with 1680D ballistic nylon, YKK RC Fuse (abrasion-resistant) zippers, custom designed extra tall skid plates, high performance 80mm super quiet wheels with sealed bearings, SpanKodra front pocket, rubberized laminate reinforcement, nylon webbing, and 3-ply bonded nylon thread.
Interior: 210D silver-toned nylon, polyurethane backed Velex liner and dividers, 2x polyurethane coated nylon 210T seam-sealed rain cover, closed-cell foam and reinforced
Specifications (per Think Tank Photo)
Internal Dimensions: 13” W x 18.5” H x 5.3 – 6.8” D (33 x 47 x 13–17 cm)
Exterior Dimensions: 14” W x 21” H x 8” D (35.5 x 53 x 22 cm)
Laptop Pocket: 11.4” W x 16.3” H x 1.4” D (29 x 41.5 x 3.6 cm)
Tablet Pocket: 9.8” W x 9.4” H x 0.8” D (25 x 24 x 2 cm)
Weight: 7.0–8.7 lbs. (3.2–3.9 kg) depending on accessories used
Where can I get more info/order this product?
Think Tank Photo
Manufacturer:
Think Tank Photo
How much is it?
$369.75


 RSS Feed