pixelPERFEXION™
pixelPERFEXION.net
Site contents ©2021 Jack Neubart. All rights reserved.
  • Home
  • Reviews
  • News/Views
  • About
  • Contact

​Field Test: MindShift Gear’s PhotoCross 15 Backpack – Lightweight and Fun to Use

5/15/2019

1 Comment

 
Picture
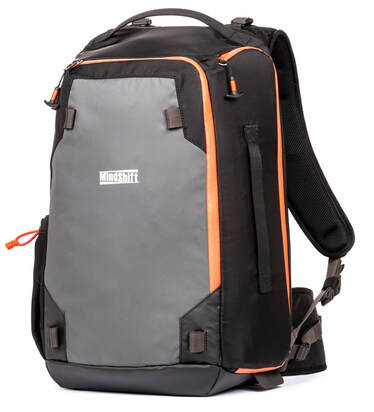
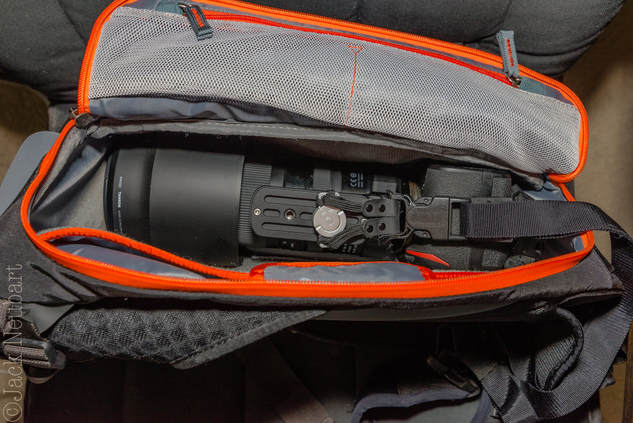
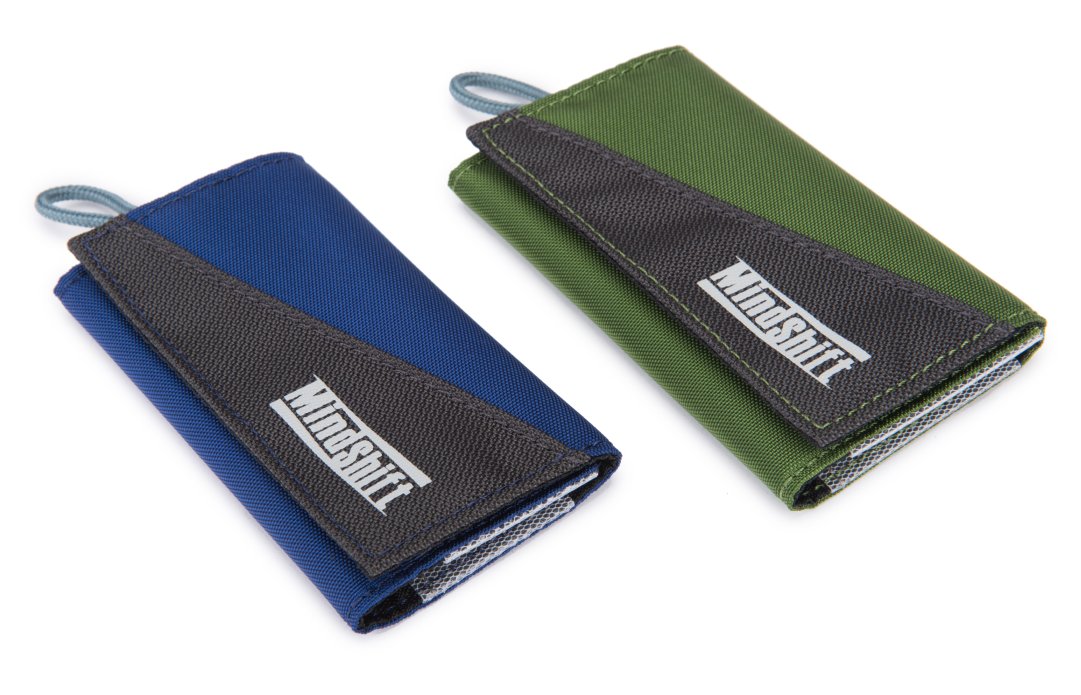
MindShift Gear's PhotoCross 15 Backpack. Courtesy Think Tank Photo.
​There’s no question that, when it comes to outdoor photography, whether close to home or far away, my go-to camera bag is a backpack. Which is why I welcomed the opportunity to field-test MindShift’s new entry in their PhotoCross lineup, the PhotoCross 15. So, did the PhotoCross 15 meet all my expectations? Will it become my go-to camera bag on outdoor adventures? And what features set it apart from the traditional sling or backpack? Let’s see…


Read More
1 Comment

Test Report: MindShift Gear Impresses Us with Two New Outdoor Bags - BackLight 18L Photo Backpack and Exposure 15 Shoulder/Sling Bag

5/6/2018

0 Comments

 
When it comes to outdoor photography, we’re used to seeing photo backpacks from MindShift Gear, but we usually turn to sister company Think Tank Photo for our shoulder bags. Think Tank does have some nice shoulder bags, but they’re really not optimized for the great outdoors, which is also true of their backpacks – great utility and construction, but aimed more at the streetshooter, than the nature photographer, which also applies to their shoulder bags.
 
Well, not surprisingly MindShift decided to divert a little bit of their attention to the shoulder bag, while not sitting idle where backpacks were concerned, and introduced a one-two punch in the new Exposure bag, practically alongside the smaller BackLight.
 ​

Where can I get more info, tech specs & order this product? (click on a bag)
BackLight 18L 
Exposure 15 
 
Manufacturer:
MindShift Gear
 
How much is it?
BackLight 18L: $199.99
Exposure 15: $169.99

A Quick Look at the New MindShift BackLight 18L
I’ve previously written extensively about the BackLight series, which, until now, consisted of two larger bags, first the 26L, followed by the 36L – the model number reflecting capacity, in liters. That makes this bag half the size of the largest version, at least in carrying capacity.
 
I still use the 26L, having gifted the 36L to a friend who routinely carries a load of gear, and when the 18L arrived, I thought it would be too small for my Tamron 150-600mm G2. I first tried the 18L out with my Nikon D500 attached to the new Tamron 100-400 (look for a review of this lens shortly). It was a perfect fit. Next came what I thought would be the impossible task.
 
On its own, the 150-600 settled in comfortably. But could I say the same when attached to the camera? Well, I did have to move a couple of the padded divers out of the way, but I managed a good fit. Of course, that shift in the partitions negated the use of the other half of the bag for a second camera with attached lens. Well, I could always carry a second body and lens separately – plenty of room for that.
 
In the backpack's factory configuration, when situating the camera with 100-400 attached (at the top of the bag, lens downward), there was plenty of room for that second body with attached lens (cradled from the bottom of the bag, lens upward). Long and short, I’ll still use my 26L for that monster glass and relegate the 18L for the D500/100-400 combo riding side-saddle with, say, a D610/90mm macro attached – and still have room for a Nissin flash.
 
You can read my earlier reviews by clicking these links:
 
BackLight 26L review 
 
BackLight 36L review 
 
I should point out that I was so happy with the BackLight 18L that I gave my trusty TrailScape 18L to a friend in favor of the new bag. I prefer the interior layout of the BackLight 18L, considering it will hold two cameras with attached lenses right from the get-go.

MindShift’s Exposure 15 Shoulder Bag
When it comes to shoulder bags, my preference runs to smaller bags. I find it more fatiguing when wearing even a small shoulder bag or sling bag than when carrying a fully loaded backpack. Still, a shoulder bag does come in handy on occasion. You won't carry a backpack to a formal occasion, or even when visiting friends. Not to mention, it's so much easier to stow a shoulder bag on the floor underneath  or alongside your seat when dining.
 
I already own and use the perfect shoulder bag, Think Tank’s Signature 13 – elegant styling, functional, and small enough to carry just what I need for streetshooting. So I wasn’t about to make that bag redundant with the Exposure 13. Besides, the larger Exposure bag sported more spacious pockets – and I love pockets.
 
Still, the Signature bag lacks one thing that, to my mind, would have made it perfect: a waist belt to take the weight off my shoulder. It would have been very easy for Think Tank to have fitted the bag with a removable waist belt, but that probably would have run counter to the fashion statement that bag makes.
 
Fast forward to the Exposure series. These bags don’t feature a waist belt, but they come with the next best thing: a security tether, or what MindShift calls a "cross-body stabilizer strap." This keeps the bag from slipping off your shoulder – or swinging around and in your way when you bend down to shoot something low to the ground. It also prevents someone from pulling the bag off your shoulder. You can also wear the bag sling-style, which is how I’d been using it, and how it was primarily designed to be worn. The neoprene shoulder pad is sewn in and runs much of the length of the strap, rendering the strap well suited to either mode of portage.
 
This bag also features new materials that make it practically impervious to the elements, and the lid has flaps at either end to keep out dust, flying debris, and rain/snow. It does not have a zipped inner lid, a trademark of the Signature bags. However, the Exposure uses only a single plastic buckle for fast access. Some Velcro-type closure system wouldn’t have hurt, so you wouldn’t have needed to constantly snap the buckle shut. It’s a noisy prospect when you’re trying to remain quiet while focusing on birds or other wildlife.
 
As for the interior of the bag, it too lacks the finesse of the Signature bag, but, having said that, it does provide the needed protection. I was able to fit my D500 with attached 100-400, standing the rig lens downward inside the bag. With a shorter lens, the camera could have been supported by the dividers along both sides. Still, even with this long lens, the flap closed without any unruly bulge. BTW – carrying this combo was another reason, perhaps the main one, I’d opted for the larger Exposure 15. The Exposure 13 would have been too small.
 
I should also note that the Exposure 15 will carry a 15” laptop, along with a tablet. There are numerous other pockets, along with a luggage-handle pass-through so you can piggyback the bag on your roller luggage. A tripod is carried at the bottom – straps included. Also included is a rain cover, not that you’ll need it in a light rain, since the bag is sufficiently weatherproofed on its own. Oh, and if that’s not enough, there’s also a water-bottle pocket that will comfortably hold your average-size water bottle.

​Conclusions
One advantage a shoulder or sling bag has over a backpack is that it allows immediate access to your camera gear. That precisely is what drives me to use a bag such as the Exposure 15 on occasion. With a backpack, you normally have to find a place to lay the bag down when it comes time to access or stow gear.
 
Well, not so with the BackLight series. You can still wear the bag, open the rear (main) flap, and access your gear. On paper, at least. As I found out with the earlier iterations of this design, this doesn’t really fit my shooting routine – and a reader concurred vis-à-vis her style of shooting. I find it faster and easier to lay the bag down. And if the ground is wet or muddy, then I’ll simply stow the lenses and flash I may later need in accessory pouches or in the pockets of a photo vest. MindShift may not have a photo vest (why not, guys?), but they do have a full line of pouches for pretty much anything you need to access on the trails.

I found myself using both bags in a variety of situations, not least of which was for bird photography. Both bags are thoughtfully designed, practical and durable, to say the least. And each should easily fit in the overhead bin, if not under the seat, on most commercial aircraft.

Who Should Use the BackLight 18L and Exposure 15?
Travel, nature, and wildlife photographers.
 
Capsule Comments
When traversing rough terrain or for long, strenuous hikes, the BackLight 18L is the clear choice, with its extra-comfy backpack harness system. On public conveyances, crowded streets, and travel involving a lot of walking on sidewalks or dirt paths in city, town, or village, the Exposure 15 shoulder bag would be my choice, for fast access, along with added security thanks to the tethered strap.

A rain cover is included with each bag, and both bags will carry a tripod, as well as a laptop (13" in BackLight 18; 15" in Exposure 15), plus tablet. And for those hot days, don't worry - each bag holds a water bottle.

​And, they are very reasonably priced for the top quality you're getting.
​
0 Comments

Test Report - MindShift Gear's BackLight 36L Photo Backpack - The BackLight Supersized

11/17/2017

3 Comments

 
Picture
​It was nearly a year ago that I tested the progenitor to the BackLight series, the BackLight 26L, from MindShift Gear. That pack has become a staple in my stable of carrying gear, which includes a variety of MindShift and Think Tank Photo products. I’ve grown to rely on them for their utility and durability. And these days, I’ve been leaning toward smaller bags that limit what I carry. I prefer to arrive home after spending hours on my feet little worse for wear, and lighter loads allow me to do that. I also find I work faster and more efficiently if I can work economically.
 
Anyway, so this BackLight 36L arrives on my doorstep. It’s a full 10 liters bigger than the previous model, which I use mainly when shooting with my Tamron 150-600mm G2. In fact, what that translates to is, the 36L is taller, wider, and deeper. So the question you have to ask yourself when choosing between the two versions is, how much backpack do you really need?
 
But even before you go there, take a closer look at the pack and you’ll notice something different – something that sets it apart from other MindShift (and competitor’s) backpacks. Hint: it has to do with camera access. The name should give you a hint.

The Design - The Good and the Bad
In contrast to typical backpack designs, the BackLight employs a rear-access panel, rather than a front panel. (Front outer pockets hold a variety of other stuff, as we’ll see.). It’s a zipped, drop-down panel, but by giving you access to your gear from the rear, you keep prying hands away from your precious cameras and lenses. It may take a little getting used to at first if you’ve been using a more traditional pack, but, provided you’re not switching back and forth, as I am wont to do, you should have a firm handle on it after one or two outings.
 
MindShift will try to tell you that you can change lenses on the fly, without removing the bag from your body, thanks to this rear panel and a short neck cord found inside the bag. I tried it with the 26L. It didn’t fly. And with an even bigger and heavier bag, I’m not even going to attempt it. Frankly, I wish they would have removed that cord, since it always came undone on the smaller bag. And it was not very comfortable.

​The Backpack Harness - Designed for Comfort
As is true with every component of each bag they make, MindShift doesn’t skimp when it comes to shoulder straps and other parts of the harness system. The shoulder straps are contoured and well padded for a comfortable fit.
 
Another feature of a well-designed backpack, the contoured and padded waist belt hugs your hips, ensuring a stress-free ride. The waist belt is supposed to take much of the weight off your shoulders, while preventing the bag from shifting around, which is important when negotiating rough, uneven terrain, but even simply for long stretches without a break. And there’s also a sternum (chest) strap, which further prevents the bag from moving around. A stable bag means you’re less inclined to lose your balance and tip over.
 
Another nice aspect of this bag, given its relatively large size, the bag reaches from your hips to your shoulders, with shoulder compression straps for added comfort and stability. I see too many people wearing backpacks that hang down like a loose sack. No chance of that happening here, since the bag just naturally lends itself to being worn properly.
​

Where can I get more info?
MindShift Gear
 
 
Manufacturer (use this link to order):
MindShift Gear

​ 
How much is it?
$289.99 (in woodland green or charcoal)
 

​Who Should Use This?
Hikers and backpackers, bird photographers, wildlife photographers, nature and landscape photographers; professionals and serious amateurs.
 
Capsule Comments
Well designed; solid construction – made with high-quality hardware and materials; weather-resistant; customizable to fit around your gear; protective; comfortable.
 
​The Customizable Interior
Inside, there’s plenty of room for two bodies with lenses attached (a 70-300mm or maybe a 70-200mm on one, a 24-70mm or fast 50mm on the other, for example). If you attach a long, fast lens or something like the aforementioned 150-600mm, sorry, you’ll only have room for one body/lens combo. But you can store a second body by itself, or with a pancake lens.
 
I should point out that the bottom of the bag is a bit more spacious than it needs to be. You might want to stick some foam at the bottom to take up the slack. You may be able to use the included rain cover, but I tend to think the material is a bit on the scratchy side for the LCD. Besides, a better place for the rain cover is in an external pocket, where it’s easily and quickly accessible.
 
The depth of the bag easily accommodates gripped DSLRs. More than that, you can stow some lenses on end. If you’re a glutton for punishment, that means you can carry more gear. There’s plenty of room. While the padded dividers employ a hook-and-loop system so you can customize the interior around your gear, I wish MindShift had used hook-and-loop-covered padded dividers here, as they do in some other bags. That system just gives you an added edge in fitting the bag exactly to your needs.
 
And again, let me point out that my fantasy dividers are closed-cell foam sandwiched between open-cell foam layers, for the ultimate in shock and vibration protection. But no manufacturer is paying attention.
 

KEY FEATURES per MindShift Gear
  • Daisy chain, ice axe loops and additional lash points for expanding carry capacity
  • Includes tripod/monopod mounting system on front or side
  • Padded waist belt for all day comfort with webbing rail for attaching MindShift accessories
  • Quick-fit waist belt adjustment for rapid and convenient fitting
  • Side compression straps with locking SR buckles for additional lash points
  • Air channel and lumbar support on rear-panel for all-day comfort
  • Ergonomic zipper pulls are easily gripped with gloves or chilled fingers
  • Highest quality YKK RC Fuse zippers, 420D Velocity and 420D high-density nylon for long lasting durability and strength
  • Front stuff pockets for trail essentials: headlamp, gloves, chargers
  • Adjustable dividers for large telephoto lenses, traditional photo gear, or personal items
  • Top zippered pocket for quick access to essentials
  • Interior mesh pockets for storing filters, batteries, cables, etc.
  • Seam-sealed rain cover included
  • Compatible with MindShift’s Tripod Suspension Kit, Filter Nest, Filter Hive and Switch Case
​Room for a Laptop, a Tablet – and a Tripod
Rear access means you can carry a tripod centered over the front of the bag for better balance on uneven terrain. All the accoutrements are in place, but neatly tucked away top and bottom. Or you can carry the tripod on either side, with a water bottle on the opposite side. If you’re mostly traveling over flat terrain, side-carry is not a problem.
 
Keeping the tripod over the center makes more sense for the long haul, but it does get in the way when laying the bag down to get at gear. And if you carry a tripod, you definitely do not want to use that neck cord to change lenses while still wearing the bag.
 
I don’t know about you, but I never take my laptop into the field. Still, if that’s your preference, this bag lets you do that – inside a padded sleeve. Not only that, but you can also carry a tablet. The tablet sleeve isn’t padded, but the surrounding pocket is so voluminous that you’ll likely keep a jacket and other stuff in there to cushion against bumps.
 
​Conclusions
This bag has a lot going for it. Added features not covered above include side compression straps and a padded carry handle – more a padded loop, than a handle, really. The hardware is, as always, uncompromising. And the airflow cushioned back with lumbar support ensures comfort under trying conditions. Plus, there are additional pockets outside and inside.
 
Some may argue, and justifiably so, that carrying the laptop up front is not the best way to go, especially on long treks. Where’s the best place? At the rear of the pack, against your back – and this is something that MindShift fails to recognize, with one or two bags being the exception. Granted, that would be extremely difficult in a bag of this design, but I do think it’s doable. On the other hand, perhaps wiser heads prevailed here.
 
If you think you’d be comfortable with a backpack that grants access to camera gear from the rear, and you need something bigger than the 26L, then the BackLight 36L is your ticket to ride. You’ll find it comfortable and your gear will be well-organized and thoroughly protected. It’s a win-win!
 

MATERIALS per MindShift Gear
Exterior: For superior water resistance, all exterior fabric has a durable water-repellant coating, plus the underside of the fabric has a polyurethane coating. Features the highest-quality abrasion-resistant YKK RC-Fuse zippers, 420D velocity nylon, 420D high-density nylon, 320G UltraStretch mesh, 350G airmesh, nylon webbing, 3-ply bonded nylon thread.
 
Interior: 210D silver-toned nylon lining, hexa-mesh pockets, high-density
closed-cell foam, PE board reinforcement, 3-ply bonded nylon thread.
 
 
PRODUCT SPECIFICATIONS per MindShift Gear
Exterior Dimensions: 13.8” W x 22.4” H x 10.2” D (35 x 57 x 26 cm)
Interior Camera Compartment: 12.6” W x 21” H x 7.1” D (32 x 53.5 x 18 cm)
Laptop Pocket: 11.2” W x 16.1” H x 1” D (28.5 x 41 x 2.5 cm)
Tablet Pocket: 10.6” W x 10.2” H x 0.6” D (27 x 26 x 1.5 cm)
Total Volume: 36L
Weight: 4.9 lbs (2.2 kg)
3 Comments

Test Report: MindShift Gear's PhotoCross 13 Sling Bag Is a Natural for a DSLR with Attached 150-600mm Zoom

7/11/2017

1 Comment

 
PicturePhotoCross 13 sling pack (orange ember). Courtesy MindShift Gear.
​If the PhotoCross 13, from MindShift Gear, can hold my Nikon D500 with Tamron 150-600mm G2 attached, imagine what other combinations of gear it can carry! That’s the surprising discovery I made on the third day working with this bag. But first allow me to detour for a moment with some thoughts on choosing between a sling and backpack for your photo gear.

​Sling vs. Backpack
I routinely prefer a backpack for my photo adventures into the wilderness, and even on the streets of Chicago. More to the point, I’ve never been one to wear or even favor a sling bag when carrying camera gear, except when testing these bags. They are favored by the younger generation, I’ll give you that.
 
Granted, when I wear a shoulder bag, namely the Signature 13, I do so largely sling-fashion, but that’s only because the strap on that bag lends itself to easy portage in this manner. And I carry a light load (read more on the Think Tank Photo Signature 13 here.) 
 
The problem with bags that carry the moniker “sling” is, in my experience, that the strap always cuts into my neck, largely due to a shoulder pad that is too stiff and inflexible. And many of these bags try to be a photo pack minus the backpack harness, meaning they strive to fit as much gear as possible, to the point where your neck and shoulder will hate you 15 minutes into your trek.
 
So when MindShift announced the PhotoCross, I approached it with some trepidation. Little by little, the bag started to grow on me. In the end, I may have found the one sling that fits me to a tee.
​
PicturePhotoCross 13 (with orange accents) on the left; PhotoCross 10 on the right. Courtesy MindShift Gear.
​Choosing the Right Size
I immediately opted for the larger of the two new PhotoCross sling bags. In determining what would be a good fit, I began with the product photographs on MindShift’s website – the pictures showing the bags decked out with a complete array of gear.
 
The second thing I did (and do routinely) before requesting a sample bag for testing and evaluation is to watch the product video. MindShift (as well as Think Tank) keeps the introductory video short and sweet. I try very hard to read between the lines, but, I have to admit, they keep the dialog tight and to the point. So the only thing left for me to do was to order the bag I felt would be the right fit. And that was the PhotoCross 13. It proved to be the right choice.
 

​PhotoCross on the Surface
Aside from a choice in size, you have a choice in color schemes. More realistically, it comes down to a choice in color accents. I chose Orange Ember, the other choice being Carbon Grey (hey, MindShift – this is the USA; we spell it “gray”! No need to get hoity-toity on us.). I would have been happier still with a bag that was predominantly orange, with gray (not “grey”) accents.
 
The color accents around the front of the bag key us into the zipper locations. There is an outside pocket, which I wish would have been pleated to accommodate a light jacket. But, as is, it’s still functional enough to hold any non-bulky extras you may need. There’s also a pair of smaller pockets inside this outer pocket. The other zipper leads to the main camera section, with additional pockets.
 
There’s also some accent stitching on the back – not that anyone will notice while you’re wearing the bag. Still, a nice touch. And there are other subtle color accents besides.
 
Okay, color schemes aside, let’s get down to the nitty-gritty. The body of the bag maintains a fairly svelte appearance. That’s not a fashion statement. That’s a practical feature. In the woods there’s less likelihood that the bag will hinder your progress in tight spaces and it won’t bump into people on buses and trains. Well, the tripod hanging off the back might, but you can always hand-carry it till you reach a clear path.

​The PhotoCross Harness System
This sling pack features a one-piece, adjustable shoulder strap, with thin, air-circulating, mesh-covered padding lining much of the strap. There’s a stretch of similar padding extending out from the base of the bag, which falls against your lower back. I wish this padding ran the entire length of the strap for added comfort.
 
That same mesh lines the back of the bag. However, lacking the raised shoulder and lumbar pads usually found on a backpack, this really didn’t provide much cooling. But there’s a way around that (read on).
 
The shoulder strap has no buckles to fasten and unfasten. While fasteners do make it easy to remove the bag when you’re seated, in every other conceivable situation, they’re a nuisance – and a potential hazard. With gravity and inertia taking over, you may lose your grip on one or both straps when trying to snap the ends together, or when unsnapping them, with the potential for the bag to come crashing to the ground.
 
And to sweeten the deal, there is even a set of compression straps – one at the top, another at the bottom – so you can better tailor the shoulder strap and ultimate fit to your comfort level. By this means you can separate the bag from your back a bit more for improved air circulation.
 
What’s more, there’s no sliding shoulder pad that you constantly have to readjust. The padding is part and parcel of the strap, so it moves with the strap. And, again, the soft padding on this bag ensures your neck won’t chafe from a stiff shoulder pad. You may still find yourself adjusting the strap to optimize your comfort level, but that’s something one does normally when wearing any bag.
 
There’s also a tuck-away waist belt. It’s largely there in case you’re negotiating treacherous terrain and want to prevent the bag from shifting and throwing you off-balance.
 
Couple that with a pair of hand straps to help you get a better grip on the bag. Add to that, the bag employs reinforced box-X stitching at stress points on the main handle. And the stitching on the bag overall is immaculate, with nary a loose thread that I could find.

PicturePhotoCross 13. I pulled out the dividers, positioning one as a "floating cushion" beneath the lens, then parked the D500 with attached Tamron 150-600mm G2 cozily in the bag.
​The PhotoCross 13 in Use
The bag is meant for a casual walk in the woods or on city streets, with a modicum of gear. You’re not going to get a gripped DSLR and long, fast lenses in here.
 
The main camera section has three, fully adjustable modules, with movable padded dividers (via Velcro-type hook-and-loop fasteners). What will that fit? I’ve carried a 70-300mm attached to the camera, a flash in the second module, and various accessories including sling strap in the third. Actually, you’ll be surprised at how much you can squeeze into this bag.
 
What’s more, I was pleasantly surprised when I was able to load my D500 and 150-600 zoom into this bag. It was a tight fit and getting this combo back in the bag while I was wearing it required a bit more of an effort than when removing the gear. It was also fairly easy to load this combo into the bag before donning it. I also managed to fit the Nissin i60 in a soft pouch on top when I'd started out.

If you’re wondering, if I had to remove the tripod mount on the 150-600, the answer is no. I inserted the camera into the bag lens first, camera grip upwards (portrait mode). And I rotated the tripod mount so it rested facing upwards, making it easy to grab the mount as a handle and pull up. Once out of the bag, the tripod mount was returned to its original position.
 
There’s also a tablet sleeve inside the camera section, lying against your back. I say “tablet,” not “laptop,” because I can’t see anyone schlepping a laptop of any size, unless it weighs no more and is no bigger than a tablet (contrary to specifications). I’m not even sure I’d carry a tablet, certainly not with the long-lens rig just described. Perhaps I would with a smaller, lighter load.
 
Because I wear hats, the hat does get in the way, requiring its removal when donning the pack, or removing it. A sling camera strap proved equally annoying when wearing this sling pack. I may try to sling the bag to the left and carry the camera at my right (for a fast grab – really, the only way to use a sling strap) and see how that works. Although I’ll probably just keep things as they are, being right-handed.
 
Given that the bag’s hand strap on top falls naturally in position for an easy grab with your right hand when the bag is carried to the left, I’m beginning to wonder if that wasn’t the intended carrying method. I gave it a quick try, but it didn’t feel natural, so back to the tried and true (subject to change without prior notice).
 
A third strap on the bottom would equal the score in terms of making it easy to grab and swing the bag around, but that may interfere with the integrity of the bottom panel, which is designed to be better resistant against wear to vertical placement and scraping of the bag on rocks and dirt.
 
All that aside, what’s important is that the entire time I wore the PhotoCross, I never felt as if it were choking me or cutting into my neck.
 
One thing I should point out. It may take a bit of trial and error to get the shoulder strap just the right length, while adjusting the compression straps for maximum comfort. For now I have the bag flush against my back at the top, but looser at the bottom, which seems to work for me.

Look for a review of the Nikon D500 and Tamron 150-600mm G2 soon.

Who Should Use This?
Hikers and nature enthusiasts; tourists; amateur photographers on a regular basis and even pros on vacation.
 
Capsule Comments
Fairly comfortable and protective; durable construction; customizable; thoughtfully designed; room for a tripod and full-size water bottle; weather-resistance aided by included rain cover; barely room for a jacket in the outer pocket but can be carried in place of a tripod, or perhaps with the tripod; holds a small laptop (PhotoCross 13) or tablet (if you must); PhotoCross 13 was surprisingly roomy – carried my DSLR with attached 150-600mm zoom.
 
Conclusions
On one outing, after detaching the sling strap from the camera, I put the camera down in preparation for returning it to the bag. Then it dawned on me: Hey, this is a sling bag! No need to take that extra step. Of course, I could have left the camera attached to the strap, but who knows how the mind works sometimes? (Either way, I often prefer to separate strap and camera till I reach my destination.) Anyway, I brought the bag around to the front and unzipped it, picked the camera up, tucked it safely into the bag, followed by the sling strap, zipped the bag, and returned it to its resting place against my back. The story doesn’t end there.
 
Going home I boarded a crowded Chicago “L” (subway) train, resigned to stand for much of the trip, when I spied a seat. I shifted the bag to the front, against my stomach, grabbed onto an overhead hand strap, and gingerly swung myself into the seat for a perfect landing that didn’t jostle the passengers on either side. Had I been carrying a backpack, this story would have ended quite differently.
 
Now here’s my full itinerary for the first three days of testing. It went something like this.
 
Day 1: Sweltering heat and humidity, but I managed a short walk around the neighborhood without feeling stressed out by the adverse conditions. Gear: Nikon D500, Nikon 18-200mm attached to camera, Nissin i60A shoe-mount; Custom SLR Glide One sling strap.
 
Day 2: This day saw me on a walking tour of Chicago Riverwalk for several hours, in the evening – cooler, but considerably more walking. Gear: D500 with attached 18-200mm, ultra-compact Sirui T-025X carbon fiber tripod; Giottos compact head carried inside the bag (so the tripod wouldn’t extend out from the bottom); Nissin i60A flash; Glide One sling.
 
Day 3: I headed into the woods sans tripod to photograph deer and wildflowers for a few hours – a mild hike on undulating paths, on a fairly muggy day. Gear: D500, Tamron 150-600mm G2 lens attached; Nissin i60A (although after packing away the camera with sling strap attached, couldn’t find room for the flash so ended up carrying it in a vest pocket); Glide One strap.
 
On that last day, as I set out on the bus, it also dawned on me that I would never have to put the bag down while on a bus or train. I could simply slide it around so that it reposed gently, without the full weight falling on my knees, allowing me to sit comfortably.
 
At this point, I’ve pretty much dedicated the PhotoCross to carrying my D500 and 150-600. Well, until this Sunday, when I hit Chinatown for a festival and will likely switch lenses – but not bags.
 ​

MATERIALS
Exterior: All fabric exterior is treated with a durable water resistant coating while fabric underside is coated with polyurethane for superior water resistance, YKK weather resistant zippers, 420D high-density nylon, heavy-duty nylon Tarpaulin, 350g air mesh, nylon webbing, 3-ply bonded nylon thread.
 
Interior: Removable closed-cell foam dividers, P210D liner, polyurethane backed Velex liner, 2x polyurethane coated 210T seam-sealed taffeta rain cover, nylon binding tape, 3-ply bonded nylon thread.

Where can I get more info/order this product? (Click on highlighted link.)
MindShift Gear (use this link to order direct)

 
Manufacturer:
MindShift Gear

 
How much is it?
$129.99/PhotoCross 13
$114.99/PhotoCross 10

​FEATURES (per MindShift Gear)
  • PhotoCross 13 fits an ungripped DSLR, 2 - 4 lenses including a 70-200mm f/2.8 and some 13” laptops
  • PhotoCross 10 fits an ungripped DSLR + 1 - 2 lenses + 10” tablet or mirrorless body + 3 - 5 lenses + 10” tablet
  • Weatherproof zippers and materials
  • Tripod or jacket carry with included straps
  • Dedicated, padded pocket fits a tablet or a laptop (10 = 10” tablet, 13 = some 13” laptops)
  • Easy rotation for rapid access to gear and accessories
  • 3-point harness for stabilization with tuck-away waist belt
  • Secure your bag by linking the zipper pulls together
  • Water bottle pocket locks in most 1 liter bottles
  • Breathable 320G air-mesh back panel keeps your back cool during long days
  • Internal zippered pockets for batteries, memory cards or other small accessories
  • Easily accessible front pocket for filters, snacks, or a light layer
  • T-pulls are easily gripped with or without gloves
  • Top and side carry handles
  • Fully customizable interior dividers for photo or personal gear
  • Seam-sealed rain cover included for downpour conditions

​SPECIFICATIONS
 
PhotoCross 13
  • Internal Dimensions: 9.4” W x 14.2” H x 5.5” D (24 x 36 x 14 cm)
  • External Dimensions: 12.6” W x 17.7” H x 7.1” D (32 x 45 x 18 cm)
  • Laptop compartment: 9.1” x 13” x 1” (23 x 33 x 2.5 cm)
  • Maximum weight (with all accessories): 2.4 lbs (1.1 kg)
  • Shoulder strap length: 42.5–62.2” (108–158 cm) (includes length of product)
  • Waist belt length: up to 63.8” (162 cm) (includes length of product)
  • Volume: 11 liters


​

PhotoCross 10
  • Internal Dimensions: 7.1” W x 12.5” H x 4.8” D (18 x 31.8 x 12.2 cm)
  • External Dimensions: 11” W x 15.9” H x 6.3” D (28 x 40.5 x 16 cm)
  • Tablet compartment: 8.2” x 11” x 0.6” (20.8 x 27.9 x 1.5 cm)
  • Maximum weight (with all accessories): 2.1 lbs (1.0 kg)
  • Shoulder strap length: 42.5–62.2” (108–158 cm) (includes length of product)
  • Waist belt length: up to 61” (155 cm) (includes length of product)
  • Volume: 7.5 liters


1 Comment

Field Report: MindShift Gear’s TrailScape 18L – A Trail-worthy Pack for Nature Outings

11/6/2016

0 Comments

 
PictureCourtesy MindShift Gear.
The moment I unpacked this photo backpack and unzipped the main flap, I had a sense of déjà vu. I’d seen this bag before.

Then I took a look at my Think Tank Photo StreetWalker and realized where I’d seen this design. 

​The new TrailScape largely mimics the interior of the StreetWalker, or perhaps more correctly the StreetWalker Pro, since the dimensions more closely match that pack. But there are substantive differences. What are they? Read on.

The TrailScape – On the Outside
Gone are the two zippered side pockets found on the StreetWalker. They are wisely replaced by two roomier stretch pockets. Granted, some may lament the loss of these zip pockets, but I always found them a bit too cramped for my taste.
 
Instead, you now have room for a 32-oz. Nalgene water bottle on one side, counterbalanced by your tripod snugly secured by compression straps, with two feet (spikes retracted) resting inside the opposite stretch pocket.
 
On the front, there is a very spacious pocket that will hold a 13” laptop and a 10” tablet, not that I ever carry either into the field. But I do make use of these sleeves for maps, pads, and various accessories. There are also organizer pockets in this section.
 
In front of this large pocket sits another pocket, diminutive by comparison, designed to carry your sunglasses, with a very softly textured fabric lining that shouldn’t scratch. I’ve got a pair of those sunglasses that are so bulbous when closed that they require a custom case. They fit here. But I was so afraid they’d get crushed at some point, that I removed them and put them back in their hard case. In their place went my Giotto’s rocket blower.
 
The zippers run very smoothly. However, I would have preferred contrasting colors for the zipper pulls on the front pocket. Yes, the zip pulls, which are designed to be easily handled with gloves, are smaller on the pocket. But I did manage to grab them by accident. So my solution was to rest them on the side, with the main zips up top. Problem solved.
 
Because this is a trail pack, in contrast to the zips on the StreetWalker, the zippers are not interlocking (for the purpose of inserting a TSA lock). Besides, locking a bag only makes it that much more tempting to those looking to steal it.
 
There are four lash points on the front of the bag, but you’ll have to supply your own rope or bungee cord. If you need to carry stuff inside the front pocket to keep it safe from the elements, you can lash a jacket to the front of the bag. I keep a light jacket inside this pocket.
 
There’s a carrying handle on top – more of a strap, really, coming to rest on the back of the pack. While not nearly as substantial as the one on the StreetWalker, such straps have been used on other packs (I believe also from MindShift or Think Tank), and I’ve never known them to fail. Besides, in contrast to that other bag, this handle doesn’t add to the height of the bag – which could make a difference when you’re trying to squeeze into a tight overhead bin or under a seat. (By the way, if you’re going to carry the pack for any distance, by any means other than fully on your back with both straps, use one of the shoulder straps, not the carrying handle.)
​On the Inside
This pack is not nearly as deep as even the original StreetWalker. What does that mean? Forget about carrying a pro-grip camera, unless you insert it face-up sans lens. That said, my Nikon D610 rides much more secure in this bag, because it’s less of a bouncy house (although, I must admit, I always secure the camera with a Velcro band over the dividers or I’ll seat another divider over the lens for a snug fit).
 
There are plenty of padded dividers. As is, this pack is fitted for a slew of lenses, accessories, and a flash. My dividers never sit in one place for very long, however. That’s the beauty of a customizable system.
 
There are also two mesh pockets inside the front lid for small, chiefly flat items.
 
In Use
The first thing I have to comment on is the backpack harness system and airflow/lumbar padding. In a trail pack, this is of utmost importance for your comfort and safety during long treks, especially over arduous terrain. While this pack is not meant for such outings, by its very nature, still, it’s comforting to know it will stand the test.
 
The harness system on the TrailScape feels better than the one found on the StreetWalker. The straps are wider at the shoulder. The straps on both packs are contoured top to bottom to fit the body nicely, but this one is decidedly a better fit.
 
As with the StreetWalker, the unpadded waist strap is removable. (Keep it inside the bag, or you’ll lose it. Better yet, leave it attached – reattaching can be a chore if you didn’t take notes on how the straps originally attached to the bag).
 
The sternum (chest) strap on the TrailScape is longer and a bit stretchy for larger chests or someone wearing lots of winter layers. On my initial outing, I didn’t find it necessary to use either the waist belt or chest strap. The pack rode comfortably on my back without requiring constant adjustments.
 
By the way, when you first get the pack, it’s important to loosen all straps. Tighten them when the pack is on your back, and adjust them once on the trail.
 
You’re probably thinking that it’s odd this pack doesn’t allow for a hydration bladder, whereas the more compact SidePath, which is essentially an enhanced daypack, will accommodate a bladder. I’m guessing, that, when you start with one basic design, namely the StreetWalker, it would be difficult to create a custom passageway for a drinking tube without destroying the solid fabric of that pack. And frankly, I’m not a fan of bladders, so this doesn’t bother me in the least. If you must use a bladder, MindShift has several alternatives available, currently the rotation 180 packs.
​Who Should Use This?
Hikers and nature enthusiasts.
 
Capsule Comments
Comfortable; protective; durable construction; fully customizable; thoughtfully designed; room for a tripod and full-size water bottle; holds a small laptop and tablet; room in outside pocket for a jacket; won’t accommodate a hydration bladder (important only if you prefer this method of hydration).
 
Conclusions
Despite being built on the framework of the Think Tank StreetWalker or StreetWalker Pro, the TrailScape has a number of useful features that stand it apart from it progenitors. Essentially, this is a trail pack, not a city-slicker pack.

You can, of course, wear the TrailScape around town. Compared to many of MindShift’s other trailworthy packs, this one has a more manageable footprint. That makes it easier to maneuver in tight spaces while wearing the pack, such as crowds and public transit.
 
What most recommends this pack is the harness system. While I didn’t load the pack to capacity, walking around with it on my back never felt like a burden. The shoulder straps kept the bag in place without digging into my shoulders – and, I should point out, I was only wearing a t-shirt and photo vest (sans epaulets).
 
So, in my book, this one’s a keeper. I know, I’ve said that before about bags I’ve later given away. But as new bags arrive, one has to make room. For now, this TrailScape 18L is the perfect size for my outings when I need to carry several lenses, with one attached to the camera, along with a flash, various accessories, and a light jacket.
 
The only thing on my wish list for this bag: a snazzier design. The exterior is a bit bland. Why stop with basic black? I would really love to see some camouflage patterns on MindShift bags – say on the order of Mojave Desert and Amazon Rainforest. Something to think about, guys.

Where can I get more info?
MindShift Gear (order direct).
 
Manufacturer (ordering info):
MindShift Gear
 
How much is it?
$169.99
FEATURES (per MindShift Gear)
  • Dedicated quick access smartphone/sunglasses pocket
  • Tripod/monopod/hiking pole mounting system on sides
  • Two large water bottle pockets with cinch cord
  • Seamless rain cover included for downpour conditions
  • Side compression straps for additional lash points
  • Adjustable dividers to customize the interior for DSLR or mirrorless kit
  • Interior zippered pockets for batteries, cards, filters and other accessories
  • Easy-grip zipper pulls for wet or cold conditions
  • Organizer pockets for pens, flashlight and business cards
GEAR CAPACITY (per MindShift Gear)
  • Holds 1 standard-size DSLR and 4 to 6 standard zoom lenses
  • Holds 2 large mirrorless bodies and 5 to 7 lenses plus a flash
  • Maximum lens size: 300mm f/2.8
Examples:
  • Nikon D810 with 70-200mm f/2.8 attached to a body and the hood in the shooting position and 2-3 additional lenses
  • Canon 5DMIII with 24-70mm f/2.8 attached and 4-6 additional lenses
  • Sony a7mII with 70-200mm f/4 attached and 5-6 additional lenses
 
MATERIALS (per MindShift Gear)
Exterior: For superior water resistance, all exterior fabric has a durable water-repellant coating, plus a polyurethane coating on the underside of the fabric. The backpack also features the highest-quality abrasion-resistant YKK® RC zippers, 420D velocity nylon, 600D poly, 320G DuraStretch mesh, 350G airmesh, nylon webbing, and 3-ply bonded nylon thread.
​
Interior: P200D lining, high-density nylex with stiffened backing, hexa-mesh pockets, high-density closed-cell foam, PE board reinforcement, and 3-ply bonded nylon thread.
 
SPECIFICATIONS (per MindShift Gear)
  • Exterior: 9.8” W x 18.1” H x 7.1” D (25 × 46 × 18 cm)
  • Interior: 9.4” W x 17.3” H x 4.8” D (24 × 44 × 12 cm)
  • Laptop: 8.9” W x 14.2” H x 1.2” D (22.7 × 36 × 3 cm)
  • Tablet: 8.5” W x 9.8” H x 0.8” D (21.5 × 25 × 2 cm)
  • Weight: 2.8 lbs. (1.3 kg)
0 Comments

Field Report: SidePath Photo Backpack for Fun Outings and Short Hikes with Your Camera

10/26/2016

0 Comments

 
PicturePhoto courtesy MindShift Gear.
MindShift Gear first came on the scene with rough-and-tumble photo backpacks. If you wanted to go into the wilderness with your camera gear, this was the way to go.

But with time, the company has mellowed in its direction, it seems, and has started producing photo backpacks with more mass appeal. Is this a good or bad thing? Well, it depends on which side of the fence you’re leaning.

I, for one, like some of the more city-slicker-oriented designs for those of us who don’t spend days trekking into the great outdoors. But, then again, I lament that the company feels a need to trim down their packs at the expense of all-around utility.

​Enter the SidePath.


The SidePath – On the Outside
Don’t get me wrong. When it comes to materials and workmanship, MindShift doesn’t skimp. Granted, a bag such as the SidePath doesn’t share the same go-anywhere body of this company’s heftier backpacks. After all, this bag was designed to be light on your back for light hikes, walks around town, and sightseeing. Toward that end, the materials are also lighter weight.
 
Where I feel MindShift has gone wrong with this lightweight pack is in the shoulder straps. They may be comfortable over several layers of clothing, but, as the day wears on, you may begin to feel it, especially if all you’re wearing is a t-shirt under those straps.
 
OK, granted, I did go ga-ga over the previous lightweight pack, the UltraLight. And I had used that bag for much of the year. But over time, I did notice a difference, especially after testing Think Tank Photo’s ShapeShifter V2.0 and MindShift’s Moose Peterson V2.0, with their heftier, more substantial backpack harness systems. And that made me long for those stockier backpacks.
 
But, then again, I’m a stocky person. Someone with a more slender frame will likely appreciate and prefer the lighter-weight of the SidePath. And, by extension, would be very happy with the existing shoulder harness.

​On the Inside
This is a twin-tier design. That means that there’s a roomy upper compartment and a lower level. Traditionally, the lower level is where camera gear goes. Which is the case here. So you can expect the required padding and the customizable interior.
 
The upper level is where your personal stuff goes. It has a tent-like zipper flap. The front flap has an inside mesh pocket, which is quite spacious. There’s also a thinly padded sleeve to hold a tablet. Alternately, you can fit a hydration bladder in this sleeve. I personally avoid inserting a hydration reservoir inside a pack, for fear of leakage.

In Use
I spent several hours on a nature hike in the woods on a chilly Illinois day, so I was wearing a photo vest and light jacket. With this outerwear, the bag felt comfy enough and the straps didn’t need constant adjustment, pretty much staying in place on my shoulders. Which is a good thing. I really dislike the annoyance of adjusting shoulder straps every few minutes.
 
Since I was carrying my Nikon D610 with Tamron 70-300mm zoom attached for grab-and-go shooting, I had to remove the dividers and store them for later use, setting up one divider in this compartment to hold lens and body caps or other small items (to the right of the lens, which also helped keep the lens from shifting position). With a SpiderPro Hand Strap and 70mm BlackRapid QR plate (for the BlackRapid sling strap) attached to the camera, it was a snug fit, but manageable. On the plus side, that meant the camera wouldn’t be bouncing around. Later on I realized that my sling strap would also fit in here, making for an even tighter fit.
 
Originally I’d kept the strap in the upper section. That section also held a Tamron 90mm macro in a MindShift Lens Switch Case (which I’d customized with my own padded dividers), the Nikon SB-700 flash (in its original soft case), and some odds and ends. All that pretty much precluded squeezing in a light jacket, but a rain poncho would be no problem.
 
One important note: access to camera gear is via the back of the pack. That means that the access panel rests against your back and away from potentially prying hands. Nice touch. It also means, you don’t want to noticeably bulk out this section. The bag should rest flush and comfy on your back. Adjust the straps so the bag ends at your lower back, with the lumbar pad (in this case, the padded camera section lid) resting against your lumbar region.
 
You can attach a lightweight tripod to either side using one of the stretch pockets. I personally didn’t carry a tripod attached to this bag. Really, it didn’t feel like a natural fit, although in testing after my nature walk, I was able to attach my compact 2.5-lb. Sirui with an Acratech head attached.

The outer stretch pockets were too tight for any of my water bottles, so I used one of the lash points on the shoulder harness to attach a water bottle (as well as a small LED flashlight). That worked out even better, giving me quicker access to these items. Had I stowed smaller gear in the camera section, it likely would have afforded more room for that water bottle. But with a long lens attached, no way that was happening.
 
One thing I hadn’t noticed when I requested the bag for review. There’s no waist belt. There is a sternum (chest) strap, however. Did I notice? Nope. I didn’t even bother using the chest strap – simply, no need. As I said, the shoulder straps remained in place and the load didn’t shift as I moved around or bent over. So, despite my earlier complaints, the shoulder harness did do its job, and quite nicely, I might add.
FEATURES (per MindShift Gear)
  • Soft-sided design looks like a daypack and not a bulky camera bag
  • Integrated tripod/monopod/trekking pole mounting system on sides
  • Two oversized stretch water bottle pockets
  • Fits a DSLR, compact DSLR, and Mirrorless camera systems
  • Adjustable dividers enable multiple camera case configurations
  • Seam-sealed rain cover included for downpour conditions
  • High quality YKK zippers, 420D high-density nylon with reinforced stress points for long lasting durability and strength
  • Zippered interior pocket to organize small items
  • Highly breathable three-layer shoulder straps for all day comfort
 
GEAR CAPACITY (per MindShift Gear)
  • Holds 1 large (un-gripped) Mirrorless body and 1-2 standard zoom lenses or primes
  • Holds 1 compact DSLR (Rebel, 3300 or 5300 series) and 1-2 lenses
  • Holds 1 DSLR (5DMIII or D750) with 1 standard zoom or 2 primes
  • Fits up to a 10” tablet
  • 8 liters of capacity for personal gear
  • Maximum lens size: DSLR: 24-70mm f/2.8 attached to a D750 or 6D

MATERIALS (per MindShift Gear)
Exterior: For superior water resistance, all exterior fabric has a durable water-repellant coating, plus the underside of the fabric has a polyurethane coating. The backpack also has high-quality YKK RC-zippers, 420D Velocity nylon, 600D poly, 320G UltraStretch mesh, 350G airmesh, nylon webbing, 3-ply bonded nylon thread.
 
Interior: 200D poly, high-density nylex, high-density closed-cell foam, 3-ply bonded nylon thread.
 
SPECIFICATIONS (per MindShift Gear)
  • External Dimensions:  10.6” W x 19” H x 5.9” D (26 x 47 x 15 cm)
  • Camera Compartment: 9.1” W x 6.7” H x 5.5” D (24 x 15 x 14 cm)
  • Tablet Slot: 8.3” W x 9.8” H x 0.6” D (22 x 25 x 2 cm)
  • Total Volume: 14L
  • Weight: 1.6 lbs (0.7 kg) (includes rain cover)

Where can I get more info?
MindShift Gear (order direct).

Manufacturer (ordering info):
MindShift Gear
​ 
How much is it?
$99.99 (available in Cardinal Red or Charcoal)​


​Who Should Use This?
Anyone out for a light hike, a walk around town, or sightseeing, or simply enjoying a fun outing with friends and family.

Capsule Comments
Despite my complaints about the lack of padding in the shoulder straps, they did manage to do a nice job. I would have liked a roomier top section, so I could fit a jacket in there with my extra gear, but I’m sure I could find a way to do that when push comes to shove. The lower section was a perfect size for my D610 and attached 70-300mm zoom. Alternatively, it would also carry my D610 with Tamron 15-30mm f/2.8 attached just as snugly. If you don’t mind carrying camera body and lenses separately, you could fit more gear in here, provided none of the lenses were long or of wide girth.
 
Conclusions
I found myself liking this bag. Of course, when MindShift sends over their TrailScape, I may shift my attention to that roomier bag. Still, the SidePath does have a place among my other packs, but, more importantly, on my back. It’s compact, lightweight, and is the perfect solution for a day out with my camera.
 
Still, MindShift, you might consider coming out with a slightly larger version, with a heftier shoulder harness. That would be my perfect bag for sauntering about town.
0 Comments

Field Report: Moose Peterson MP-3 V2.0 Photo Backpack for Wildlife Photographers

7/24/2016

0 Comments

 
Picture
Courtesy MindShift Gear.
​The Moose Peterson MP-3 V2.0 photo backpack marks a departure for MindShift Gear in two respects. First, MindShift doesn’t normally take on camera bags designed and previously marketed by a third party. And, second, the interior is different from anything MindShift has offered before now. The first marks a prudent step toward expansion, which, in today’s world, makes economic and business sense for a forward-thinking company. The second signifies a long-awaited and highly significant step toward making MindShift products more user-friendly and utilitarian.
 
As you may have figured out, this pack is the baby of wildlife photographer Moose Peterson--for wildlife photographers. It’s a vast improvement over the original Moose Peterson pack, which I’d reviewed some years back for a major photo magazine. And it stands head-and-shoulders above a similar design from another camera bag company. In fact, even hinting at any similarity is an insult to the Moose pack.
PictureJust a few of the possible layouts for a mix of gear that's ready for any eventuality. Courtesy MindShift Gear.
​An Inside Look
Professional wildlife photographers use long, fast lenses. These lenses are, by and large (no pun intended), ginormous. But many photo backpacks are not designed to easily hold them, without sacrificing much, if not all, of the available space, leaving little room for anything else.
 
What makes this bag eminently suited to this pursuit is its tripartite design. The longest compartment is specifically designed around a long, fast lens attached to the camera or an even physically bigger lens on its own. Two smaller sections house the camera (when detached from the lens), along with a second body and even a third, several additional lenses, converters, a shoe-mount or two, and filters. When the main section is not fully occupied, there’s plenty of room for other gear. In fact, whichever size Moose pack you buy, it will comfortably hold at least one body with pro-grip, with lens attached.
 
Each item of gear is securely nestled in place thanks to the thick but flexible Velcro-friendly dividers—a serious departure from the dividers MindShift has been using in its other packs, and a welcome change. The new dividers let you customize the interior almost infinitely, with various-sized sections. The new dividers also do a better job of hugging and grabbing your stuff so it doesn’t slide around, or out of the bag, should you open it while it’s in an upright position. All this is safely contained within a fairly rigid, padded wall that encompasses the pack.
 
Protecting everything at the front end are three separate zipped access panels, which are padded. What’s noteworthy about these panels is that, rather than remaining open and exposing the contents to the elements, they drop back down. Just make sure to zip the panels shut before donning the pack. What would have made this even sweeter is if MindShift would have used the magnetic-locking clips, similar to the ones used on the Rotation packs, so the panels would stay closed. Then again, someone might see that as an encumbrance to quickly getting into the bag.

​Is It Perfect?
This pack will also hold a tripod over the large front panel or on the side, using the mesh pocket. However, I’m sure you’d rather reserve this sizable pocket for a large Nalgene water bottle. Either way, it’s a workable arrangement.
 
There’s no space for a hydration pack. In fact, as comfy as the bag is to wear, it’s best use comes from taking short hops away from your vehicle or traversing mild terrain. It’s too bulky to negotiate tight spaces. Still, I’m pretty sure you don’t plan to use this bag on long, arduous hikes over treacherous terrain or to scale steep slopes. And even if you did, feel assured that the bag will remain steadfastly on your back.
 
There’s no room for lunch, a jacket, rain poncho, first aid kit, guide books, and other hiker essentials, unless you want to clear out a section of gear. A spacious front pocket or upper tier, where stuff like this goes, is lacking. There is a small pocket on top, where you can store filters, lens tissue, and the like, plus mesh pockets inside each flap, but none of these is well-suited to a sandwich or a change of clothes.
 
The Moose pack is perfectly suited as a bag you’d want to work out of. The self-closing flaps help toward that end. When laid flat, the pack serves as the perfect workspace. And it’s designed to keep you well organized. To say that this pack is thoughtfully designed would be an understatement. 
PictureA few more possible layouts to prepare you for any situation. Courtesy MindShift Gear.
​In Use
I loaded the bag up with about 25 pounds of gear. I don’t usually carry this much gear around and dreaded the thought. Still, once I got over the shock of how heavy it felt when I first picked it up (before actually weighing the load), after donning the pack, I must say that it felt good. In fact, I’d noted that the shoulder straps didn’t slide off my shoulders. Sliding shoulder straps are a big bane on most backpacks. Still, to make carrying this load even easier, I cinched the included waist belt and sternum strap. The shoulder straps, by the way, are well padded to handle the load, as well as contoured and breathable for a comfy ride.
​
I should point out that the waist belt, while included, does not come attached to the bag. Slide it through the lumbar pad on back of the pack. You’ll note that the strap has two hook-and-loop strips. They attach to their counterpart on the inside of the lumbar pad, so make sure to insert the strap properly (the breathable mesh goes against your waist). The tapered waist strap is thin enough to be easily stored out of the way when not in use, but ample enough to give you the needed support and comfort.

You’ll note that there are no compression straps anywhere. They’re not really needed. Compression straps are required on bags designed for arduous hikes and backpacking. But to protect the zippers, at least around the circumference of the bag, there is a narrow rain flap, just wide enough to do the job, not too wide that it gets in the way.

Speaking of straps, I almost forgot to mention a few things. First, there are two padded carry handles – one on top, another on the side, so you can carry the bag like a suitcase.  While I haven’t had the opportunity to test it out, the bag’s squarish design makes it well-suited for overhead stowage on most airlines. And to further your efforts toward that end, the shoulder straps tuck neatly behind the airflow shoulder pads that lie against your back. (In fact, that’s how the bag is delivered to you.) Also, you can wrap the waist belt and secure it in front, to maintain the bag’s svelte lines.

On the face of it, this Moose pack looks like a piece of handsomely crafted luggage. In fact, the pack appears so innocuous that there’s nothing about it that even remotely screams camera bag. Well, if you don’t count the tripod hanging in front…


​Who Should Use This?
Wildlife photographers, hikers, nature enthusiasts.
 
Capsule Comments
Built tough and structurally sound; comfy; holds a lot of gear, including a long, fast lens attached to the camera; keeps gear safe and even more secure thanks to new padded divider system; three fully customizable compartments make it easy to stay on top of your gear.
 
Conclusions
This new version is a big step up from the original Moose Peterson backpack. It’s easily superior to a well-known competitor’s pack with the butterfly-wing design (based on my latest experience with that pack). And, if you’re a wildlife photographer, you shouldn’t even be thinking twice about getting this bag. Buying it should be a no-brainer.
 
I especially appreciate the new interior, which is a change of pace for MindShift. And the three separate compartments let you allocate your gear in terms of importance. Or keep one set of camera gear for wildlife in one section, another for macro in the second compartment, and a third with wide-angle lenses for landscapes—three outfits ready to go at a moment’s notice.
 
This pack will hold practically everything you need, short of snacks and a rain poncho. But the photographer’s vest you’ll likely be wearing will take care of that. Okay, this pack won’t hold a laptop or even a tablet, but how important is that? And if you’re overnighting, chances are you’re carrying more bags besides your camera gear, so don’t make the tablet or laptop the deciding factor. Consider the Moose Peterson backpack as a long-term investment and you won’t go wrong.
Manufacturer (ordering info):
MindShift Gear
​KEY FEATURES (per MindShift Gear)
  • Original 1998 ‘Moose Ears’ design with auto-close compartment flaps protect the interior from dust, spray, wind, etc.
  • Three-compartment system allows you to keep lenses attached providing the quickest way to access gear
  • Tuck-away harness system with removable waist belt easily allows you to streamline your bag when loading it in a train, plane, or automobile (MP-1 & MP-3 only)
  • Sized for carry-on, allowing you to get the maximum amount of gear on the plane
  • Long glass carrying solution with body attached
  • Tripod/monopod mounting system on side and front
  • Flap guard protects front zippers
  • Highest quality RC Fuse YKK zippers, 600D and 420D nylon construction for long-lasting durability and strength
  • Dual-density foam padded shoulder harness, cushioned with air mesh
  • Zippered side pockets fit full-sized flashes (MP-7 only)
  • Stretch water bottle pocket fits 32 oz. water bottle
  • Robust zipper pulls are easily gripped with or without gloves
  • Seam-sealed rain cover/drop cloth included protects against rain and dust


GEAR CAPACITY (Mfr. specifications)
 
Moose Peterson MP-3 V2.0 (tested)
  • 3 gripped DSLRs with lenses attached, 1–2 additional lenses and 1–2 flashes and accessories
  • Or, 3 gripped bodies and 1 ungripped body detached from lenses, 4–5 standard zoom lenses, 1–2 flashes, a 2x teleconverter and accessories
  • Maximum lens size: Holds 600mm f/4 detached or 500mm f/4 lens attached to a gripped body
 
Moose Peterson MP-1 V2.0
  • 3 gripped DSLRs with lenses attached,3–5 additional lenses, 2x teleconverter,1–2 flashes and accessories
  • Or, 3 gripped bodies and 1 ungripped body detached from lenses, 7–8 standard zoom lenses, 1–2 flashes, a 2x teleconverter and accessories
  • Maximum lens size: Holds 800mm detached
 
Moose Peterson MP-7 V2.0
  • Holds 1 gripped body attached to 70–200mm f/2.8 and two ungripped bodies with primes attached, two flashes and accessories
  • Or, holds 1 gripped body and one ungripped body with 70–200mm f/2.8, 24–70mm f/2.8, 14–24mm f/2.8 (or 16–35mm f/2.8), a 2x teleconverter, two flashes and accessories
  • Maximum lens size: 200mm f/2 attached to a gripped body
MANUFACTURER SPECIFICATIONS
 
Moose Peterson MP-3 V2.0 (tested)
  • External Dimensions: 14” W x 20” H x 8” D (35.5 x 50.8 x 20.3 c m)
  • Large Camera Compartment: 6.8” W x 18” H x 6.8” D (17.3 x 46 x 17.3 cm)
  • Small Camera Compartments (each): 6” W x 8.5” H x 6.8” D (15 x 21.5 x 17.3 cm)
  • Weight: 3.2–4.6 lbs. (1.5–2.1 kg) (Lower weight excludes all dividers and accessories)
 
Moose Peterson MP-1 V2.0
  • External Dimensions: 14” W x 23” H x 8” D (35.5 x 58.4 x 20.3 c m)
  • Large Camera Compartment: 6.8” W x 21.8” H x 6.8” D (17.3 x 55. 4 x 17.3 cm)
  • Small Camera Compartments (each): 6” W x 10” H x 6.75” D (15 x 25 x 17 cm)
  • Weight: 3.7–5.1 lbs. (1.7–2.3 kg) (Lower weight excludes all dividers and accessories)
 
Moose Peterson MP-7 V2.0
  • External Dimensions: 15” W x 15.5” H x 8” D (38.1 x 39.4 x 20.3 cm)
  • Large Camera Compartment: 5.3” W x 14” H x 6.5” D (13.5 x 35.5 x 16.5 cm)
  • Small Camera Compartments (each): 5” W x 6.3” H x 6.5” D (12.5 x 16 x 16.5 cm)
  • Weight: 2.5–3.3 lbs. (1.1–1.5 kg) (Lower weight excludes all dividers and accessories)

​MATERIALS​ (Mfr. specifications)
Exterior: For superior water resistance, all exterior fabric has a durable water-repellant coating, plus the underside of the fabric has a polyurethane coating. The bag also features highest-quality abrasion-resistant YKK® RC-Fuse zippers, 420D velocity nylon, 600D polyester, 1680D ballistic nylon, 320G DuraStretch mesh, nylon webbing, 350G airmesh, nylon webbing, 3-ply bonded nylon thread.
 
Interior: High-density velex, 210D silver-toned nylon lining, hexa mesh pockets, high-density closed-cell foam, 3-ply bonded nylon thread.
0 Comments

Field Report: MindShift Gear’s Multi-Mount Holster 50 – When a Regular Shoulder Bag Just Won’t Do

7/14/2016

0 Comments

 
PictureMindShift Gear's Multi-Mount Holster collection. Courtesy MindShift Gear.
​I can’t remember ever using a camera holster. Fact of the matter is, I find them too limiting. More to the point, I’m a photo backpack guy.

Still, I was intrigued by the moniker Multi-Mount, so I opted to test out this new bag from MindShift Gear, one of my two favorite camera bag companies (along with Think Tank Photo).

I chose to review the largest holster in this new lineup, the Multi-Mount Holster 50. And when the bag arrived and I initially holstered my Nikon D610, my first thought was: big mistake. What was I thinking? This bag is too roomy for a camera without a pro-grip. I should have ordered this bag one or two sizes smaller.

So I let it sit around, and sit, and sit.

Until one day, when I was retrofitting a backpack to give to a friend.

​Unlike some reviewers, I recycle my older camera bags. I even ask that the bag recipients make a small charitable contribution in place of paying me for the bag.

Anyway, I came upon a padded divider that I’d stored. That’s another thing I do. Some packs—not any from MindShift or Think Tank, I might add—are just not worth giving to anyone, so I gut them and keep the dividers for later use, relegating these bags to other purposes, or just leaving them in the laundry room for any takers.

​Retrofitted to Suit My Needs
So, here was this wedge-shaped divider that turned out to be a perfect fit for the Multi-Mount 50. Well, almost perfect. To make this an even better fit, I added a thick pad covered in Velcro-friendly material to the bottom of the holster. Which now meant I could secure the divider on three sides using its hook-and-loop tabs. (And, yes, that pad came from yet another old pack.)
 
I wasn’t done. The holster included two narrow, thinly padded dividers. I don’t even recall where they were placed initially, but the first thing I did was to pull them out. It turned out that the wedge-shaped divider fell a bit short, leaving the top of the camera with the pentaprism housing exposed to bumps from anything sitting in the newly partitioned adjoining section. So I simply used these spare dividers to add to the height of the barrier. The arrangement was flexible enough to accommodate the top of the camera while isolating the two sections.
 
Granted, I probably could have used the two spare dividers alone, without adding anything, but the divider that I did add was thicker and of a heavier density and I felt it would do a better job of separating one section from the other.
 
Now I had room for my Nikon SB-700 flash in the ancillary section, with the D610 and attached Tamron 70-300mm zoom (or Tamron 24-70mm f/2.8 zoom) in the main, larger section. Could I do even better? (Note: the manufacturer recommends using the outside pocket for the flash, but I prefer keeping my flash where it would be better protected while on the move, then possibly sticking it in a photo vest pocket once I arrive at my destination.)
PictureMulti-Mount Holster 50 customized to hold a DSLR with attached lens, a second lens, flash, rain cover, and filter, as well as additional items in the outside pocket. ©Jack Neubart. All rights reserved.
​Room for More
One day I’d decided to do some macro shooting, replacing the zoom with my Tamron 90mm f/2.8 macro. That meant I’d also need my Metz ring flash. Hmm, could I also make room for the SB-700 inside the bag?
 
Why bother with the SB-700? I’ve often used a shoe-mount in place of the macro flash. The trick is to use the flash in bounce mode with the dome diffuser (diffusion dome) attached. That produces a soft, feathered light that doesn’t overwhelm the subject or create heavy, disturbing shadows behind it.
 
Anyway, that step was simple enough. I added a layer of protection (another padded divider from the storage bin) over the ring flash and lay the shoe-mount on top.
 
Next I wondered if I could make room for a second lens. Okay, something would have to give. I removed the ring flash. After all, the shoe-mount had greater utility. The Tamron macro was still on the camera, but I also wanted to take my Nikon 60mm macro, and as luck would have it, this lens was compact enough to fit in place of the ring flash, with the shoe-mount again riding on top.
 
And There Was Room for Even More
There is a zippered inside pocket—mesh so you can see what’s inside. I stuck the rain cover and a filter (inside its case) in there.
 
I wasn’t done. I had an outside front pocket waiting to be filled. This space was relegated to anything that wasn’t easily damaged, which included batteries for the camera and flash, a white balance target, and Rocket blower.
 
I was a happy camper.

​In Use
First, you’re probably asking, how easy was it to get at the camera, now that I’d crowded it in with all the extras? Very easy indeed.
 
I should point out that I’d attached a SpiderPro Hand Strap to the camera, with a BlackRapid Tripod Plate 70 at the bottom, which now lets me readily use a tripod when needed.
 
While the bag would have accommodated a neck strap on the camera, a sling that attaches to the tripod socket would have been a bit much for this configuration. I would have had to make room, at the expense of the second section.
 
The nice thing about this Spider wrist strap is that I’ve gotten so used to it that I no longer feel a need to hang the camera around my neck or deal with a long strap getting in my way.
 
Wonder how I manage to hold onto the camera with that wrist strap for long periods without a neck strap or sling? Intermittently I rest the camera in my free hand, relax my grip for a moment or two, and flex my fingers. Simple, really.
 
The holster comes with a waist belt. That made a big difference, securing the bag in place so it wouldn’t swing around as I bent over to shoot low when focusing on macro subjects. That meant that I wouldn’t constantly have to divert attention away from the subject and toward the bag in an effort to reposition the holster behind my back, where I generally like to keep it, rather than at my side. (Okay, it did slide around a little, since I don’t like to cinch the waist belt too tight, but it wasn’t enough to prove an annoyance as I was shooting.)
 
The waist belt also takes some of the weight off your shoulder. However, it didn’t go far enough. Because I’d weighed the bag down by filling it to capacity, I found myself having to swap out the shoulder strap for one with a more substantial all-rubber shoulder pad, which also did a better job of gripping my shoulder. (Again, another remnant from a bag relegated to the throw-away pile.)
 
That said, the shoulder pad on the shoulder strap that came with the bag is pliable enough so that it won’t dig into your neck when you wear it sling-style, if that’ how you prefer to wear a shoulder bag. The strap would also work well if you opted to wear the bag as a chest pack, with the strap draped around your neck. This holster bulked out too much for me to comfortably wear it in this fashion. That’s something I might have done with one of the smaller versions.
 
I didn’t even try the other carrying modes. Again, if this were one of the smaller holsters, I would have entertained the notion of attaching it to my backpack. The bag also comes with a pair of tether straps that let you secure the holster to the back of the backpack; in front, as a chest pack but this time in tandem with the backpack; and as a waist pack, attached to the waist belt of the backpack, albeit at the front, lower down than you’d normally wear a chest pack. By letting the Multi-Mount ride tandem with a backpack, you can keep the camera in the holster, at your beck and call, while the rest of your gear rides comfortably on your back.
 
What can I say? The Multi-Mount Holster gives you the best of all worlds, keeping gear safe and ready for use the moment inspiration strikes. I didn’t think I’d like it, but I do. I use it regularly. And now I’m glad I’ve got the Multi-Mount Holster 50, the biggest holster in the lineup, since it lets me carry enough gear to tackle whatever I expect to encounter during the day, or night.

Capsule Comments
Uncompromising quality and craftsmanship; lightweight; highly durable; multi-use: carry it alone or attached to any backpack; the largest bag in the lineup, the Multi-Mount Holster 50, carries enough gear to cover a wide range of situations.
 
Conclusions
I managed to pack a Nikon D610 with attached lens, a Nikon SB-700, and either a ring flash or extra lens in this bag after I retrofitted it to my needs. As is, it will easily fit a pro camera with a pro-grip and lens attached, and some extras.
 
This Multi-Mount Holster has become a replacement for my UltraLight Dual when I want to be really light on my feet. I did swap out the shoulder strap for one with a more robust shoulder pad, and, once I did that, I found myself wearing this holster for hours on end. The included waist belt was especially welcome, making the bag so much more comfortable and secure, no matter how much I moved around. You might want to consider the Multi-Mount 30 or 20 (one or two sizes smaller) for a DSLR without a pro-grip, for a snug fit without reconfiguring the bad as I did.
 
In the final analysis, from my experience, the Multi-Mount Holster is a better, more practical choice than a shoulder bag. And it’s a compact alternative to my photo backpacks.
 
On a long hike, I’d definitely consider one of the smaller Multi-Mounts attached to my backpack. No matter how thoughtfully designed the pack, nothing beats having a camera immediately at hand in one of these holsters.

Who Should Use This?
Travel photographers who like to travel light, hikers, nature enthusiasts, mountain climbers, rock climbers.
Picture
Multi-Mount Holster climbing to new heights. Courtesy MindShift Gear.


FEATURES AND BENEFITS (Mfr. specifications)
  • Designed for today’s DSLRs with attached quick release or L-bracket
  • Integrated multi-mount adjustable strap system tucks away into three dedicated pockets
  • Weight bearing shoulder strap features stretch-free neoprene comfort, slip-resistant shoulder pad, lightweight clips, and two-sided length adjustment including one ladderlock
  • Front harness weight-bearing pack mount straps feature quick-release SR buckles for instant removal and pivoting lightweight clips that attach to any pack’s shoulder harness with daisy chain webbing
  • Lightweight and compact stabilizer waist belt is designed to easily pivot the shoulder bag configuration around over the webbing
  • Stabilizer straps, stored in tuck-away pockets, quickly wrap around any backpack shoulder strap and create triangulated stabilization from low and high points on the front end of the bag
  • New YKK zippers are coated with an anti-corrosion substrate, providing enamel-finish durability. These zippers are less prone to freezing and much lighter than standard slides. They also pass YKK’s industry-renowned production fastening standard with a static pull test at three angles result in smoother zipping in all conditions.
  • Exterior shell is constructed with 420D nylon with Durable Water Resistance finish for long lasting durability and strength
  • Front expandable pocket includes organizer pocket, two separate loops for memory card holder and keys, and double sliders
  • Domed top creates room for attached camera strap storage
  • Comfortable air mesh back panel includes stabilizer waist belt pass-through
  • Internal zippered lid pocket for added protection from the elements
  • Removable LCD screen protector and adjustable divider(s) for different lens configurations
  • Main compartment security loop secures camera to lanyard in exposed environments
  • Top grab handle
  • Ergonomic zipper pulls are easily gripped with gloves
  • Shoulder strap loops double as clip-in point for water bottles, etc.

​MATERIALS (Mfr. specifications)
Exterior: For superior water resistance, all exterior fabric has a durable water-repellant coating, plus the underside of the fabric has a polyurethane coating. The holsters also feature high-quality YKK zippers, 420D high-density nylon, 420D velocity nylon, 320G, 350G airmesh, nylon webbing, 3-ply bonded nylon thread.
Interior: 200D poly, velex, high-density closed-cell foam, belly-o mesh, 3-ply bonded nylon thread.

​
Where can I get more info?
MindShift Multi-Mount Holster collection

Manufacturer (ordering info):
MindShift Gear
 
How much is it?
$119.99/Multi-Mount Holster 50 (product reviewed)
GEAR CAPACITY (Mfr. specifications)
Multi-Mount Holster 50
  • Holds one gripped Pro DSLR (Nikon D3/D4 series or Canon 1D/1Ds/1DX series) and one standard zoom lens
  • Holds one standard DSLR with L-bracket (Nikon D800/D700) and one standard zoom lens
  • 24-70mm f/2.8 with hood extended (Canon or Nikon); 70-200mm f/2.8 with hood reversed (Canon or Nikon); 300mm f/4 with hood reversed (Canon or Nikon); 80-400mm f/4 AF-S/G with hood reversed (Nikon)
  • Front pocket holds SB-910 (Nikon Speedlight); 600 RT (Canon Speedlite)
 
Multi-Mount Holster 30
  • Holds one standard-size DSLR (5DM3 or D810) and one standard zoom lens
  • Holds one gripped DSLR (1Dx or D4s) and one standard zoom lens
  • 24-70mm f/2.8 with hood extended (Canon or Nikon); 70-200mm f/2.8 with hood reversed (Canon or Nikon); 300mm f/4 with hood reversed (Canon or Nikon); 80-400mm f/4 AF-S/G with hood reversed (Nikon)
  • Front pocket holds SB-910 (Nikon Speedlight); 600 RT (Canon Speedlite)
 
Multi-Mount Holster 20
  • Holds one standard-size DSLR (5DM3 or D810) and one standard zoom lens or two primes
  • Holds one large (un-gripped) Mirrorless body and one standard zoom lens or two primes
  • 16-35mm f/2.8 with hood extended (Canon); 16-35mm f/4 VR with hood extended (Nikon); 24-70mm f/2.8 with hood reversed (Canon or Nikon); 17-55mm f/2.8 with hood reversed (Canon or Nikon)
 
Multi-Mount Holster 10
  • Holds one large (un-gripped) Mirrorless body and one standard zoom lens or prime
  • Holds one compact DSLR (Rebel, 3300 or 5300 series) and one lens
  • Compatible Lenses:  Prime lens; Kit Lens; 16-85mm (Canon or Nikon) with hood reversed; 16-35mm f/2.8 (Sony)

​MANUFACTURER SPECIFICATIONS
 
Multi-Mount Holster 50 (tested)
External Dimensions: 13.25” H x 8.5” W x 8.75” D
Camera Compartment: 11.25” H x 7.25” W x 6.5” D
Weight: 14.875 oz.  (Weight w/ all straps and rain cover: 1 lb. 7.625 oz.)
 
Multi-Mount Holster 30
External Dimensions: 13.25” H x 8.5” W x 6.5” D
Camera Compartment: 11.25” H x 7.25” W x 4.5” D
Weight: 12.875 oz.  (Weight w/ all straps and rain cover: 1 lb. 5.25 oz.)
 
Multi-Mount Holster 20
External Dimensions: 9.5” H x 8.25” W x 6.5” D
Camera Compartment: 7.5” H x 7.25” W x 4.5” D
Weight: 11.625 oz.  (Weight w/ all straps and rain cover:  1 lb. 3.5 oz.)
 
Multi-Mount Holster 10
External Dimensions: 8.5” H x 7.25” W x 6.25” D
Camera Compartment: 6.75” H x 6” W x 3.75” D
Weight:  10 oz.  (Weight w/ all straps and rain cover:  1 lb. 2.125 oz.)


Picture
MindShift Gear Card-Again memory card wallets. Courtesy MindShift Gear.
A NEAT ACCESSORY
Keep memory cards at the ready with MindShift Gear’s Card-Again memory card wallets. The CF version holds 4 cards; the SD version holds 6. If you get the CF version, as I did, you can store 2 SD cards in each slot.

0 Comments

    Reviews

    TECHNICAL EDITOR
    Jack Neubart


    Archives

    December 2019
    September 2019
    August 2019
    July 2019
    May 2019
    April 2019
    February 2019
    November 2018
    September 2018
    August 2018
    May 2018
    January 2018
    November 2017
    September 2017
    July 2017
    June 2017
    May 2017
    April 2017
    February 2017
    December 2016
    November 2016
    October 2016
    August 2016
    July 2016
    May 2016
    April 2016
    March 2016
    February 2016
    January 2016
    December 2015
    August 2015
    December 2014
    August 2014
    July 2014
    April 2014
    November 2013
    October 2013

    Categories

    All
    13x19-inch Printers
    35mm-style Digital Cameras
    Acratech
    Adobe Software
    Austin
    Backpacks
    Ballheads
    Camera Backpacks
    Camera Bags
    Camera Cases
    Camera Holsters
    Camera Luggage
    Camera Supports
    Canon Cameras
    Canon Lenses
    Compact DSLRs
    Compact Photo Printer
    Compact System Cameras
    Desktop Printers
    Digital Projectors
    Digital Retouching
    Digital SLR
    DSLR
    Epson
    Exposure Control
    Fashionable Bags
    Fast Lenses
    Film Emulation
    Flash Photography
    Hawaii
    HDR Plug-in
    HDR Software
    HD SLR
    HD-SLR
    High-resolution DSLR
    Holster Bags
    Image-editing Software
    Image-stabilized Lenses
    Inkjet Printers
    L Bracket
    L-bracket
    Lens Cases
    Lenses
    Lens Pouches
    Leveling Base
    Long-lens Bags
    Macphun
    Macro
    Macro Flash
    Manfrotto
    Mega-zoom Digital Camera
    MindShift Gear
    Mirrorless Cameras
    Nikon Cameras
    Nikon Digital Cameras
    Nikon Mirrorless
    Nikon Pro Digital Cameras
    Nissin
    Nodal Rail
    Nodal Slide
    Olympus
    Outdoor Photography
    Panorama Head
    Panoramas
    Panoramic Photography
    Photo Accessories
    Photo Backpacks
    Photo Belts
    Photo Luggage
    Photo Rollers
    Plug-ins
    Point-and-shoot Zoom
    Portrait Retouching Software
    Printer
    Pro Cameras
    Pro Digital Cameras
    Radio Remote Flash
    Radio TTL Wireless Flash
    Rain Covers
    Rain Hoods
    RAW Conversion Software
    Review: Photo Accessories
    Review: Phottix Odin Radio Remote
    Review: PocketWizard ControlTL
    Review: Software
    Ring Flash
    Rolling Cases
    Samsung Cameras
    Shimoda Designs
    Shoe Mount Flash
    Shoulder Bags
    Shutterbug.com Review
    Shutterbug Magazine
    Sigma Lenses
    SKB Cases
    Sling Bag
    Sling Bags
    Sling Pack
    Snapshot Printer
    Software
    Software Effects
    Super Wide Lenses
    Super-wide Lenses
    Superzoom
    Tamron Lenses
    Telephoto Zooms
    Tenba
    Texas
    Think Tank Photo
    Tripod Heads
    Tripods: Carbon Fiber
    TTL Radio Wireless Flash
    TTL Wireless Flash
    Ultra Wide Lenses
    Ultra-wide Lenses
    Ultra-zoom Digital Camera
    Wide Format Printers
    Wireless Flash
    Zoom Lenses

    RSS Feed

    All products and services are the trademarks or registered trademarks of their respective owners.
    Use or mention of any product or service is not an endorsement - compensated or otherwise.
    However, manufacturers, distributors, vendors & services may provide products or services for use.

    Your purchase and/or use of any product or service tested, reviewed, listed or mentioned is solely at your discretion and you release us from any and all liability associated with such purchase and/or use.

Your satisfaction, our expertise. They go hand in hand.
Bringing over 35 years' experience into everything we create.

Entire contents of this website is comprised of original works created by Jack Neubart, including but not limited to photographs, digital work, musical compositions, stories, humor, poetry, and any other artistic or textual material. 
All work Copyright ©2021 Jack Neubart and is protected under United States and International laws and treaties.
All rights reserved. None of the contents may be copied, extracted, abstracted, adapted, transmitted, digitally altered, or otherwise used or published without express permission of the Copyright owner.
Webmaster: Jack Neubart (building on a Weebly.com template).