
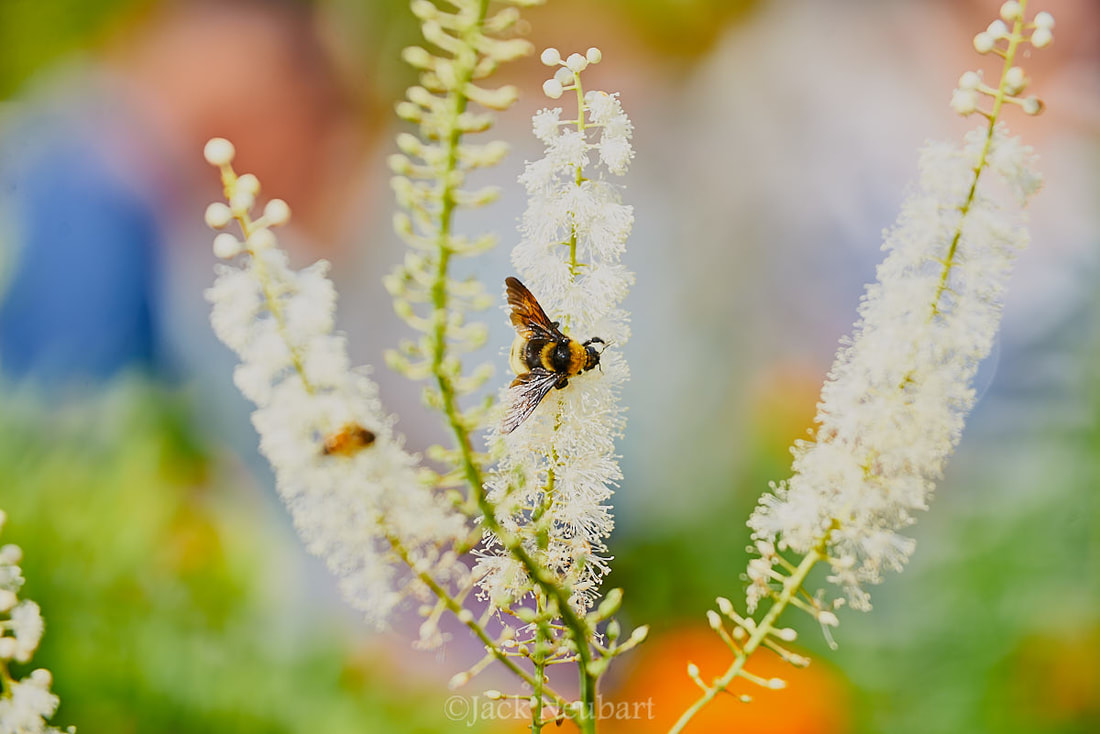
 Bokeh is beautifully rendered, with the lens delivering pleasingly soft backgrounds. No cropping. 210mm; ISO 100, f/4, 1/320 sec, flash. ©2018 Jack Neubart. All rights reserved.
 The new Tamron 70-210mm f/4 telephoto zoom (Model A034) won’t break the bank to own or break your back to carry. Cost and heft aside, what really matters is performance. I used the lens with my Nikon D610 – a full-frame DSLR matched to a full-frame lens (although the lens could also be used with my DX/cropped-sensor Nikon DSLRs), photographing a variety of subjects large and small. How well did the lens perform? Let’s see. But first…
Why Do You Need an F/4 70-210mm Zoom?
Well, let’s imagine for the moment that you already own a variable-aperture tele zoom. What’s to be gained? We’ll put aside consideration of an f/2.8 lens, given that glass’s relatively high price and heft.
An f/4 lens is a workable compromise. Popularly priced variable-aperture telephoto zooms weigh in at a zoom range of 70-300mm with a corresponding variable aperture range of f/4-5.6, or, worse, f/4.5-5.6. These lenses are more than you need for that portrait session you’re shooting outdoors. Not to mention, those variable maximum apertures can be a royal pain when using a handheld meter to check exposures, especially with studio flash or manual shoe-mount flash. Knowing where you stand with your F-stops always gives you a leg up on your exposures.
The story doesn’t end there. Zoom out and that variable-aperture f/4-5.6 lens loses more and more light in the process. At just under 200mm, it’s at f/5, hitting f/5.3 at 200mm and f/5.6 at around 250mm. In other words, an f/4 lens is nearly a full stop faster at 200mm.
Photographing kids? You’ll definitely appreciate having a maximum aperture of f/4 to blur out annoying backgrounds as you zoom in, while shooting at relatively faster shutter speeds without having to crank up the ISO. But beyond that, autofocusing is faster with an f/4 lens when trying to capture a precocious toddler in an outdoor setting than with your other zoom, given that focusing sensors are designed around faster maximum apertures, for the most part.
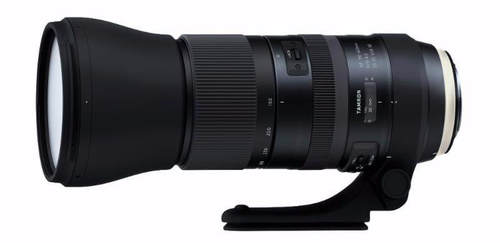
| Zooming and Focusing I had no complaints when it came to zooming or focusing. Well, only one, which I’ll get to in a moment. What I usually concern myself most with on today’s autofocusing (AF) lenses is manual focusing, since many do not manually focus as smoothly as did strictly manual-focus lenses of the past. That said, focusing on this lens was quite smooth – no complaints there, with manual focus (MF) working well both during AF operation and dedicated MF operation. Zooming was equally smooth. My sole complaint comes with the focusing ring moving past the near and far distance points as you continue to rotate it. I really wish Tamron would make it a point to physically prevent the lens from rotating further at each end. I often don’t feel the resistance during the heat of the moment and have to check to make sure where I’m at. And that means taking my eye off the subject. | Where can I get more info, tech specs? Tamron USA 70-210 f/4 (model A034) Manufacturer: Tamron USA How much is it? $799 Available in Nikon & Canon mounts. |
And Now for the Nitty-Gritty – Optical Performance
I’ve used this lens on things you wouldn’t normally use a 70-210, as well as the expected. I shot street candids, landscape, and even birds, bugs, and flowers. With birds and bugs there is a caveat: you keep the subject near or at the center of the frame, expecting to do some tight cropping in post. And for that reason, the lens has to be really sharp, especially toward and at the center.
Still, I want good performance out to the corners and edges as well. And let’s not forget that vignetting and distortion, as well as chromatic aberration (color fringing), also have to be taken into account.
While we can use vignetting to frame the subject on rare occasion, for the most part we’d prefer to live without it. And shooting without any pronounced distortion would be welcome as well. So, to cover my bases, I also set up some test targets, in addition to my field shooting.
Vignetting. I primarily tested for vignetting by shooting at a uniform area of blue sky in the afternoon (with the included petal-shaped lens shade attached). On my full-frame DSLR, with the lens set to 70mm, vignetting was readily observable at maximum aperture (f/4), diminishing as you stopped down – until you reached the magic number – 2 full stops down (the sweet spot for many lenses), where it practically vanished. (Expect performance to be even better with a cropped-sensor camera, which cuts out much of the offending vignetting from the get-go.) However, the picture was a bit different as I zoomed out. At 210mm I noticed a faint trace of vignetting even at f/8. At f/11 it was no longer a practical concern.
In day-to-day shooting, I focused more on my subject than on vignetting, and often found myself shooting wide open, or close to it. Vignetting was not a practical consideration – or a problem. Where necessary, I was able to address it to my complete satisfaction in Capture One using the Light Falloff slider. (I found the lens profile in Lightroom less than optimum for this correction.)
| Edge-to-Edge Sharpness. I was quite surprised at how well this lens held sharpness across the frame. While you could see a slight loss of sharpness at the corners at maximum aperture, it wasn’t readily apparent. I had to look really hard to see any loss of sharpness, which, in practical terms, means it didn’t enter into the equation when shooting. And, again, count on lens performance to improve beyond that when stopping down. In fact, I was happy with sharpness across the zoom range, especially considering I had to rely on some very tight cropping with my small, skittish subjects. Chromatic Aberration. A bad case of chromatic aberration can make your pictures look blurry, and many of us tend to overlook this aspect of lens performance. You have to view the image at 100% - actual size, to clearly see these colorized ghost images. So, yes, it was there, but the beauty of using Capture One is that it tackles chromatic aberration so effortlessly, with one click, that I also let this aspect of lens performance slide. Or more to the point, color fringing was faint to begin with and absent after RAW processing in Capture One. Distortion. Yes, it’s present, but to a minimal degree, and is easily corrected – even manually (as was necessary in Capture One, given that profiles for this lens are lacking). This lens aberration goes from very slight barrel distortion (outward bowing) at 70mm to very slight pincushion distortion (inward bowing) at the long end of the zoom range, with this inward (pincushion) bowing beginning but barely apparent at around 100mm. Flare and Ghosting. I intentionally pointed the lens toward the sun to see how strong lighting will affect the picture. Flare was very well controlled. Flare ghosts did reveal themselves but not to the point where they haunted me. They were mild. In fact, those of you who like flare and ghosts in your pictures may be disappointed by the degree of control experienced with this lens. Clearly this is a testament to the various coatings used by Tamron. | Who Should Use This? Street photographers, portrait shooters, wedding photographers, photojournalists. Landscape may be a stretch, with wildlife & birds, bugs & flowers even more so, but they all are doable. Capsule Comments Working with this lens reminded my of my Canon 70-200mm f/4 (when I shot with the 5D). The Canon lens carries a heftier price tag. But just comparing the overall feel and handholdability of this Tamron lens, I felt equally at home with this glass - albeit on my Nikon D610, and equally confident of the results. |
Build
The lens certainly felt solid in my hands. All operations were smooth. If you’re fishing for more details, we should note that, despite its relatively low cost, the lens also boasts moisture-resistant seals (get it, fishing, seals?). Beyond that, the front element features the same smudge-resistant barrier incorporated into Tamron’s costlier lenses, such as the 150-600mm G2 and 70-200 f/2.8 G2, via a fluorine coating. As I’ve pointed out in the past, I wish Tamron would add the fluorine coating to the rear element as well. Still, the front element is the one that fingers, flying insects, and the elements target first and foremost, so having this as a first line of defense, together with that moisture seal, is a welcome step.
The lens certainly felt solid in my hands. All operations were smooth. If you’re fishing for more details, we should note that, despite its relatively low cost, the lens also boasts moisture-resistant seals (get it, fishing, seals?). Beyond that, the front element features the same smudge-resistant barrier incorporated into Tamron’s costlier lenses, such as the 150-600mm G2 and 70-200 f/2.8 G2, via a fluorine coating. As I’ve pointed out in the past, I wish Tamron would add the fluorine coating to the rear element as well. Still, the front element is the one that fingers, flying insects, and the elements target first and foremost, so having this as a first line of defense, together with that moisture seal, is a welcome step.
| My Tamron 70-210mm f/4 Experience I’m not going to rehash all the specs. You can read that on Tamron’s website (link above). But I will mention those things that made a difference to my picture-taking. For starters, I wondered why Tamron had left out the lens lock here. Then I did one of those (picture me hitting myself upside the back of my head) as I was walking along a bike trail in hopes of spotting some White-tailed Deer, thinking to myself, Of course, it doesn’t need it. Zooming on this lens is entirely internal, as is focusing. By the way, I did spot that deer, but this lone deer proved more skittish than others I’d photographed in the past. Is it impossible to shoot a deer successfully with a 70-210? Suffice to say, I managed to capture deer in the same park with my Tamron 90mm f/2.8 macro. You just have to be prepared to do a bit more cropping in the end, but not always, as some deer in often-visited locations may approach to within 10 or 15 feet (no doubt people have been feeding them, despite restrictions to the contrary). Back to the lens. These internal zoom and focus movements have several advantages. With the lens length remaining fixed, you’re less noticeable in a crowd. When someone sees you with a zoom extended all the way out to Mars, it gets noticed – and that’s not something you necessarily want. What’s more, the lens has a more balanced feel on the camera in this configuration. On top of that, front-mounted accessories don’t twist and turn as you twist and turn the zooming and focusing collars. So your polarizer setting remains exactly where you left it, no matter how much you zoom and focus. And the coup de grâce, no lens creep! So a lens lock becomes moot. Which brings us full circle to where we entered this discussion. All this translates to a lens that eminently lends itself to handheld shooting. I did attach the camera to a tripod with the bare lens (sans optional tripod mount), and in theory would have felt more comfy had I opted for the mount. Yet, as I found out, my Nikon D610 with metal lens mount bore the weight with no ill effect. The only time you begin to feel the weight of the lens (it is heavier than my Tamron 70-300, if only marginally) is during extended handheld shooting, such as when waiting for that bird to land on a nearby branch. And, yes, I even photographed birds – hummingbirds, no less - with this lens, not to mention bees, butterflies, and dragonflies. Admittedly, cropping was often required during RAW processing. | Conclusions The Tamron 70-210mm f/4 lens did not disappoint. It may not be constructed to the same standards as Tamron's SP glass, but, in day-to-day shooting, that did not faze me in the least. I pointed the lens at a variety of subjects, confident I would get the shot. I did not rely on Tamron's proprietary Vibration Compensation (or VC, Tamron-speak for image stabilization in the lens) to prevent camera shake, although I did test for it and achieved admirable results. For the most part, I employ VC to steady the viewfinder image and keep focus on critical areas of my subject, usually the eyes in people and wildlife. I came away from the experience wanting to buy this lens, and would have - if I didn't already own an f/2.8 lens in a comparable focal-length range. The subjects I photographed bear repeating, if only to emphasize the utility of this lens: street photography, cityscape, landscape, flowers, butterflies, bees, dragonflies, and hummingbirds - with my smaller subjects relying on tight cropping in post. Still, you have to give it to this lens for delivering where it counts, cropping and all. |
 RSS Feed