pixelPERFEXION™
pixelPERFEXION.net
Site contents ©2021 Jack Neubart. All rights reserved.
  • Home
  • Reviews
  • News/Views
  • About
  • Contact

Metz Mecablitz 64 AF-1 Flash Review

12/20/2014

0 Comments

 
Picture
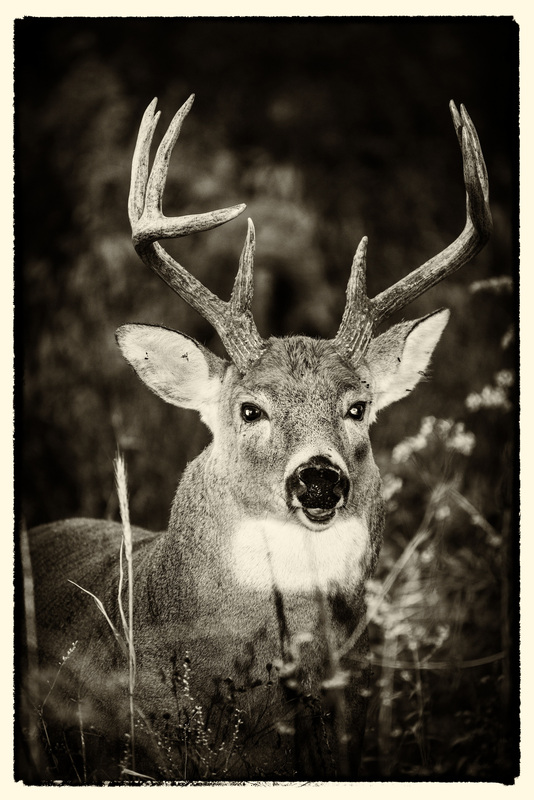
A DEER IN THE HEADLIGHTS. I photographed this male white-tail deer with a Nikon D610 and Tamron 70-300mm zoom, shooting handheld at 300mm with VC engaged. Direct on-camera flash resulted in a red-eye-like effect in the eyes. That aside, the flash brings out considerable detail that’s lacking in exposures made by available light. In Lightroom, I edited the image in Nik Silver Efex Pro, filtering out cyan in the eyes to lessen the “red-eye” effect. (ISO 1600, f/5.6, 1/125.) ©Jack Neubart. All rights reserved.
Posted 12/19/2014 on www.shutterbug.com.
Shoe-mounted flashes are handy tools. Where space or weight is a concern, a kit with two or three shoe-mounted flashes is much easier to carry than even the smallest power pack/head combo or a low-output monolight, and more versatile.

Case in point, on two separate photography assignments I employed no more than two shoe-mount strobes to light-paint the huge blue whale model exhibited at New York’s American Museum of Natural History (in collaboration with museum photo staff). In fact, there is an entire subculture among pros that favors shoe-mount strobes – aka “strobists” – over bulky and expensive studio lighting gear for location work and even in the studio.

The dedication to the shoe-mounted flash for other than run-and-gun photography is largely centered on finding portable lighting gear that will reliably deliver the kind of results we expect of larger strobes.

Among the “third party” shoe-mount strobes I’ve come to trust is the Metz brand. Reliable German engineering and a long-standing reputation reinforce that trust. And the company’s new flagship Mecablitz 64 AF-1 digital flash promises to keep that reputation intact. Metz also makes my favorite ring flash, the wireless and ultra-compact Mecablitz 15 MS-1, which also played a part in this review.

The Mecablitz 64 AF-1 retails for $449 and is available in versions for Nikon, Canon, Sony, Olympus, Panasonic, and Pentax cameras. I tested the Nikon version of the flash. READ THE ENTIRE REVIEW.
0 Comments

Sekonic LiteMaster Pro L-478DR: Outdoor Lighting Control

8/22/2014

0 Comments

 
By Jack Neubart • Posted: Apr 29, 2014 • Published in SHUTTERBUG MAGAZINE: March 1, 2014
A handheld meter is not just for studio work. Tricky lighting situations, high contrast, and unusual subject tonalities can often pose problems for camera metering systems, as advanced as they are. Beyond that, the camera meter can’t help with studio flash.

The first step toward taking tighter control with a broader range of lighting situations is to use a handheld meter. Enter the new Sekonic LiteMaster Pro L-478DR (PocketWizard version). Out of the box, it measures incident light. This exposure meter will also prove valuable when working with studio (or any manual) flash or a mix of ambient light and flash.

CLICK ON THIS LINK TO READ THE COMPLETE PUBLISHED REVIEW ONLINE: SEKONIC L-478DR

Picture
PHOTO CAPTION
The New Sekonic L-478DR vs My Old Sekonic L-558R.
Compare the new with the old. My trusty, but huge, L-558R offers one distinct benefit - a built-in one-degree spot meter, whereas the new L-478DR is ultra-compact with a touch-control user interface, with added functionality (read the review for more details).
0 Comments

Field Report: Nissin i40 Shoe-Mount Flash

7/28/2014

6 Comments

 
A tiny flash with awesome capabilities.
No doubt about it, a camera’s pop-up flash is handy. There’s nothing extra to carry around or leave home. And there’s no added expense. But as convenient as it is, this built-in flash also drags you down, limiting what you can do. Recycling times are painfully slow; it prematurely exhausts the camera’s battery; the light reach is fairly restrictive at low ISO levels; a long lens barrel or lens shade (hood) can get in the way and obstruct part of the light (toward the bottom of the frame); and it almost invariably produces red-eye in people and many animals. What’s more, the lighting is flat and harsh when used as a primary light source.

Enter the accessory shoe-mount flash, or simply shoe-mount. This flash slides into the camera’s hot shoe (“hot” meaning there’s a singular electrical contact point whereby releasing the shutter triggers the flash).

Making things even simpler, on practically every camera today that accepts an external flash, that hot shoe features a camera brand-specific array of “dedicated” contact points that allow the camera and flash to communicate with each other. This dedicated hot shoe gives any flash unit amazing capabilities centering on the ability to effortlessly deliver usable exposures tailored to the subject and surrounding conditions automatically, with little or no user input, aside from switching on the camera and flash and selecting TTL mode on the flash.

What this does is, when using any camera autoexposure (AE) mode, it directs microprocessors in both the camera and flash to talk to each other to determine a proper exposure for a given subject and situation. And all by reading light through the camera lens (TTL), much the way normal ambient-light exposures are made—and the way the built-in flash works. This is what allows camera and flash to deliver balanced fill-flash so that backlit faces are not lost to the murky depths of shadowland.

TTL flash is also usable when the camera is set to Manual mode, but here you have to set both the lens aperture (f-stop) and shutter speed. With shutter-priority autoexposure mode, you need to set a flash sync speed or slower so that the flash is triggered at the right moment. If you use aperture-priority AE mode, the camera should set a suitable flash sync speed, and in program AE mode, the camera also sets the required f-stop as well.

TTL flash, in any camera mode, does away with having to manually calculate flash exposure when: the flash is bounced, filters and/or lens extension is employed, and the flash is used off-camera—it’s all calculated automatically.

Of course, there is one piddling little problem with a shoe-mount. Most are big clunkers, whereas the small ones can’t really do much. So a flash worth carrying is often a pain to carry around and it weighs the camera down when mounted.

Well, that picture has changed with the new Nissin i40. This is the one shoe-mount flash you’ll want to carry with you all the time. Unlike its more robust siblings, the Di866 Mark II and MG8000 Extreme, the i40 is not a bells-and-whistles kind of flash. There’s no fancy display. It’s understated in size and appearance, yet packs a punch where it counts. You might say it’s flashy without being obvious. And it’s small. Really small.

Just Dial It In
In contrast to some of the more high-tech flashes, with their fancy and sometimes colorful LCD panels, the i40 simply relies on two mechanical dials and accompanying indicator lights to set modes and output. Unfortunately, for those of us who need reading glasses, using the mode (“function”) dial unaided can be a chore and, for anyone, reading even the larger output (“power”) dial under low light levels is not an easy task. A flashlight would be handy (or your cell phone).

The main mode is TTL. When TTL is selected, a white indicator light glows next to TTL and a corresponding white indicator light glows alongside the power dial setting, where you adjust output upwards or downwards, up to +/- 2 steps.

Whereas detents on the mode dial are positive enough to lock in the mode without fear of moving the setting, the same can’t be said of the output dial. I’ve noted the setting inadvertently changed by apparently a slip of a finger. So that’s something to keep an eye on.

There’s also an Auto setting, but this deactivates the power dial, so, for me, this setting is meaningless. However, you might feel more comfy with it if you don’t fully understand when and by how much to override the flash exposure. (Tip: use plus settings for more fill light or when encountering overly reflective subjects; minus settings for the opposite effect.)

Manual mode is something you’ll rarely use, so one wonders why Nissin bothered with it on this flash. Select this mode and the power dial selections switch to the left side. You can choose full (“1/1”) to 1/256th power output. The reason to choose Manual is where you don’t want the camera controlling output. Specifically, unlike TTL flash, where output can vary from one exposure to the next just by the inclusion of an object passing through the frame or by reframing, Manual output is constant. You have tighter control over a sequence of exposures. If you hadn’t guessed, Manual mode requires a more studied approach.

Manual mode is also the only mode that supports manual zooming. In contrast to the majority of TTL flash units, which offer manual zoom overrides in practically any mode, that’s not the case here. Disappointing that Nissin chose to take this route, but it’s not a major flaw.

One little extra you’ll find on this flash is a built-in video light. Consisting of two white LEDs, light output can be increased or decreased with the power dial. Frankly, this light is not strong enough to be of practical value, but it does make a great flashlight. Since it’s a mode and not a separate function, it can’t be used to help with focusing in flash photography.

Tilt & Swivel
The i40 has both tilt and swivel functionality, although it does lack a couple of things. For one, there’s no negative (macro) tilt to lower the flash head for close-ups, but this is not a feature ordinarily found on compact shoe-mounts. Also lacking is a locking mechanism that prevents head movement when the head is fully raised. That means that attaching accessory flash panels such as the weighty Rogue FlashBender is an iffy proposition because the flash head might plop down under the weight.

In fact, the detent positions are not all that secure—they’re fine to work with, but can easily be knocked out of position if the head brushes up against something. Not a major concern, but something you should watch for when running around. That being said, raising and rotating the head is made that much simpler because there is no lock-releasing mechanism to deal with.

Wireless Operation
In wireless operation, the flash can be used remotely, that is, off camera, without any sync cords connecting flash to camera. A triggering pulse (the “Master”) triggers the remote flash (the “Slave”). That triggering pulse can come from a camera’s built-in flash (where that function is provided—it’s not available with all cameras or all camera models), or from another flash (again provided this function is built in) or triggering device seated in the camera’s hot shoe. There are different kinds of wireless technologies. This describes a simple scenario, and when all connections and devices support TTL auto flash operation, it’s known as “TTL wireless” or “wireless TTL.”

The mode dial features several wireless settings. The i40 supports TTL wireless flash when the mode dial is set to A, B, or C. These represent Groups, which must correspond to the Group setting on the Master/transmitting pulse. In theory, any number of flash units can be assigned to any Group.

TTL wireless operation on the i40 is omni-Channel. That is, there is no Channel selection required and the flash responds to pulses from any Channel on the Master/triggering unit. Normally, you’d select a Channel for the Master/triggering flash and that same Channel on the Slave/Remote flash to avoid other flashes from triggering yours if they’re on the same frequency (Channel). That is only likely to happen when you’re among a crowd of photographers, and only if they’re using compatible flash units specifically set to trigger remote strobes. Which is rare, so it’s not a real concern.

Nissin offers two additional wireless modes. In contrast to the TTL A/B/C settings at one end of the Mode dial (where output is controlled by the Master device, whether that be the Master flash or the camera, in the case of the Nikon D610/D300 that I was using), the SF and SD modes let you select output by way of the Power dial.

Unfortunately, you need to access the e-manual to find out how to use these modes. And, frankly, as often as I’ve written about it, I don’t entirely get the SD mode. Normally, any wireless flash (other than Nissin) that I’ve worked with made jumping through such hoops unnecessary—it was all controlled by the microprocessor.

That said, SF wireless mode is a nice touch. SF allows the flash to be triggered by any flash pulse, so the i40 can be used as a kicker or fill light when used together with a conventional studio strobe. Otherwise, you’d need an optical Slave connected to the flash, which in this case would not be possible, since there are no input terminals on the flash.

Keep in mind that wireless operation with the i40 and compatible triggers requires a direct line of sight. Also, outdoors bright or glinting light can interfere with the signal. And distance between trigger and remote flash should be kept short. Indoors you have more leeway, but don’t place the flash in a different room or otherwise block the sensor from receiving the triggering pulse. The signal will bounce off walls and furniture, but it won’t go through them.

In Use
I loaded up the i40 with four freshly charged Ansmann 2850 mAh NiMH batteries and hit Chicago’s Michigan Avenue and surroundings. The flash was seated in the hot shoe of my Nikon D610, with Tamron 24-70mm f/2.8 VC lens attached.

When I work with my Nikon flashes, I typically attach the included diffusion dome (dome diffuser). It may reduce overall output and reach, but the dome softens the light, making on-camera flash less harsh, and produces a more uniform light spread. And often I’ll use the dome in conjunction with bounce flash. Yes, outdoors there’s nowhere to bounce light off of, but the flash in this instance either provides a kicker or fill for a candid portrait or, again, creates a less harsh light when shooting close-ups. So, I employed the diffusion dome that came with the i40, with the head in bounce mode, where warranted.

I must admit. This tiny flash surprised me, very nicely, I might add. Okay, it’s not perfect. Light distribution on the raw head (sans diffusion), when used with a Nikon D300 and 60mm Micro lens (sans lens shade), was uneven. It was visibly weighted toward the upper half of the frame (horizontal format), with some vignetting occurring in the bottom corners.

I brought the i40 indoors for a simple studio still life, to test wireless flash. I set up a resin figure inside a rectangular light tent with both my new Nikon SB-700 and the Nissin i40 providing all the light, triggered by the D610’s built-in flash serving as Commander (Master/triggering pulse). I set up output for each flash on the D610’s menu, with the camera in Manual mode and each flash in TTL mode. I often prefer Manual mode on the camera for tighter control, whereas TTL mode on the flash allows camera and flash to talk to each other and deliver the best exposures without worrying about light lost with diffusion and bouncing and flash-to-subject distance. Of course, things aren’t really that simple in the real world. You do have to play around with settings to arrive at the right combination for the two flashes, as well as positioning each relative to the subject. A practiced hand can do this in minutes. Give yourself time if you’re new to wireless photography. And if you don’t have a second flash, no worries. Use a bounce card instead. There are always workarounds.

Conclusions:
You really can’t go wrong with this flash, especially for travel. Although it doesn’t automatically adjust beam spread for sensor size, the Nissin i40 worked flawlessly with my Nikon D610 and D300. In wireless TTL mode, I had no problem triggering the flash with the pop-up strobe on either camera in the corresponding Group (A/B/C) setting.

One small thing that concerned me: the lack of a low-battery indicator. The flash does enter standby mode (on/off indicator—aka test flash button—blinks) after a short spell. However, it doesn’t respond directly to the camera’s on/off/standby status, unlike Nikon’s dedicated strobes. But it’s easy enough to press the microswitch on the flash and turn it off when it’s not needed. Besides, after 60 minutes of sitting idle, the flash shuts itself off.

Pros:
Very user-friendly; tiny size; lightweight; appears to be ruggedly built—certainly feels that way; wireless functionality (remote only); durable metal foot; included dome diffuser proved very handy in a variety of situations.

Cons:
Difficult to remove flash from camera hot shoe (not for arthritic hands); flash head does not lock in position; output dial can too easily be moved to another setting; mode dial is difficult to read (both dials are difficult to read in very low light); requires the e-manual for a fuller explanation of how to use the flash.

Compatibility:
Canon, Nikon, Sony DSLR systems; 4/3 & Fujifilm mirrorless (Canon E-TTL II/ E-TTL, Nikon iTTL, Sony PTTL, 4/3 TTL, Fujifilm TTL).

Tested version:
Nikon iTTL.

Where can I get more info?
www.nissindigital.com

E-manual:
www.nissindigital.com/files/EN_i40_rev_1_1.pdf

Manufacturer:
Nissin

Distributor:
Minox USA. 

P.O. Box 123 Meriden, NH 03770
TEL: 866-469-3080 / 603-287-4840 / FAX: 603-287-4834

www.minox.com/usa
usa@minox.com

How much is it?
$269. At B&H and Adorama.

What’s in the box?
Nissin i40 flash, mini stand, dome diffuser, quick guide instruction sheet, padded soft case.

Does It Reach pixelPERFEXION? (100 pixels is best):
Nissin i40: 90 pixels—eminently practical for travel and everyday use, and a great kicker/fill light for the home studio. Leave the padded case at home and you won’t even know the flash is in your jacket or vest pocket.

Selected Specifications:
For complete specs, visit: http://www.nissindigital.com/i40_spec.html
Guide Number (GN) @IS) 100/ft: 89 (at 35mm zoom position)
Auto zoom range: 24 – 105mm
Bounce/tilt: Yes/Yes
Interface: 2 dials (modes & power output); on/off button
Special features: video light; spring-loaded release
Power: 4 x AA
Recycling: 0.1 – 4 sec
Color temp: 5600K
Size: 3.35” (H) x 2.4” (W) x 3.35” (D)/85 x 61 x 85mm
Weight: 7.16oz (w/o batteries)/203g
Design and specifications subject to change without prior notice.

6 Comments

Phottix Odin Wireless TTL Flash Trigger: A Radio Frequency-Controlled System

10/7/2013

0 Comments

 
By Jack Neubart • Posted: Sep 27, 2013 • Published in SHUTTERBUG MAGAZINE: Aug 1, 2013
The Phottix Odin is a radio frequency-controlled system, or simply radio remote. The basic package includes two units: a transmitter and a receiver. Additional receivers are optional. You only need one transmitter to sit in the camera’s hot shoe and trigger compatible i-TTL strobes, but you need a receiver for each off-camera flash. And recently, Phottix introduced a new combo pack that includes one additional receiver—perfect for my two-speedlight setups. The unit tested here is for Nikon and I worked with my Nikon SB-900 speedlights.
The Odin Transmitter is also the Control Unit (which is why it’s called a TCU), and it sports an easily readable, user-friendly digital display. In fact, if you’ve used your Nikon in Commander mode, it’s not a big leap to work with the Odin. I even found the Odin simplified working with off-camera flash when using Nikon’s WU-1b wireless mobile adapter with my D600 and iPad.

CLICK ON THIS LINK TO READ THE COMPLETE PUBLISHED REVIEW ONLINE: PHOTTIX ODIN
PHOTO CAPTION
Tabletop: Light Ratio Mode 
The light ratio mode (via the Option menu screen) lets you easily adjust TTL lighting when only two Nikon SB-900 speedlights are used. In these two examples (shown with Odin light ratio settings that I used), I first positioned the Group A flash (with diffusion dome) in the front-left corner of the set aimed into the ceiling but angled slightly downward toward the subject. Then I added the Group B strobe, on the floor, bounced into the wall at an upward angle so that it hit the white plastic sweep at the back. A silver card was added on the right for fill. You can see the effect that adjusting the light ratios has on this still life. I prefer the shot where the key light is stronger (4:1) because it gives the crystal goblet more of a high-key feel, while giving the candy wrappers increased presence. ©Jack Neubart
0 Comments

PocketWizard ControlTL System For Nikon: A TTL Wireless Radio Remote System For Speedlights    

10/7/2013

0 Comments

 
By Jack Neubart • Posted: Sep 11, 2012 • Published in SHUTTERBUG MAGAZINE: Aug 1, 2012
While I’ve found Nikon’s wireless TTL system to be a great asset, I also understand that it has inherent weaknesses when used around obstacles that block the signal, as well as outdoors beyond a few feet or under sunlight. Enter PocketWizard’s ControlTL (Control The Light) TTL-auto radios for Nikon (originally introduced for Canon). These radios are designed to respond in every respect as a dedicated extension of the Nikon CLS/i-TTL system. And they have the potential to do that, provided you keep on top of firmware updates (www.pocketwizard.com/support). I conducted my tests using my Nikon D300 together with the Nikon SB-900 speedlight (verified by PocketWizard as compatible) and briefly an SB-700 (not confirmed at time of testing).

CLICK ON THIS LINK TO READ THE COMPLETE PUBLISHED REVIEW ONLINE: POCKETWIZARD CONTROLTL
Picture
I wanted to give this fountain, located in Arlington Heights, Illinois, a bit of color, so I set up one Nikon SB-700 with a blue gel on one side, an SB-900 with a green gel on the other, each high up on a light stand around 10 or 15 feet from me. A FlexTT5 was fitted to each. For most shots, only the SB-700 responded to the on-camera MiniTT1, but in this shot I did manage to get both lights contributing. Later PocketWizard explained that water could interfere with radio signals. © Jack Neubart
0 Comments

    Reviews

    TECHNICAL EDITOR
    Jack Neubart


    Archives

    December 2019
    September 2019
    August 2019
    July 2019
    May 2019
    April 2019
    February 2019
    November 2018
    September 2018
    August 2018
    May 2018
    January 2018
    November 2017
    September 2017
    July 2017
    June 2017
    May 2017
    April 2017
    February 2017
    December 2016
    November 2016
    October 2016
    August 2016
    July 2016
    May 2016
    April 2016
    March 2016
    February 2016
    January 2016
    December 2015
    August 2015
    December 2014
    August 2014
    July 2014
    April 2014
    November 2013
    October 2013

    Categories

    All
    13x19-inch Printers
    35mm-style Digital Cameras
    Acratech
    Adobe Software
    Austin
    Backpacks
    Ballheads
    Camera Backpacks
    Camera Bags
    Camera Cases
    Camera Holsters
    Camera Luggage
    Camera Supports
    Canon Cameras
    Canon Lenses
    Compact DSLRs
    Compact Photo Printer
    Compact System Cameras
    Desktop Printers
    Digital Projectors
    Digital Retouching
    Digital SLR
    DSLR
    Epson
    Exposure Control
    Fashionable Bags
    Fast Lenses
    Film Emulation
    Flash Photography
    Hawaii
    HDR Plug-in
    HDR Software
    HD SLR
    HD-SLR
    High-resolution DSLR
    Holster Bags
    Image-editing Software
    Image-stabilized Lenses
    Inkjet Printers
    L Bracket
    L-bracket
    Lens Cases
    Lenses
    Lens Pouches
    Leveling Base
    Long-lens Bags
    Macphun
    Macro
    Macro Flash
    Manfrotto
    Mega-zoom Digital Camera
    MindShift Gear
    Mirrorless Cameras
    Nikon Cameras
    Nikon Digital Cameras
    Nikon Mirrorless
    Nikon Pro Digital Cameras
    Nissin
    Nodal Rail
    Nodal Slide
    Olympus
    Outdoor Photography
    Panorama Head
    Panoramas
    Panoramic Photography
    Photo Accessories
    Photo Backpacks
    Photo Belts
    Photo Luggage
    Photo Rollers
    Plug-ins
    Point-and-shoot Zoom
    Portrait Retouching Software
    Printer
    Pro Cameras
    Pro Digital Cameras
    Radio Remote Flash
    Radio TTL Wireless Flash
    Rain Covers
    Rain Hoods
    RAW Conversion Software
    Review: Photo Accessories
    Review: Phottix Odin Radio Remote
    Review: PocketWizard ControlTL
    Review: Software
    Ring Flash
    Rolling Cases
    Samsung Cameras
    Shimoda Designs
    Shoe Mount Flash
    Shoulder Bags
    Shutterbug.com Review
    Shutterbug Magazine
    Sigma Lenses
    SKB Cases
    Sling Bag
    Sling Bags
    Sling Pack
    Snapshot Printer
    Software
    Software Effects
    Super Wide Lenses
    Super-wide Lenses
    Superzoom
    Tamron Lenses
    Telephoto Zooms
    Tenba
    Texas
    Think Tank Photo
    Tripod Heads
    Tripods: Carbon Fiber
    TTL Radio Wireless Flash
    TTL Wireless Flash
    Ultra Wide Lenses
    Ultra-wide Lenses
    Ultra-zoom Digital Camera
    Wide Format Printers
    Wireless Flash
    Zoom Lenses

    RSS Feed

    All products and services are the trademarks or registered trademarks of their respective owners.
    Use or mention of any product or service is not an endorsement - compensated or otherwise.
    However, manufacturers, distributors, vendors & services may provide products or services for use.

    Your purchase and/or use of any product or service tested, reviewed, listed or mentioned is solely at your discretion and you release us from any and all liability associated with such purchase and/or use.

Your satisfaction, our expertise. They go hand in hand.
Bringing over 35 years' experience into everything we create.

Entire contents of this website is comprised of original works created by Jack Neubart, including but not limited to photographs, digital work, musical compositions, stories, humor, poetry, and any other artistic or textual material. 
All work Copyright ©2021 Jack Neubart and is protected under United States and International laws and treaties.
All rights reserved. None of the contents may be copied, extracted, abstracted, adapted, transmitted, digitally altered, or otherwise used or published without express permission of the Copyright owner.
Webmaster: Jack Neubart (building on a Weebly.com template).