
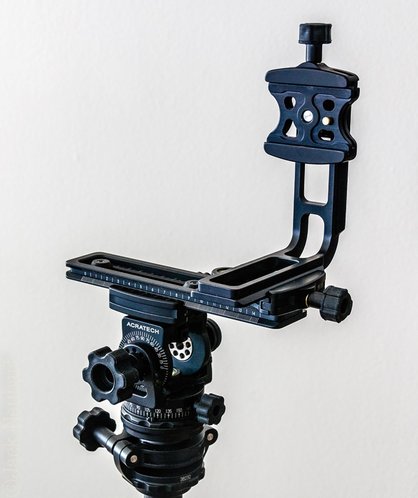
 The complete Acratech panoramic rig, featuring pano head, leveling base (underneath head), nodal rail, and L-bracket. (Photo ©2017 Jack Neubart. All rights reserved.)
 Until now my forays into panoramic photography were limited to what I could do with my regular Acratech ballheads. When I first set out to shoot panos, I didn’t pay attention to a certain feature on these heads—that being that you can remove the quick-release clamp from the top of the head and re-mount it to the bottom. You then effectively attach the head to the tripod upside down. I’m not quite clear on what difference it makes except that you somehow create a more efficient, built-in leveling base that works in tandem with the head as a whole. This feature is available on most Acratech ballheads, the notable exception being the new Nomad.
Anyway, so when I first set out to shoot panoramas I ended up making do with the head in its original configuration. I would level the head and visually determine the overlap from frame to frame. It seemed to work – at least when generating panoramas in Lightroom, using its Photo Merge/Panorama feature. But I wanted more – I wanted tighter control over my panos and I wanted to try dedicated pano software for this process.
So my next step was to talk to Acratech about their pano gear. It’s still somewhat of a learning process, especially in terms of the software – I opted to use PTGui (review to come). But I now feel that I have a much better handle on it, with a greater understanding and appreciation for what’s involved. And that wouldn’t be possible without this Acratech gear.
Note: be sure to click Read More for a guide to Determining the Nodal Point and 10 Tips to Successful Panoramas.
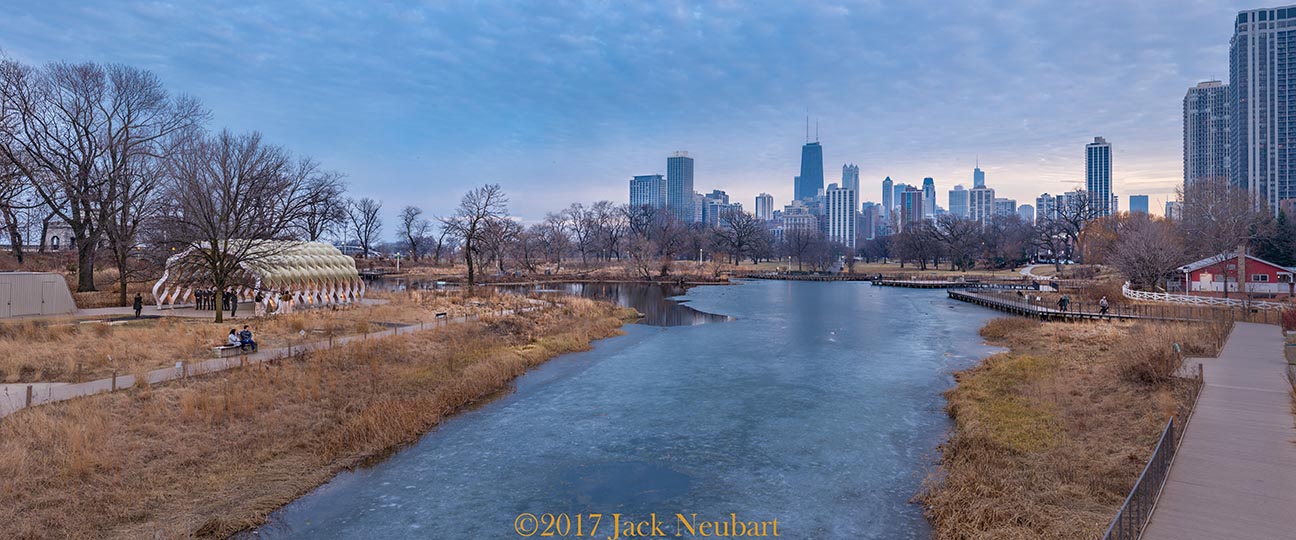
Chicago skyline viewed from Lincoln Park Zoo. To save on system resources, I didn't build this panorama as wide as I would have liked. It's constructed from vertical frames in 3 layers (top to bottom) - in PTGui pano stitching software (individual frames processed in Lightroom to restore the color and tonal depth to the scene and punch it up a bit, so it wouldn't look flat). All done using my Giottos carbon fiber tripod with Acratech panoramic head, Acratech leveling base, Acratech nodal rail, and Acratech L-bracket. I couldn't have done it without the Acratech gear! (Note the wedding party under that structure on the left.) ©2017 Jack Neubart. All rights reserved.
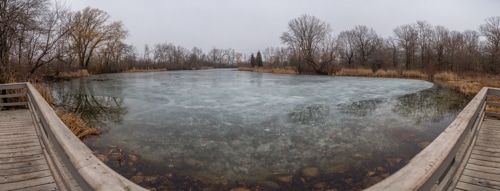 Emily Oaks Nature Center, Skokie. Panorama with Nikon D610 and Tamron 24-70 f/2.8 lens at 24mm, employing full complement of Acratech panoramic gear. ©2017 Jack Neubart. All rights reserved.
 The Acratech Armada
Acratech sent me their Panoramic Head, Leveling Base, L-Bracket, and Nodal Rail. Let’s address each in turn. While I could have added an Acratech QR plate as well, I opted to stick with my Giottos universal QR plate. I should add that Acratech makes plates custom designed around numerous camera bodies and lens tripod mounts with a special back lip that prevents accidental rotation.
Panoramic Head. This is a work of art in itself! Much like its siblings, it could easily be mistaken for a museum piece were it not so practical to work with. It’s sexy and solid. Movements are fluid and all the knobs work smoothly and effortlessly, locking firmly in place, with no fear that they’d come loose or shift my viewpoint upon tightening (something heads of lesser quality are known to do). Aside from etched markings for horizontal panoramic movement, there are also marked settings for vertical movement, so the head can easily be used for multi-row panos. For the horizontal panos, there is a movable indicator to notate your starting point. What’s more, the QR clamp rotates (for camera positioning as needed) but does lock in place. And the head is fully compatible with all tripods. This head easily fits on the Acratech Leveling Base (strongly recommended). Verdict: the Acratech Panoramic Head is the perfect tool for the job.
Leveling Base with stud. There are two types of leveling base that I’ve come across in researching the topic. One type uses three- or four-point leveling. The Acratech base uses one-point leveling, meaning, the base pivots around a central axis. Less to fuss with, as I see it. The base screws right onto the tripod. There is also a Large Leveling Base, for larger still heads and professional video heads, and a Leveling Base with QR Clamp, for direct mounting of a camera (with QR plate) to the base. A large bulls-eye spirit level makes it easy to level the base. Verdict: With the Acratech Level Base, I can get the camera level or at least to within a few degrees in a minute or two. May take a bit more finessing with the camera mounted, owing to greater torque, but certainly doable.
Universal L-Bracket. This bracket is a practical necessity to allow you to simply and effortlessly shoot vertical panos without throwing off camera alignment. It quickly lets you switch from vertical back to horizontal shooting. A larger version, the Extended Universal L-Bracket, is available for cameras with battery grip and oversize bodies. The bracket attaches to the nodal rail. For verticals, the raised L should be on the right, to allow enough room for the grip. When shooting horizontals, that part of the bracket resides on the left. Verdict: it’s so much easier to go from horizontal to vertical and back again with the Acratech L-Bracket, without spoiling the framing. My one concern – attaching the Nikon wired release MC-DC2 being hampered by the bracket – quickly dissolved, thanks to the open channel in the bracket.
Nodal Slide. This nodal rail is what you need to ensure accurate, parallax-free frame-to-frame alignment, regardless of which lens you use. There are two stops that you can lock in place to guide positioning of two separate focal lengths (the provided hex wrench lets you adjust them on the fly). Meaning, you don’t have to mark down the positions of the lens along the rail, as you’d ordinarily need to do with conventional rails. The camera, alone or on the L-bracket, just slides into the designated position marked by the stop. The clamp knob should be facing you. The clamp rotates by releasing the hex screw on the bottom (using the hex wrench) to orient the camera as needed. (Of necessity, the orientation changes when using the L bracket.) Verdict: those two stops along the Nodal Slide are a game-changer. Unless you use more than two focal lengths, you’ll find setting up for the lens’s sweet spot to avoid parallax is fast and effortless. And if you need to change it on the fly, that’s quickly doable as well.
In Use
This was my first time working with a panoramic head, L-bracket, leveling base, and nodal rail, despite my many years as a photographer. They’re just not tools I found I needed till now. And now that I’ve found them, I wish I’d had them decades before, although I’m not sure I would have had the wherewithal to make the best use of them back then. What’s more, for many years I simply preferred to shoot handheld. So all this extra gear would just have been gathering dust.
Not today. I’ve got my MindShift Gear backpacks configured so they easily tote the Acratech panoramic components along with my Giottos carbon fiber tripod. By “configured,” I mean, I’ve made sure they’d fit easily in the bag without bumping up against other gear or me having to dig for them. Granted, owing to its L shape, the L-bracket is the most cumbersome to carry. I do leave the leveling base attached to the head, since they neatly and snugly fit in one modular section in the pack. (Your mileage may vary.)
What I don’t do is leave all this attached to the tripod, because it makes for awkward portage, especially when carried along the side of the pack. And whether side- or front-carried, the head alone (or seated on the leveling base) sticks up, so that it might catch on something or bump into things along the way. Leaving the rail and bracket attached on top of that just compounds the situation. Sure, if you’re going by car or hand-carrying, then leave everything in place on the tripod, although that awkwardness does manifest itself when schlepping the tripod by hand from one location to the other. Remember, the added gear does make the tripod considerably more top-heavy.
As to actual use, once I got past the intimidation factor, it was smooth sailing. I’m still mastering the art of the panorama, but I’m confident that I have a firm handle on it, thanks to this Acratech gear.
Acratech is a master at designing and machining components that fit well together and fit well in your workflow. I did have to go back to the company’s online tutorial videos once or twice before everything clicked, but now, even in extreme cold conditions, I can manage to rig the tripod in moments ready to shoot panoramas. I’m still getting the hang of the stitching process vis-à-vis the software (specifically, PTGui) but mastering that phase of it is next on my agenda.
Zeroing out the bubble level on the leveling base proved fairly effortless. I’d recommend carrying out this operation before attaching the head, but certainly before mounting the camera onto this rig. The greater torque with the added load works counter to making easy adjustments.
Conclusions
A couple of points worth noting. When using my more stable tripods, I didn’t find it necessary, to lock down the panorama knob on the Acratech pano head as I panned with the camera. This way I could quickly move from one exposure or bracket set to the next. And you can avoid the nodal rail entirely when shooting fisheye panoramas. (Despite claims to the contrary, a fisheye lens can be used – just expect some distortion.)
Admittedly, when you add all the components together, shooting panoramas becomes an expensive proposition. But it also has potentially great rewards. And once you’ve got a handle on the mechanics of shooting panoramas, you next find yourself muddling over the software and trying to make heads or tails out of, why don’t these frames fit together the way they’re supposed to? Frankly, it’s a serious commitment in money, time – and patience.
There’s one thing in this Acratech gear that puts you on the right footing: Every component has a bullseye level, so you can start working on a level playing field – literally.
The pano head itself has a drag/friction knob. Ease back on this just a bit so it allows some movement as you twist the main knob and move the camera. It may take a while to find the sweet spot to control drag for your rig, but keep in mind that the amount of drag will have to be adjusted for different loads. Once locked in place, the camera stays put – there’s no shift when locking the knobs and no drift after the camera is locked in place.
In fact, if you’ve worked with any Acratech ball head, working with the pano head shouldn’t be much of a stretch. The only difference: the pano head tilts only front to back, not side to side, as would be the case with a regular ball head. This keeps you level. The forward/backward tilt, aside from leveling the head initially, is to allow you to build horizontal layers and add depth top to bottom so the panorama doesn’t begin to look like a strip mall.
Final word: the Acratech pano gear is an investment that will pay for itself before long. As with anything, mastering panoramic photography will take time and patience. But the Acratech gear will put you on the right path and put you on solid footing.
FEATURES (prices/features per manufacturer)
10-year warranty
Made in U.S.A.
10-year warranty
Made in U.S.A.
| Acratech Panoramic Head ($379.95)
Acratech Leveling Base ($149.95)
| Acratech Universal L-Bracket ($229.95)
Acratech Nodal Rail (Nodal Slide - $199.95)
Who Should Use This? Landscape photographers, travel photographers, and essentially any photographer who wants to create stitched panoramas. Capsule Comments Fairly easy to use (small learning curve); relatively lightweight (all components combined); smooth movements; ultra-stable camera platform; durable and easy to maintain (not that I’ve had to do any maintenance to date); priced right – trademarks of Acratech gear; does add height to the tripod, so you may have to take that into account when extending the legs or choosing a tripod; avoid extending center column, since added weight/height raises center of gravity, which could add wobble to less sturdy tripods. |
 RSS Feed