pixelPERFEXION™
pixelPERFEXION.net
Site contents ©2021 Jack Neubart. All rights reserved.
  • Home
  • Reviews
  • News/Views
  • About
  • Contact

Field Review – MindShift Gear’s BackLight 26L – A Photo Backpack with a Difference

12/14/2015

3 Comments

 
​I’ve made a few things clear in past reviews of photo backpacks and in magazine features I’ve written on the subject. One is that I favor a backpack over a shoulder bag for most of my photography. Second, I’ll only use a backpack that’s a good fit – feels comfy and rides well on my back, holds the gear I need to carry securely and in an organized fashion, and lets me get at my gear relatively easily and quickly. Third, I prefer a backpack that lets me carry a water bottle and a few extras, such as a light jacket – in other words, has pockets where and in a size I need them.
 
All of which has led me in recent years to MindShift Gear photo backpacks. I’ve become increasingly enamored of these products. And the fact that this company continues to innovate without compromising the integrity or functionality of their bags speaks volumes.
 
However, when MindShift Gear announced the BackLight 26L, my first thought was: I have enough photo backpacks already. I’ll skip this one.
 
Glad I didn’t. But I also had to reconcile where this new photo backpack stood in relation to my other backpacks, especially the FirstLight, which had previously moved to the front of the pack, so to speak.

​Fast forward, from the day it arrived, the BackLight has become my go-to photo backpack – and for good reason. 

The following are some of the images I shot while wearing the BackLight 26L. As you can see, this pack lends itself nicely to a wide range of situations.
Picture
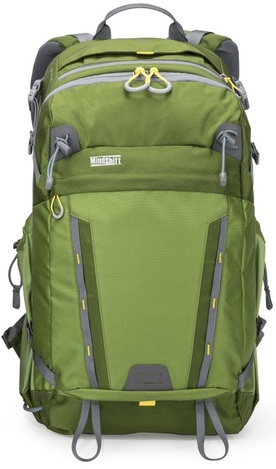
BackLight 26L (green version). Courtesy MindShift Gear.
BackLight 26L: Key Features
These are features outlined by MindShift Gear in a press release (with my comments and observations).
  • Includes tripod/monopod mounting system on front or side. (I love having choices, and these work well.)
  • Padded waist belt for all day comfort on the trail, with webbing rail for attachment of additional MindShift accessories. (I always prefer a padded to an unpadded waist belt when it comes to a pack of this size/carrying capacity or larger.)
  • Quick fit waist belt adjustment for rapid and convenient fitting. (A properly fitting waist belt can make the difference between a comfortable hike and a tortuous journey. This one is on the money. When not needed, the waist belt wraps around the front, a feature MindShift introduced with the FirstLight series. However, this means you can’t access the bag while wearing it, because the waist belt must be cinched. So use this wraparound feature when transporting the bag in a vehicle and restore the waist belt to its intended function once you hit the trails or the streets.)
  • Adjustable neck strap keeps the back panel against your chest, providing unencumbered access to your gear. (This is for when you keep the bag on your person as you access the back panel. I removed this bungee cord – it kept coming undone - although I should perhaps learn to tie a better knot. Besides, I found it just as easy to hold the bag open with one hand. But try the bag with the cord and see for yourself. More on this below.)
  • Integrated insert with customizable dividers allows you to maximize the space for photo gear, personal gear, or a combination of the two. (Nothing beats a well-organized interior. Keep batteries inside in extreme temperatures, since the bag acts as an insulator.)
  • 2 large water bottle pockets with cinch cord fit a 32 oz. Nalgene. (I can appreciate a good-size water bottle pocket such as found here, although I still may attach a separate insulated pouch in hot weather. You can use one of these pockets for a tripod, or alternately carry the tripod over the front of the bag – everything you need for the tripod is built in, although an optional mode of tripod transport is also available.)
  • Side compression straps with locking SR buckles for additional lash points. (These come in handy when securing a tripod to the side of the bag.)
  • Air channel and lumbar support on rear-panel for all-day comfort. (Yup, agree whole-heartedly. Comfy! I should point out that I started working with the bag in warmer weather, so this feature definitely helped.)
  • Ergonomic zipper pulls are easily gripped with gloves or chilled fingers. (I love these zippers!)
  • Highest quality YKK RC Fuse zippers, 420D Velocity and 420D high-density nylon for long lasting durability and strength. (Highest quality materials and workmanship are important to this type of bag, and that’s what you get. The bag is made to last and should endure numerous adventures.)
  • Front stuff pockets for trail essentials: headlamp, gloves, and chargers. (I keep the outside front pockets filled with lightweight stuff, such as a light jacket. I don’t like keeping a laptop or anything heavy in the front pocket – throws the pack off balance.)
  • Top zippered pocket for quick access to essentials. (It’s small, but you can keep a pack of lens tissue or a lens cloth and a small screwdriver kit in there. When the temperatures are moderate, I may keep spare batteries in this pocket.)
  • Seam-sealed rain cover included; folds flat for use as a ground cover. (Haven’t had to use it yet, but glad to have it included. On its own, the bag is water-resistant – just not to a drenching downpour, hence the rain cover.)
BackLight 26L vs. FirstLight 20L
  • Going green. I was getting tired of black and gray backpacks, so I welcomed the green BackLight. I figured this color would blend in fairly well in woodland environments. Yet, at the same time, this pack would be easily spotted by cyclists on bike paths that traversed some of the woodlands I frequent – so far, so good. (In the evening, I attach a strobing LED flashlight to the pack as a precaution).
  • Bigger volume, not overall size, is important. The BackLight 26L adds nearly a full inch to the depth, which means you can store some lenses on end, making room for more gear while letting you more easily get at the lenses you need. With the 20L, that was not the case. (Of course, you could move up to a FirstLight 30L, but for me, that was too spacious).
  • Large water bottle pockets on the BackLight. I had to use an accessory water bottle pouch on the FirstLight 20L.
  • Spacious front pocket on the BackLight. Big enough to carry a light jacket comfortably, in place of a laptop, which I never carry into the field.
  • Less complicated can make a difference. The BackLight is a simpler bag to use overall. Unlike the FirstLight, there’s no torso length adjustment on this pack (yes, this could make a difference to a very tall person). Also unlike the FirstLight, there are no compression straps on the shoulder straps and waist belt of the new BackLight (that should only make a vital difference for a really rugged outdoor excursion – and even then, it’s arguable). MindShift also got rid of the whistle on the chest strap, but I can see the reasoning behind this: Put the bag on the ground and the whistle lands there as well. I leave the rest to your imagination. The airflow back panel is also different on the new pack, but I didn't see any practical difference while wearing either pack.
  • A simpler carry handle. The carry handle, while not a key feature, can make a difference. The BackLight uses a more basic, flexible loop-like carry handle, which I find eminently satisfactory and easy to grab when needed. The FirstLight has a substantially padded handle that adds to the height and makes it feel as if I’m carrying a suitcase – you can’t just quickly slip a couple of fingers into it; you need to grab it.
  • Gear access panel. The gear access panel affects the way you work and how secure you feel. The new BackLight features a rear access panel – away from prying fingers. The FirstLight uses the more conventional front panel. But what MindShift Gear is mostly touting about the BackLight is that you can wear the bag while accessing gear and changing lenses on the fly. I tried it, and my assessment follows below (see In the Field).
​In the Field
I loaded the bag (not fully) with a Nikon D610 and several lenses, including a Tamron 15-30 f/2.8, Tamron 90mm f/2.8 macro, and Tamron 70-300mm, plus Nikon SB-700 flash, and had plenty of room to spare. I could easily have carried a 300mm f/4 attached to my trusty old Canon EOS 5D, together with other Canon lenses instead. There was even a special space for my Giotto’s Rocket Blower and room to store a sling strap. And there was definitely space for a second camera body.
 
For the most part, I didn’t notice I was wearing the bag. However, I did find that the FirstLight 20L did ride a bit better on my back, without me having to readjust the position of the shoulder straps as I was walking about. That said, this was not a concern when shooting while wearing the BackLight 26L, which remained firmly and comfortably on my back. (I should point out that everyone will have a different experience with any backpack, so you’d do well to try it on, preferably filled with gear, and walk around a bit – something more easily done at home, when ordering online.)
 
Now, as to that thing about accessing the interior while wearing the pack. Okay, here’s the unvarnished truth. It’s doable – but mostly if you’re not wearing an open jacket or open photo vest, which tends to get entangled or snarled in the process of shifting the pack around. When I wear a vest as the outer layer, it’s always open. Ditto for a jacket as the outer layer, with an open vest underneath (or the other way around – depends on the situation). Open outer garments just make a mess of things, and I'm not about to zip up and then unzip afterwards, which only wastes time.

But when I did successfully manage to access my gear while wearing the pack, I found it best to position one knee under the pack for added support (set your foot on a step or mound). You can also try leaning the bag against a wall or tree. I didn’t feel entirely comfortable allowing the pack to float tethered to the waist belt, although I’ve done it with a light load.
 
And as I mentioned, I didn’t like using the neck tether. I should add the reason for that is, my hat kept getting in the way. (I keep the neckband in the pack in case I change my mind, or in the event I might need it to tie off something.)
 
I did try attaching a spare, lightweight, clip-on shoulder strap (a camera strap can also be used) to the carry handle as a means of supporting the bag. But again, my hat got in the way, and since this became such a production, hence counterproductive, I gave up on the idea. Besides, it also meant that I ended up with something dangling off the pack when the added strap was not in use. Still, you might try it. Just don’t wear a hat.
 
So, in the end, I found myself using the bag more conventionally. It just meant I had to find a convenient spot to lay the bag down. Which is not as easy as it sounds in many situations. Still, I expect that I'll go back and try using the pack as intended. Whenever I hit a stumbling block, I always try and try again. It's who I am.
Special Usage Note
Make sure to keep the waist belt securely cinched before attempting to rotate the bag around your waist.
 

The waist belt should tightly hug the waist, but not so tight as to hinder the bag’s movement.

On the other hand, if it’s too loose, like loose-fitting trousers, it will start sliding downward as you remove the shoulder straps.

​The process can get a bit tricky, which is why you should practice with a fully loaded pack until you’re confident you’ve got it.

​
​Conclusions
You may be asking, what about the Rotation180 Horizon 34L you gushed about in an earlier review? Clearly, any of the Rotation180 packs will give you fast access to your gear, much more so than the BackLight. However, the Horizon won’t fit long lenses in the rotating section. And it is bigger and bulkier overall. Plus it’s clearly intended for rigorous excursions.
 
The BackLight is tamer, by comparison. It lends itself to a wider variety of environments, from city streets to woodland and is less of a nuisance on a crowded subway.
 
Which brings me back to my earlier comment: The BackLight 26L has become my go-to photo backpack. It carries what I need and in a fashion that is protective, makes my gear readily accessible, and it's smart-looking. I simply and utterly refuse to look at another photo backpack. That is, at least until MindShift Gear comes up with yet another winner.
 
Once you’ve got the hang of using the BackLight 26L, you can be assured of retrieving the camera and grabbing that shot when the opportunity to photograph a 10-point buck presents itself or ducking the camera back in the bag when that buck starts eyeing you suspiciously. There are definitely times when you do not want to put a pack down on the ground and turn your back on an animal just to get inside the bag.
 
So, the next time I find myself ankle-deep in mud or knee-deep in fresh powder, you can bet I’ll figure out a way to work around the hat, vest, and jacket I’m wearing and keep the BackLight 26L on my person as I retrieve the camera, change lenses, or return the camera to the bag. 
Capsule Comments
Sturdy, well crafted, stylish yet practical, does a great job protecting my gear.

Where can I get more info?
MindShift Gear BackLight 26L
 
Manufacturer:
MindShift Gear
 
How much is it?
Direct: $249.99 (same price at B&H, Adorama). 
 
Specifications
Exterior Dimensions: 11.4” W x 20.3” H x 7.9” D (29 x 51.5 x 20 cm)
Interior Camera Compartment: 10.2” W x 19.3” H x 5.9” D (26 x 49 x 15 cm)
Laptop Pocket: 10” W x 15.3” H x 1”D (25.5 x 38.8 x 2.5 cm)
Tablet Pocket: 9.3” W x 10.2” H x 0.6” D (23.5 x 26 x 1.5 cm)
Total Volume: 26L
Weight: 3.9 lb (1.8 kg)

3 Comments

Field Review – Think Tank Photo’s Retrospective Leather 5 Elegantly Compact Shoulder Bag

12/11/2015

0 Comments

 
PictureThat's me wearing the Retrospective Leather 5 while shooting the full moon over the New York skyline from New Jersey. Photo ©Denis Finnin. All rights reserved.
Right off the top let me say that I’m not a shoulder-bag guy. In fact, I loathe shoulder bags. Want to know why? Look at any photographer who walks around stoop-shouldered from bearing the burden of a ton of gear on one shoulder. Even slung over the neck, it’s a wearisome weight to carry around. So why am I writing about Think Tank Photo's Retrospective Leather 5 shoulder bag, you ask?

Well, let me just add this. There is decidedly a place for a shoulder bag - for some people, on certain occasions. If I were a wedding photographer, I wouldn't want to show up at a wedding wearing the backpack I normally use. 
 
But I’m not a wedding photographer. In my role as nature/wildlife photographer and travel/street shooter, I head out these days with one of my MindShift Gear photo backpacks. When I have to travel light, as when I'm flying, I carry gear in my Think Tank Photo StreetWalker pack, because it’s compact yet holds a fair amount of gear - and it will fit under the airline seat in front of me. Provided I’m not carrying my clothes in a second, larger backpack, that is - which would be the case in this instance. Toting two backpacks just didn't make much sense. Which brings me to this compact shoulder bag.

My Camera Bag Solution 
For my recent trip to New York City, I needed a small camera bag, one that would easily fit inside the backpack. I wanted my hands free of any additional luggage and didn't want anything else hanging off my shoulder. What's more, if I'd decided to carry it separately, the bag had to be small enough to easily pass as my “personal” carry-on item when boarding the plane. 

That carry-on backpack, by the way, was originally a photo backpack from which I’d removed the padded insert. And, no, it’s not one from Think Tank Photo or MindShift Gear – I’d never relegate those packs to such lowly a task. I’d stopped using photo backpacks from other manufacturers to carry photo gear because I realized that they were not as comfortable or as practical or as protective of my gear as these packs from MindShift or Think Tank.

I knew of one bag that would fit my needs for this trip. My solution was Think Tank Photo’s Retrospective Leather 5, the smallest size in this series.
 
What I Had in Mind for This Bag
On this New York trip I was planning to carry my Nikon D610 with Tamron 24-70mm f/2.8 VC lens attached. And this bag was the perfect size for that. I wasn’t planning to take extra lenses.

I often set out with just one lens to challenge myself to explore the different perspectives and viewpoints in my compositions this lens would allow. What I especially like about this 24-70mm lens is that it’s image-stabilized. And it’s a great all-purpose lens, especially under dim lighting conditions!
 
What’s more, I don’t like carrying body and lenses detached because that slows down your response time immeasurably. Yes, carrying separate components – body and lenses - would have allowed me to carry an extra lens – but then what happens when you have to put the camera away, especially in a rush? There would be no room, unless you detached the lens. So why start out at a deficit was my argument! Not to mention, you may not be in a dust-free or weather-conducive environment when it comes time to attach or change lenses, or somewhere that you’re comfy letting your guard down while messing with the camera.
 
Oddly enough, I still had room for one more key item: my flash. I was able to comfortably stuff my Nikon SB-700 into the outside front pocket without bulking the bag out much. Yes, there was room for the flash inside the bag, but I found it hindered quick access to the camera, and worse, got in the way when trying to replace the D610 inside the bag. This proved to be the best and most practical carrying solution, giving me easy access to camera and flash.

(I should also note that I wear a photo vest - a great way to carry lots of small stuff, including a pocket camera, while getting around carry-on restrictions, although it does go through the airport security scanner, along with my bags.)
 
Retrospective Leather 5 Key Features
The leather Retrospective is a more elegant version of the all-canvas version released several years back. Not that the original wasn’t stylish in its own right. Still, leather, especially when it’s of good quality, does have a nice ring to it. And it’s considerably more fashionable. The leather series comes in three sizes, whereas the original Retrospectives are available in numerous configurations.
 
Here are the key features, from a Think Tank Photo press release (with my comments/observations added).

  • Hook-and-loop “Sound Silencers” eliminate the noise of front flap hook and loop. (You can take this route and use the clasp, but I found it’s faster and easier to work with the hook-and-loop fasteners, if a bit noisier - but easily overlooked on a noisy New York City street. For quicker access maybe just silence one of the fasteners.)
  • High quality YKK zippers, metal hardware, leather accents, premium build. (The YKK zippers really do make a difference in any bag. There’s plenty of leather, so it’s more than just “accents.” From what I’ve read on the Internet, Dakota leather, which is used here and by BMW, is very durable. But don’t expect that heavy leather smell, which, frankly, I was looking forward to.)
  • Adjustable cushioned nonslip shoulder strap for all day comfort. (Works nicely! That said, I wear the bag sling-fashion, which is doable with a light load. The strap webbing goes all the way around. This level of support is especially important in the largest bag.)
  • Easily accessible front organizer with key tether. (I never use key tethers in a bag, but I can appreciate the organizer pocket. There are also side pockets that hug the bag – perfect for spare batteries, although batteries should be stored inside the bag in freezing cold weather to take advantage of the insulation.)
  • Stiffened, padded removable dividers. (Since I carry the camera with lens attached, I take some of these dividers and form an added cushioning layer at the bottom, as a buffer in case I set the bag down too hard. I do the same with all my backpacks. Essentially, I “float” these dividers so there’s a layer of air underneath, which still leaves plenty of room to position the camera with the grip up for a fast grab. And there's room to stow small items such as filters in this new "compartment.")
  • Inner zippered pocket for important documents. (I keep overlooking this option. There’s also a zippered pocket on the back, against your body. There is also a pair of inner side pockets for batteries in cold weather.)
  • Removable carrying handle for grab and go convenience. (Don’t remove it. When you board the plane, tuck the shoulder strap inside – it’s not detachable. Now carry this more compact bag by the handle and conveniently stow it under the seat in front of you.)
  • Webbing attachment points to accommodate modular pouches or a carabineer. (I attach a water bottle or pouch here on either side.)
  • Seam-sealed rain cover included. (Very, very nice touch!)
 
In the Field
For starters, the bag was a perfect fit under the seat in front of me, even on a relatively small commuter jet, Endeavor Air, to be specific.
 
Because the bag was so small and held a minimum amount of gear, carrying it was not uncomfortable in the least. In fact, I slung the shoulder strap over my neck. I hate it when a shoulder bag keeps sliding off the shoulder. ​I should add that the shoulder pad on this bag is quite nice, with strips on the underside designed for a secure purchase on the shoulder.

​Still, simply carrying the bag on your shoulder invites someone on the street to grab it. Which is also a good reason for using a sling strap on the camera. And, thankfully, there was room enough for that camera sling strap as well inside the bag.

Picture
Retrospective Leather collection. Courtesy Think Tank Photo.
​Concluding Remarks
If you’re into shoulder bags and, like me, don’t want to get weighed down with a big bag, then Think Tank Photo’s Retrospective Leather 5 is the perfect choice.

Of course, if you’re a wedding or portrait shooter, the Retrospective Leather 30, the largest in this new series, would be a logical alternative to a roller case, especially if you constantly need both hands free to shoot while moving about. And it would reflect a certain air of professionalism and sophistication while providing quick access to gear.
 
But, again, I needed a bag that was compact and lightweight and would hold just one DSLR with wide-to-tele zoom attached, and this was a good fit.

​Whether boarding a plane, or walking around the streets of New York or in the subway system, or shooting in the American Museum of Natural History, I always felt assured that I had my camera readily accessible and well protected.
Capsule Evaluation
Very practical, very well constructed - and spiffy.

Where can I get more info?
Think Tank Photo Retrospective Leather 5
 
Manufacturer:
Think Tank Photo
 
How much is it?
Direct: $199.75 (same price at B&H, Adorama).
0 Comments

Epson SureColor P600 Wide Format Printer Review:  User-friendly, desktop, 13x19-inch pigment-ink inkjet printer with wireless capability

12/3/2015

3 Comments

 
​With few exceptions, and largely due to publishing demands, printer reviews are written rather hastily. I decided to take my time with this one to see how well this printer would do when left idle for weeks at a time. Usually that’s when you see problems crop up with the print heads. Well, the Epson SureColor P600 performed admirably right after I unpacked it and months later, after extended periods of idleness – without a hiccup, where the print heads were concerned. Ink delivery was always spot on, to borrow a British expression. And in contrast to some competitive products, installation was a breeze and operation went smoothly, for the most part. The only glitches lay entirely on my shoulders.
 
A Little Background
I’ve used Epson printers exclusively for many years. Some years back I reviewed the Stylus Photo R2880—an early predecessor to the new P600 in the 13x19-inch printer arena. And I fell in love with that printer. One of the things lacking, however, was wireless capability.
 
Both the R2880 and P600 are 9-ink cartridge systems, with one substantial difference—well, actually more than one, as you’ll soon see. The one particular feature that annoyed me when I worked with the R2880 was that I had to exchange ink cartridges – matte in place of photo black, or the other way around – when using matte or glossy paper, respectively. To top it off, I couldn’t feel assured that the removed cartridge would remain viable for long, despite being stored inside two zipped baggies.
 
Well, the new SureColor P600 remedies both situations. It features wireless connectivity. So now I don’t have to feel claustrophobic with a large desktop printer fencing me in or have to deal with tripping over overly long USB cables when the printer was positioned some distance away (or having to plug/unplug the cable each time I used the printer to get around that problem).

What’s more, this printer employs both matte and photo black inks as part of the 9-ink system—without you having to physically swap them out. Meaning, they both reside inside the printer, ready to go when called upon.

And there are of course numerous other improvements, not least of which is the new and improved ink set - Epson UltraChrome HD (it seems everyone likes to get in on the “HD” craze these days).
 
Features at a Glance
  • Advanced media handling up to 13 inches wide – front-in and front-out paper path; print with a wide variety of media, including fine art papers; roll-paper printing for panoramas over 10 feet long (roll-paper holders included)
  • New ink set with denser blacks – Epson UltraChrome HD pigment ink delivers black density richer than previous Epson pigment ink printers for the richest blacks
  • Greater productivity with high-capacity cartridges – nine 25.9 ml pigment ink cartridges with auto-switching photo and matte black inks
  • Versatility – prints on canvas, art boards, and CD/DVDs
  • Intuitive interface – easy-to-use 2.7-inch tilting touch panel color LCD
  • Optimized dot placement – for more precise dot placement and enhanced image quality
  • Professional control – Advanced Black-and-White Mode for professional level neutral or toned B&W prints
  • Enhanced connectivity – Apple AirPrint and Google Cloud Print support; USB 2.0; Wireless n, Wi-Fi Direct, and 100Mbit Ethernet
 
What’s Special About the P600
First, it’s sleekly styled yet unassuming in design, with functionality standing at the forefront. The very inviting interface consists of a control panel with three buttons and touch panel, making the P600 even less intimidating to first-time wide-format printer users than the R2880.
 
Second, it’s fairly easy to set up and use right out of the box. You don’t really have to know anything about inkjet printing to get started right away, although it does help to have an understanding of how to get prints to look the way you want them to. Everything went smoothly, from unboxing to setup and making my first print.
 
Third, the P600 features an Advanced Micro Piezo AMC print head with ink-repelling coating technology incorporated in the new ink set. The nozzles lay down ink with a minimum droplet size of 2 picoliters (compared with 3 picoliters on the R2880). And I can’t emphasize it enough: You no longer need to switch out photo and matte black – the printer automatically selects the correct ink (based on paper settings). You have to see the results for yourself to fully appreciate all of this.
​Setting Up the P600
Setting up the printer was a breeze. The toughest part probably was removing all the packing tape. Just follow the instruction sheet and you should be fine.
 
Ditto installing the print cartridges.
 
Except one thing: when inserting a cartridge, make sure you hear it snap into place. I initially installed them just short of that when I realized my mistake—it takes a bit more pressure to get the cartridge to go down all the way—click! Oh, and be sure to shake each cartridge (gently, you’re not on the dance floor) and be super-diligent to remove the yellow tape (hard to miss when it’s practically staring you in the face).
One more thing, if you’re new to inkjet printing, especially on Epson, be careful to not touch the green chip on each cartridge. That chip is how the printer communicates with the cartridge, and vice versa.
 
When setting up, once you plug in and turn the printer on, don’t leave it idle too long, or the display will black out. If and when that happens, don’t touch the screen if you haven’t completed the setup process. I made that mistake and ended up choosing German as my language. With a little backtracking, I managed to correct the error. Henceforward I learned to simply hit the power button to turn the display back on.
 
It does take the printer a few minutes to initialize for the first time, which includes charging the print head. But once that was done, I was ready to print.
​Printing with the P600: Auto Sheet Feeder
I can’t emphasize enough how effortless the process of printing was with the P600, at least when using auto sheet feed. That is, once I made one or two adjustments.
 
There were a few critical settings that I had to make in Lightroom and in the Epson printer software before printing: namely, setting paper type and size and setting Epson color management (managed by printer, not Adobe Lightroom, the software I used for printing). Using Epson color management follows Epson’s recommendation, and I have to say it was on the money. I was especially pleased with prints that featured good color depth, rich colors, and clean blacks and whites. There was no need to soft-proof when following this approach. (Some may argue with this.)
 
Printing on Fine-Art Paper: Manual Feed
This is where things can get a bit tricky. Nothing bad, only somewhat circuitous. Be sure to follow the instructions to the letter. The most prevalent problem I encountered was with the paper being fed askew (ever so slightly, I might add). I figured out a workaround: I place a finger along the edge of the paper to make sure it lies flush against the right side—with very gentle pressure, releasing as the paper starts to feed. (Manual feed is actually semi-automatic: once you’ve positioned the paper and directed the printer to move to the next step, the process once again becomes fully automatic.)
 
Once the paper is ready at the printer’s end, you can return to the computer and click Print (or make your settings, if you hadn’t already done so).
​
Don’t be intimidated. On-screen prompts (on the printer, not the computer) guide you step by step. Just be sure to position the paper with the print side up. If you get an error message after you hit Print on your computer, retrace your steps. In your software, make sure you’ve set the correct paper type, set “Matte” (where applicable), and set the applicable color management (for Epson papers, I used “Managed by Printer”). There was no need for Print Adjustment. Again, I’m using Lightroom CC for my printing.
 
Manual feed works with fine art media with a thickness ranging from 0.012 to 0.028 in. (0.3 to 0.7mm). Unfortunately, paper thickness on the package is given in “mil.” (Equivalent values in “mm” are given below.)
Working with Epson Papers
Epson sent a generous selection of papers, mostly letter-size, but also one 13x19 pack. A fellow photographer that I showed sample prints to was duly impressed by the output.

My recommendation is to limit switching back and forth between papers requiring different black inks. More to the point, gang all jobs that use either photo or matte black ink together, where possible. As it turns out, you waste considerable ink in the process, as Jon Canfield pointed out in his review of the larger Epson SureColor P800 on shutterbug.com. This would, of course, apply to any papers, regardless of manufacturer. By the way, the P800 would be a good desktop choice in a 17-inch printer if you don’t want to step all the way up to a floor-standing model but still want larger prints that the P600 can deliver.
 
The papers I tested, and which produced truly admirable and striking results, included the following. But what it really comes down to is this: You have to try each of these (and the other available Epson papers) for yourself. Choice of paper is always personal, although end use and subject may dictate or at least influence those choices.
 
Epson Photographic Papers (papers tested with photo black and auto-sheet feeder). Sheet size tested shown.
 
PERSONAL OBSERVATION: a good choice for everyday printing, although, of the three listed, I tend to favor the metallic media for their added depth.

  • Ultra Premium Photo Paper Luster (letter-size & 13x19). 10 mil (= 0.254mm). USAGE NOTE: a more economical, all-around paper – really handy, especially if you’re handing out free or sample prints.

  • Metallic Photo Paper Luster (letter-size). 10.5 mil (= 0.2667mm). USAGE NOTE: according to the guidelines that came with this paper, it should use the manual feed slot, although I had no problem using the auto-feeder. I like the look and feel of these metallic papers. It’s different.

  • Metallic Photo Paper Glossy (letter-size). 10.5 mil (= 0.2667mm). USAGE NOTE: according to the guidelines that came with this paper, it should use the manual feed slot, although I had no problem using the auto-feeder. Choose Glossy if you prefer a slicker look.
 
Epson Fine Art Papers (papers tested with matte black and manual sheet feed). All tested papers were letter-size.
 
PERSONAL OBSERVATION: I love these papers! I don’t know why anyone would use papers from another manufacturer, especially given the fact that, in combination with the P600, prints come out deliciously rich without soft-proofing or profiling.

  • Exhibition Watercolor Paper Textured (letter-size). 22 mil (= 0.5588). USAGE NOTE: you can fairly easily detect the printable side. It has a rough feel to it. The prints have a soft, painterly quality, but with a certain richness to them.

  • Velvet Fine Art Paper (letter-size).  19 mil (= 0.4826). USAGE NOTE: I don’t know why Epson clearly labels some print packages as the printable side and not others. In this case, much more so than the watercolor paper, it’s difficult to discern the printable side – even by touch. When I have difficulty, I hold my papers up to the light at an angle to see which side looks more heavily textured – look for an embossed (stippled/dimpled) look. If that doesn’t work, a neat trick is to very mildly dampen thumb and index finger (saliva will do – apply to one finger then gently rub fingers together); next, hold the paper between these two fingers, pressing firmly, on one corner (supporting the rest of the sheet so it doesn’t bend). Whichever side really sticks – that’s the printable side. However, if you print full-bleed (borderless), this may mar the print in that corner, so proceed with caution. This is my favorite paper of those tested for this review. Prints have a tactile quality and beautiful depth, yet easily hold their crisp clarity.

  • Hot Press Bright (letter-size).  18 mil (= 0.4572). USAGE NOTE: even though the package label identifies the printable side, both sides are printable (from information gleaned from other Epson websites). On the P600, select the option Ultrasmooth Fine Art paper.
 
You can find more information on Epson professional imaging media by clicking here.  
 
Epson also sent a couple of roll papers, but I didn’t have any panoramas that I felt worthy of using that much ink. When I do, I’ll update this review. (One of these rolls is canvas, and previous experience has taught me to be careful when using this substrate, to prevent clogging of print heads. So, even though it’s possible to simply print standard print sizes and manually cut as needed, I’m opting not to go this route.)

​Conclusions:
The Epson SureColor P600 is a great choice, whether you’re stepping up from a letter-size or all-in-one printer or updating your current wide-format workflow. It’s easy to use, and, in combination with Epson papers, delivers output of outstanding quality.

I should point out that Advanced Black-and-White Mode was particularly beneficial and rewarding for monochrome printing. (This setting is found under Printer Settings/Print Mode under Print Settings.) You have a choice of neutral, cool, warm, or sepia.
 
If you’re looking to treat yourself this holiday season or to treat that special photographer in your life for the holidays, this 13x19 printer would be a solid and affordable investment. Keep that small printer for the daily grind and dedicate this printer to producing meaningful, archival, artistic prints you and others will appreciate and treasure for years to come.

Want a Less Expensive Large-Format Experience?
Give the Epson SureColor P400 a try. This machine is not quite on the same level as the P600, but it’s an easier-to-use starter printer for large format (13x19 in.) and may be more economical overall. It’s still a big step up from letter-size printers (in terms of overall quality) and an even bigger step up from all-in-ones, especially for those of you who only print occasionally but still want top-quality output. I haven’t tested this one so I can’t compare. As for myself, I’ll stick with the P600.
​
For more information, click here.

Click here to read Jon Canfield's excellent review of the Epson SureColor P800 on shutterbug.com.
SureColor P600: What’s Cool…
  • Sleek styling
  • User-friendly touch-screen interface
  • Quick startup (relatively speaking)
  • No need to manually swap out photo and matte black cartridges (it’s automatic)
  • Wireless control (goodbye USB cable – unless you choose that route)
  • Ink cartridges appear to last a long time (enough for numerous letter-size prints)
  • Epson color management leads to usable prints without soft-proofing or profiling, when using Epson papers (based on a sampling of Epson’s professional imaging media)
  • Advanced Black-and-White Mode is really cool!

…And What’s Not
  • Manual feed for fine-art papers can be tricky (requires a little care and patience - but don't read too much into this: it really is fairly straightforward)
  • Auto-swapping of photo/matte black ink uses up considerable ink in the process (stick to papers using either ink alone as much as possible)
 
SureColor P600: Best Use
  • Professional imaging applications, including fine art and archival printing.
 
Worst Use
  • Office documents, PDFs, and things of that nature would be a waste of this printer’s talents, albeit doable.
 
Where can I get more info?
Epson’s website (click here for the P600 page).
 
Manufacturer:
Epson
 
How much is it?
Direct: $799.99 ($549.99 after $250 mail-in rebate) (On back-order at this time at B&H 
and at Adorama.)
 
Ultachrome HD Ink for the P600:
$31.99 per cartridge (you may be able to save by buying all 9 cartridges in one kit)
 
Technical Specifications
Click here. 
 
What’s in the Box
  • Epson SureColor P600 Photo Inkjet Printer
  • Power Cable (USB and Ethernet cables not included – but you shouldn’t need them if you go wireless)
  • 9 UltraChrome HD ink cartridges (Photo Black, Matte Black, Cyan, Vivid Magenta, Yellow, Light Cyan, Vivid Light Magenta, Light Black, Light Light Black)
  • Roll-paper holders
  • CD print tray and software
  • Accessory box
  • Printer documentation
  • CD-ROM containing printer drivers and software (Windows and Macintosh)

3 Comments

    Reviews

    TECHNICAL EDITOR
    Jack Neubart


    Archives

    December 2019
    September 2019
    August 2019
    July 2019
    May 2019
    April 2019
    February 2019
    November 2018
    September 2018
    August 2018
    May 2018
    January 2018
    November 2017
    September 2017
    July 2017
    June 2017
    May 2017
    April 2017
    February 2017
    December 2016
    November 2016
    October 2016
    August 2016
    July 2016
    May 2016
    April 2016
    March 2016
    February 2016
    January 2016
    December 2015
    August 2015
    December 2014
    August 2014
    July 2014
    April 2014
    November 2013
    October 2013

    Categories

    All
    13x19-inch Printers
    35mm-style Digital Cameras
    Acratech
    Adobe Software
    Austin
    Backpacks
    Ballheads
    Camera Backpacks
    Camera Bags
    Camera Cases
    Camera Holsters
    Camera Luggage
    Camera Supports
    Canon Cameras
    Canon Lenses
    Compact DSLRs
    Compact Photo Printer
    Compact System Cameras
    Desktop Printers
    Digital Projectors
    Digital Retouching
    Digital SLR
    DSLR
    Epson
    Exposure Control
    Fashionable Bags
    Fast Lenses
    Film Emulation
    Flash Photography
    Hawaii
    HDR Plug-in
    HDR Software
    HD SLR
    HD-SLR
    High-resolution DSLR
    Holster Bags
    Image-editing Software
    Image-stabilized Lenses
    Inkjet Printers
    L Bracket
    L-bracket
    Lens Cases
    Lenses
    Lens Pouches
    Leveling Base
    Long-lens Bags
    Macphun
    Macro
    Macro Flash
    Manfrotto
    Mega-zoom Digital Camera
    MindShift Gear
    Mirrorless Cameras
    Nikon Cameras
    Nikon Digital Cameras
    Nikon Mirrorless
    Nikon Pro Digital Cameras
    Nissin
    Nodal Rail
    Nodal Slide
    Olympus
    Outdoor Photography
    Panorama Head
    Panoramas
    Panoramic Photography
    Photo Accessories
    Photo Backpacks
    Photo Belts
    Photo Luggage
    Photo Rollers
    Plug-ins
    Point-and-shoot Zoom
    Portrait Retouching Software
    Printer
    Pro Cameras
    Pro Digital Cameras
    Radio Remote Flash
    Radio TTL Wireless Flash
    Rain Covers
    Rain Hoods
    RAW Conversion Software
    Review: Photo Accessories
    Review: Phottix Odin Radio Remote
    Review: PocketWizard ControlTL
    Review: Software
    Ring Flash
    Rolling Cases
    Samsung Cameras
    Shimoda Designs
    Shoe Mount Flash
    Shoulder Bags
    Shutterbug.com Review
    Shutterbug Magazine
    Sigma Lenses
    SKB Cases
    Sling Bag
    Sling Bags
    Sling Pack
    Snapshot Printer
    Software
    Software Effects
    Super Wide Lenses
    Super-wide Lenses
    Superzoom
    Tamron Lenses
    Telephoto Zooms
    Tenba
    Texas
    Think Tank Photo
    Tripod Heads
    Tripods: Carbon Fiber
    TTL Radio Wireless Flash
    TTL Wireless Flash
    Ultra Wide Lenses
    Ultra-wide Lenses
    Ultra-zoom Digital Camera
    Wide Format Printers
    Wireless Flash
    Zoom Lenses

    RSS Feed

    All products and services are the trademarks or registered trademarks of their respective owners.
    Use or mention of any product or service is not an endorsement - compensated or otherwise.
    However, manufacturers, distributors, vendors & services may provide products or services for use.

    Your purchase and/or use of any product or service tested, reviewed, listed or mentioned is solely at your discretion and you release us from any and all liability associated with such purchase and/or use.

Your satisfaction, our expertise. They go hand in hand.
Bringing over 35 years' experience into everything we create.

Entire contents of this website is comprised of original works created by Jack Neubart, including but not limited to photographs, digital work, musical compositions, stories, humor, poetry, and any other artistic or textual material. 
All work Copyright ©2021 Jack Neubart and is protected under United States and International laws and treaties.
All rights reserved. None of the contents may be copied, extracted, abstracted, adapted, transmitted, digitally altered, or otherwise used or published without express permission of the Copyright owner.
Webmaster: Jack Neubart (building on a Weebly.com template).