pixelPERFEXION™
pixelPERFEXION.net
Site contents ©2025 Jack Neubart. All rights reserved.
  • Home
  • Reviews
  • News/Views
  • About
  • Contact

DxO PureRAW 5 Review: Start Raw Image Processing Here

5/28/2025

1 Comment

 
By Jack Neubart
Photographer, photo-technical writer, musician/composer, software developer, birder.
Text and images ©2025 Jack Neubart. All rights reserved.
Picture
Racccoon, Indiana Dunes State Park. Now free from the digital noise that plagued this image. Processed in DxO PureRAW 5 (DeepPRIME XD2s/XD) and edited in PhotoLab 8. Series ©2025 Jack Neubart. All rights reserved.
Let’s face it. We don’t really pay attention to the Raw processing engine behind the software we use to edit our digital images. So why should we spend money on a dedicated application?
 
Well, once you try DxO PureRAW 5, you’ll be convinced. At the very least, this review will introduce you to the advantages of DxO’s DeepPRIME technologies, a feature we only glossed over when reviewing DxO PhotoLab 8. And if you want to stop at denoising and demosaicing via PhotoLab 8, then all well and good. But as you’ll see, there are benefits to be had from PureRAW 5 beyond what even PhotoLab 8 can deliver.

​DxO PureRAW 5 software generously provided by DxO. Version tested: 5.1

Read More
1 Comment

DxO PhotoLab 8 Review: Raw Image Editing for the Consummate Image

5/13/2025

1 Comment

 
By Jack Neubart
Photographer, photo-technical writer, musician/composer, software developer, birder.
Text and images ©2025 Jack Neubart. All rights reserved.
All original photos processed in DxO PhotoLab 8.
Picture
Golden-crowned Kinglet, Magic Hedge, Montrose Point Bird Sanctuary, Chicago. ©2025 Jack Neubart. All rights reserved.
The first thing that becomes abundantly clear the moment you step on DxO PhotoLab 8’s turf is that you’re genuinely engaged and focused on your task: You work methodically to make the image the best it can be. You’re not entering a funhouse filled with whimsical illusions and seemingly magical transformations. You’re here to do a job. And that’s serious business.
 
Not that PhotoLab 8 isn’t fun to use. It is, but only up to a point. This Raw image editor takes itself very seriously – and for good reason. That’s because it has earned the right to do so. It comes replete with all the necessary tools to deliver a photograph you can proudly display, publish or gift.
 
And let me tell you: it’s mesmerizing. I can’t pull myself away from the computer. Fact is, I'm constantly drawn back and keep finding more and more images to edit. And sometimes it's just to revisit an image and fine-tune the edits already done. It's challenging. And, yes, it's fun.

Read More
1 Comment

Luminar Neo Review: Digital Image Editing with the Magic of AI

4/28/2025

 
By Jack Neubart
Photographer, photo-technical writer, musician/composer, software developer, birder.
Text and images ©2025 Jack Neubart. All rights reserved.
All photos processed in Luminar Neo.
Skylum’s Luminar Neo is fully immersed in AI, with a special shout out to Generative AI. One might say that artificial intelligence (AI) is the raison d’etre behind this software’s existence. Nothing wrong with that. AI and, particularly, Generative AI are merely additional tools in our photographic toolbox. AI is a means of expressing yourself, just like choosing which software you use for processing, which paper you use for printing or which brush, pigments or canvas an artist uses when painting. These are all individual choices.
 
With that tirade out of the way, let’s move on to ask what Luminar Neo can actually do for you. Can it take the mundane and make it extraordinary? Can AI imbue Luminar Neo with what’s needed to take you on a journey of exploration you’ve only dreamed of? More importantly, can Luminar Neo truly help you realize your creative vision? We shall see…
 
(Note. Skylum provided me with a one-year license, which includes all Generative AI features and updates.)
Picture
Martians Enjoying Fireworks. The fireworks (emanating from Chicago's Navy Pier) were cut off at the top. Initially, I lived with it but wanted more. Along came Skylum's Luminar Neo with its toolbox of Generative AI options. So I expanded the canvas upwards and directed the software to fill in the gap and add the UFO. Photo ©2025 Jack Neubart. All rights reserved.

Read More

Affinity Photo 2 Review: A Full-bodied Digital Imaging Application – Powerful, Yet Intuitive

4/22/2025

 
​By Jack Neubart
Photographer, photo-technical writer, musician/composer, software developer, birder.
Text and images ©2025 Jack Neubart. All rights reserved.
All photos processed exclusively in Affinity Photo 2.
PictureCzech Glass Egg (souvenir from Prague). Tone Mapping and Liquefy Personas played a key role in creating this image. ©2025 Jack Neubart. All rights reserved.
A key ingredient behind any digital imaging application worthy of your time and money is that it helps you realize your creative vision, letting you recapture in that image, or meaningfully enhance, what you saw in your mind’s eye at the moment of exposure. On that score, Serif’s Affinity Photo 2 delivers admirably, with many of the tools we need and an intuitive, user-friendly workflow that works.

Picture
Original. A remotely triggered Nikon shoe-mount flash was positioned off-camera, beneath a milk-white glass tabletop, with a decorative red paper backdrop added for contrast. When I purchased this souvenir, I envisioned this lighting treatment. What I did not envision was taking the image to the next level. ©Jack Neubart. All rights reserved.
​What essentially makes Affinity Photo 2 eminently practical is that it combines a Raw processing engine, where you add the critical ingredients required to properly cook the image, with a digital image editor, which adds the garnish to give it just the right flavor and bakes in the finishing touches – and does all that in one package. On top of that, Affinity Photo has a few tricks up its sleeve to season the image just the way we like it – or even surprise ourselves by achieving what we could only imagine.

​It gets even better. Serif has managed to keep the price within easy reach and did so without bogging us down in tiresome subscription models. It’s simply a one-off purchase. Buy it once, it’s yours forever – through every succeeding iteration! That alone is saying a lot these days. (If you’re of a mind that a freebie imaging application is a better deal, think again. You’ll be missing out on quite a bit.)

Read More

Photoshop 2025 Review: Part 1 - Just Like a Fine Wine, Adobe Photoshop Improves with Age, but Also Develops More Complex Flavors, Textures and Tones

4/2/2025

 
​By Jack Neubart
Photographer, photo-technical writer, musician/composer, software developer, birder.
Text and images ©2025 Jack Neubart. All rights reserved.
​Picture it: the sun rises slowly, as if pacing itself, revealing the dawn of humankind. (The orchestra plays the theme to 2001: A Space Odyssey, hitting a resounding crescendo, then slowly fading as another image emerges…) On the horizon lies a figure of massive proportions, soon to be awakened, and, once awakened, finds itself propelled forward. The flurry of movement is beguiling and bewildering. Upon reaching the digital stage, it will have reached a pinnacle of being. It will rise on eagle’s wings and soar into the heavens!

Well, that may be a passable opener for a novel, but, really, it’s not that far from the truth. Adobe Photoshop has been around for a long time. And I’m happy to say, I had the pleasure of working with this giant of digital image editing in its formative stages.
​
Back then, I was new to image editing, as were we all. And, truth be told, I was a bit intimidated by all this new technology. There was a handful of notable editing apps out there back then – I tested them all. But, of those, Photoshop was the only one to stand the test of time. And, yes, it has soared, if not on eagle’s wings, then certainly on its own merits.
Picture
Okay, it's actually a sunset, but you get the picture. And it was processed in Adobe Photoshop 2025. ©Jack Neubart. All rights reserved.

Read More

Software Review: Lightroom Classic or Lightroom CC – Which RAW Image Editor Is Right for You?

1/3/2024

 
By Jack Neubart
Photographer, photo-technical writer, musician/composer, software developer, birder.
Picture
Clown Face from Inner Space. This is a reimagining of Chicago's famous Cloud Gate sculpture, popularly known as "The Bean," (masterfully designed by sculptor Anish Kapoor) when viewed from underneath its dome. Most views of this sculpture are shot from outside, but you'll experience a wondrous journey once you step inside. Shooting from different angles yields different results, as does shooting with different focal lengths. This was shot with an ultrawide lens. Editing here was miminal - but Lightroom CC  did the job needed. ©Jack Neubart. All rights reserved.

Adobe Photoshop Lightroom Classic has been my go-to for RAW image processing for the longest time. Yes, I may have wandered afield on occasion – but I always came back.
 
When Adobe adopted a subscription model for their software, Lightroom Classic found it had a younger sibling, in the form of Adobe Lightroom CC. But I could never be bothered with this new arrival beyond a passing glance. Until now. The time has come to take a deep dive into Lightroom CC and see how it compares with its older sibling. Should I adopt a new strategy in my ever-evolving universe of digital image editing or stick with the tried-and-true? Let’s find out, shall we?
 
This is a no-holds-barred, take-your-gloves-off-and-get-in-the-ring face-off between two imaging tools designed to help us squeeze out every last ounce of flavor a RAW image has to offer. (JPEGs have less potential, but they’re still on the table.) However, if you’re expecting a clear winner and loser, think again. These are both very capable applications. It’s just that they target different audiences. And, perhaps more importantly, one is considerably less expensive, but does come at a tradeoff.
 
Desktop versions of Lightroom Classic and Lightroom CC are currently the topic of discussion.
​We’ll examine Adobe mobile imaging apps at a later time.
Picture
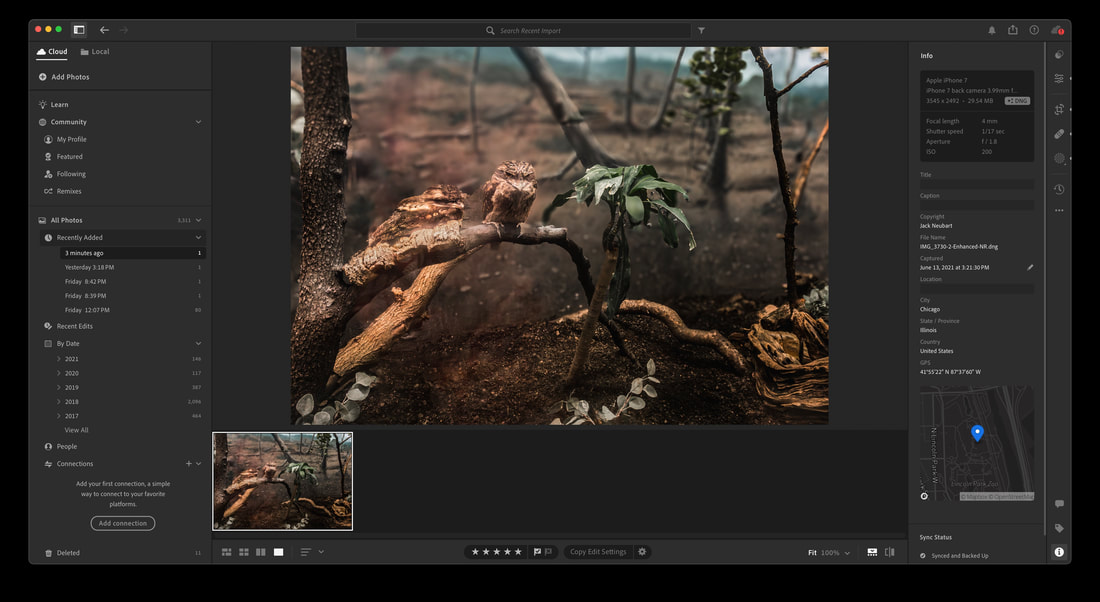
Lightroom CC interface with Info panel. For details on this image, see below. ©Jack Neubart. All rights reserved.

Read More

Software Review: Lightroom Classic (Release 13.1) - My Forever Home for Image Editing

12/20/2023

 
By Jack Neubart
​
Photographer, photo-technical writer, musician/composer, software developer, birder.
Just set up a cot with a large pizza in front of my computer and I’ll delight in the knowledge that all my basic image-editing needs - and then some - are taken care of right here, in Adobe Lightroom Classic.
 
Okay. Perhaps I should take a step or two back before locking the front door and devoting myself to life as a hermit. (Although the idea of eating pizza round-the-clock does have some appeal.) A few questions first need to be answered…
 
Wherefore Art Thou, Lightroom?
Many of us entered the world of image editing via Photoshop, so why venture into a parallel universe? What do we need Lightroom for?  Why should we use it? More to the point, what is it exactly?
 
Sadly, many of us are intimidated by Lightroom. We simply eschew it and go straight to Photoshop. Why? Either we don’t understand Lightroom, or don’t understand it fully, or we don’t appreciate what it can do for us. Well, if you count yourself in that number, I’m here to set the record straight and show you what can be done in Lightroom – and often without even venturing further. But first, allow me to explain what took so long for me to get here…

Fire extinguisher & window. This scene reminded me of a diptych, with two adjoining panels, each telling one part of the story to form a cohesive whole. I was struck by the simplicity of the red fire extinguisher, which made it stand out against the drab street scene below, as seen through the window. I chose to soften the window view even further by using the Lens Blur tool (still in its formative stages), while also desaturating that section of the image. (Someone else might have preferred to retain the color and focus attention on the supporting role the fall foliage might have played.) I generated a Subject mask for the extinguisher to make it stand out more, while copying and inverting that mask for the wall to desaturate and remove color there. Compare with the original image, which had lots of potential, but lacked character. iPhone 7 DNG (RAW) capture/Chromatica software camera. ©Jack Neubart. All rights reserved.

Read More

Field Test: Shimoda Designs Large Core Unit for Explore Backpacks – Extending the Utility of My Favorite Backpack

12/6/2019

 
PictureThis configuration may not look as pretty as the factory-installed version, but it was practical and served my needs. I refashioned the Shimoda large Core Unit so it could easily fit either zoom: the Tamron 100-400mm or 150-600 attached to my Nikon D500. Shown here: camera with 100-400, with room for an added lens (compared to the 150-600 configuration). ©2019 Jack Neubart. All rights reserved.
​When Shimoda originally sent me the Explore 30 for review, the pack arrived with a combination of the two smaller Core Units: the medium and small. Shimoda Core Units are interchangeable gear inserts, fully padded, entirely user-customizable, and of a proprietary design.
 
I was able to fit my Nikon D500 with attached Tamron 100-400mm zoom, a Nikon flash, and a few extras besides inside the medium DSLR Core Unit, which occupied the bulk of the pack’s interior. I also had room for extras that I tossed into the various pockets, including my large Nalgene water bottle in the outside water-bottle pocket (which tucks away when not needed). Since I couldn’t fit the small Core Unit in together with the medium insert, it remained at home, and was relegated to storing lenses for quick and easy access.
 
Enter the 150-600 Zoom
But there was one problem. I also own the Tamron 150-600mm G2 – which is a monster of a lens compared with the almost diminutive (by comparison) 100-400. On its own, the larger lens had no problem fitting in the medium insert – even with lens hood attached (in reversed position), with the camera body snuggled into its own module alongside it. (A “module” is simply a subdivision within the Core Unit, formed by the dividers and/or walls of the insert.)
 
However, I prefer keeping the lens attached to the body for ready access. Besides, you never know what dust and grit and even sand are kicked up when a wind gust kicks in – so I always feel it’s best to start my day on the right foot, as it were, with the lens fitted to the camera body from the outset. Granted, I do change lenses in the field, but I try to minimize these occurrences to when and where the situation allows or when absolutely necessary. But with my gear stowed in the medium insert, carrying and using the longer zoom would unquestionably require me to be a quick-change artist in the field. What to do?
 
After some hesitation, I again reached out to Shimoda, this time asking for the large DSLR Core Unit. After comparing measurements for the large Core Unit and long zoom, I felt assured this would be a good fit for my D500/150-600 combo.
 
Shimoda agreed to send the insert. With the large Core Unit in hand, it was now time to test my hypothesis… (See my earlier review – click here.)


Read More

​Field Test: Tenba Roadie Backpack 20 – Built Tough for the Adventure Photographer

9/10/2019

 
PictureThe Tenba Roadie Backpack 20 is designed to safely carry the gear you need for practically any wildlife excursion. Photo courtesy Tenba.
​Long ago, and seemingly in a galaxy far away (from where I now live, in Chicagoland), Bob Weinreb had set out to design a photo backpack that would be utilitarian and stand up to the rigors of adventure travel. That resulted in the Tenba backpack, one of a select few soft-sided photo luggage product lines that would hit dealer shelves back then.
 
I recall visiting Weinreb’s shop when it first opened in New York City and being impressed by him, the quality of his bags and his dedication. As a professional photographer, he was well aware of what pros needed – and he'd delivered.
 
It’s been awhile since I’d reviewed a Tenba backpack. So I thought a review was long overdue, and chose the Tenba Roadie Backpack 20. Unofficially, this is version 3.
 
How has my impression of the Tenba pack changed over the years, or, for that matter, did it change at all? Read on…


Read More

​Field Test: Think Tank Photo Digital Holster 150 – Think Big

8/6/2019

 
PictureDigital Holster 150, from Think Tank Photo - designed to hold an ultra-long lens attached to the camera for a quick grab. Photo courtesy Think Tank Photo.
Camera holsters are designed with one aim: to hold a DSLR with attached lens ready for a quick grab. The design concept makes sense – for a small outfit. But what about a camera with a humongous lens attached?
 
Let’s cut to the chase. The Digital Holster 150, from Think Tank Photo, is big for its ilk. This bag will carry a DSLR with 150-600mm zoom lens (or equivalent) attached. So how well does it serve that purpose? Read on...


Read More

​Field Test: Shimoda Designs Explore 30 – My New Go-to Photo Backpack

7/28/2019

 
PictureThe Explore 30 photo pack, from Shimoda Designs, is designed for practically any outdoor photo adventure. Photo courtesy Shimoda Designs.
I’ve worked with photo backpacks of every design imaginable, big and small, and always managed to find one thing or another that bothered me about the pack. Perhaps I’m nitpicking, but I like comfort, especially on a long, hot day, and I like a pack that fits my outdoor shooting style – whether that be on remote trails or in more familiar surroundings. Is that too much to ask? In particular, I like shoulder straps that don’t slide off the shoulder and to store gear so that it’s not only well-protected but also immediately visible and readily accessible. And I believe I found just that pack in the Shimoda Designs Explore 30.
 
Still, backpacks come and go in my photo arsenal. So let’s see how the Explore 30 measures up inside and out - and whether or not it has staying power for the long haul.


Read More

​Field Test: MindShift Gear’s PhotoCross 15 Backpack – Lightweight and Fun to Use

5/15/2019

 
PictureMindShift Gear's PhotoCross 15 Backpack. Courtesy Think Tank Photo.
​There’s no question that, when it comes to outdoor photography, whether close to home or far away, my go-to camera bag is a backpack. Which is why I welcomed the opportunity to field-test MindShift’s new entry in their PhotoCross lineup, the PhotoCross 15. So, did the PhotoCross 15 meet all my expectations? Will it become my go-to camera bag on outdoor adventures? And what features set it apart from the traditional sling or backpack? Let’s see…


Read More

​Review: Think Tank Photo’s Vision 15 Shoulder Bag

4/26/2019

 
PictureThink Tank Photo's Vision 15 shoulder bag. Courtesy Think Tank Photo.
​Photo backpacks aren’t for everyone or every occasion. Even hardened backpack users find themselves turning to a shoulder bag or sling bag to carry their precious camera gear. And if you’re looking for a modestly priced shoulder bag that also delivers on quality, then a good starting place is Think Tank Photo. And you might want to consider the new Vision series.


Read More

Field Test Report: Nikon Z 7 FX-format (Full-frame) Mirrorless Digital Camera – Is This Nikon’s Way of Telling Us the DSLR Will Go the Way of the Dodo?

4/24/2019

 
PictureNikon Z 7 full-frame mirrorless camera. Courtesy Nikon.
In what promises to be a growing lineup of mirrorless FX (full-frame) interchangeable-lens digital cameras for the pro and serious amateur, Nikon recently unveiled the 45.7MP Z 7 and 24.5MP Z 6. My mouth watered as I awaited delivery of a Z 7 test camera from Nikon – the “big kahuna” in the new lineup – (with Nikkor Z 24-70mm f/4 S kit lens). While bad weather kept me from spending as much time as I would have liked with the camera, I did manage some quality time with the Z 7 on a number of outings, photographing wildlife, sports, architecture and landscapes, and came away with several clear impressions of this formidable mirrorless camera. (Z 7 firmware version tested: 1.03.)

The Burning Questions
The Nikon Z 7 is undeniably a professional tool. But does it have what it takes to bring countless photographers, especially pros, back into the Nikon camp? More to the point, will the Z-series put a big detour sign on future DSLR development from this manufacturer, perhaps stopping it dead in its tracks, as these new mirrorless cameras pave their own path? And will video shooters find in the Z 7 what they’ve been missing in the D850? Granted, the delay in the Z-series introduction may have weakened the initial foothold Nikon had hoped to gain, but time (and timely innovative product introductions, especially lenses) will tell if this icon in the world of photographic image-making will recapture the adoration of photo enthusiast and pro alike that this company once enjoyed.
 
First things first, however… How did the Nikon Z 7 fare in our real-world tests?
 
Even before that, allow me to add, for the most part, I am bypassing tech specs. You can read tech specs on Nikon’s website by clicking this link. Other reviews get bogged down in them. I won’t waste your time.

​And Questions I Ask Myself
My go-to DSLR these days is the Nikon D500, so I naturally had to compare the new Z 7 with my D500. Of course, one key difference, aside from the mirror, is that the D500 sports the smaller APS-C sensor, compared with the full-frame sensor of the Z 7. But if sensor size were the only factor driving you to the Z-series, then you might consider the D850.
 
The D500 serves me well in my wildlife and bird photography, given the fast 10 fps. And, arguably, the cropped sensor proves beneficial in stretching the reach of my long zooms. And, yes, I also own a full-frame D610, which mostly sits idle these days (until I brought it out to compare with the Z 7, in terms of footprint and interface). But both the D500 and D610 DSLRs are a bit on the hefty and bulky side.
 
Still, the D500 is my go-to, and in testing the Z 7, my overriding thought was: Are the smaller size and weight of the Z 7 enough to sway my thinking toward mirrorless, notably the Z 7 (or any Z-series camera)? And are the newer technologies really relevant to what I photograph, notably wildlife, and my style of shooting? Will this camera benefit me, and, if so, how? Also, is it worth the price of admission and am I willing to replace a number of my lenses just to buy that ticket? Further, how much am I focused on shooting movies? This last factor could tip the scales for many photographers these days, though I'm currently on the fence when it comes to shooting video with a still camera. Read more by clicking this link.

Where Do I Get More Info? (click link)
Nikon USA

How Much Is It?

Nikon Z 7 w/24-70mm kit lens: $3,999.95
Nikon Z 7 body only: $3,399.95


Read More

​Test Report: Think Tank Photo’s Photo Accessories – Designed to Ease a Photographer’s Life on Location

2/8/2019

 
For the most part, I’ve avoided writing about lens pouches and related accessories because, frankly, I rarely use them. But when Think Tank upgraded their lens pouches, protective covers, and photo belts, I thought, hmm, maybe it’s time to reevaluate my decision. Think Tank was generous enough to send a selection of these items for review.
 
Don’t get me wrong: I still prefer to travel light, unencumbered by anything that might weigh me down. But there are occasions when you need that extra something to make your life easier on the trails or even while negotiating the streets, byways and alleyways of a distant shore and, notably, to facilitate lens changes wherever you happen to be, even close to home. The problem becomes even more pronounced when you’re carrying gear in a backpack and the ground is muddy or wet and you can’t find a dry spot anywhere to conveniently set the pack down so you can get at that gear. Or when you’re in a tenuous situation where it might not be prudent to turn your back for the few minutes it takes to access gear from a backpack that’s sitting on the ground (watch out for that buck behind you!). The Think Tank products that neatly fit the bill here are the Lens Case Duo and Lens Changer series.
 
And, speaking of wet, we don’t all use cameras and lenses that have been waterproofed. Even if we do, some added protection against rain and snow and blowing debris couldn’t hurt. That’s when a water-repellent rain hood comes into the picture. And Think Tank offers two solutions to tackle these nasty situations: the Hydrophobia Rain Cover V3.0 and Emergency Rain Cover series.
 
Finally, you may need some means to carry all these accessories conveniently. Attaching lens pouches to a backpack that you’ll first have to remove is counterproductive. And you can’t depend on the backpack’s waist belt since, sooner or later, you’ll be unfastening it, if you even buckle it in the first place, which I rarely do. And shoulder/sling bags don’t all provide attachment points. Besides, the added weight may add to the strain of carrying the bag at your side. And, whereas you could use the belt that holds up your pants, not everyone wears pants – or a belt. And even if you do, carrying accessories on your belt can be a real drag.  So a special belt might be in order. And here too Think Tank comes to the rescue - with the Thin Skin Belt V3.0. The lens pouches we’ll be reviewing are designed to be carried on this belt, as well as the more heavily padded Pro Speed Belt V3.0 (not reviewed here).

Read More

Test Report: SKB Series 2011-7 Case with Think Tank Padded Insert and Lid Organizer (Model 3i-2011-7DL)

11/8/2018

 
PictureSKB model 3i-2011-7DL with Think Tank insert and lid organizer. Courtesy SKB Cases.
​There’s a good argument to be made for using a molded hardshell case, especially one with wheels. And for starters, let’s put it out there in the photoverse… the SKB case model 3i-2011-7DL with Think Tank insert will give you a pretty good ride. But is it a perfectly smooth ride? Read on…


Read More

Test Report: Think Tank Photo’s Retrospective 10 V2.0 Shoulder Bag – Same Chic Styling, Look and Feel, with Added Features

9/12/2018

 
PictureCourtesy Think Tank Photo.
​There is something about Think Tank’s Retrospective shoulder bags that has to be experienced personally.
 
I’d previously tested the leather version of the original series and found it eminently suited to my trip to New York. (Read about it here.) But that was a small bag that I chose because it would fit inside my luggage.  And even before that I’d worked with the original Retrospective. Yet another small bag.
 
This time I thought I’d go for something bigger, but not quite as spacious as MindShift Gear’s Exposure 15. And I certainly wasn’t about to tote around an even bigger shoulder bag, although, if you are of that mind, there are two larger versions of this bag available.
 
I was especially curious to see what improvements were made to this series. I would not be disappointed, though I did find room for improvement.

What’s Old Is New Again
As the saying goes. And that easily applies here. The basic design of the Retrospective revolves around a soft, fabric outer shell with a stylish distressed look– specifically, cotton canvas that is water-repellant. The bag is lightweight, yet ruggedly constructed. And for those heavy downpours, it comes with a seam-sealed rain cover. The wide strap webbing encircles the bag, for a more assuring support (without having to deal with connectors), with the addition of a non-slip, shoulder pad.
 
After reading my review of that earlier Retrospective, it makes me wonder why I gave it away, but one only has room for so many bags. When a new one comes through the door, an older one goes out, which makes my friends happy campers, knowing they get a camera bag worthy of their expensive gear.
 
BTW – just heard from the recipient of that bag, who wrote, and I quote: “I liked your review and the bag as well.”
 
Since I no longer own the earlier versions, I have to go on memory and my review when comparing them. Aside from the obvious difference – size (and, to a certain extent, weight), the V2 version offers the same practical advantages, with a fully customizable interior (additional padded dividers included). And there are roomy pockets front and back, including an organizer pocket. The new version makes room for a full-size tablet as well (or a tiny MacBook).

Who Should Use the Retrospective 10 V2.0 ?
Travel photographers, street photographers, photojournalists and documentary/news photographers.
 
Capsule Comments
It’s stylish and practical, and designed to last. And reasonably priced. The new luggage handle pass-through is great when traveling with a wheeled suitcase.

How much is it?
Retrospective 10 V2.0 (tested): $169.75 
Retrospective 5 V2.0: $149.75 
Retrospective 7 V2.0: $ 164.75 
Retrospective 20 V2.0:  $179.75 
Retrospective 30 V2.0: $199.75

Where can I get more info/order this product? (Click link.)
Retrospective 10 V2.0

 
Manufacturer:
Think Tank Photo

The Handy Water Bottle Pocket
A water bottle pocket has been added. I would have preferred a stretch mesh pocket, but I can see Think Tank’s thinking behind the design they used. A nylon pocket would not be in keeping with the retro-canvas styling of the bag. Either way, it now means you don’t need to add an accessory pouch just for a water bottle. You can, however, add a lens case by way of the loop on the flip side of the bag (more on Think Tank’s new lens cases in a later review).
 
You could hold a lens in this side pocket, but I would hesitate to do so for any length of time. There’s no real way to secure the pocket, and a lens could slip out when you’re not paying attention. You know what would have been cool? A sealable lid, via Velcro, a zip, or even a snap or clasp. But, again, it could come in handy when changing lenses, if not already occupied by a water bottle. (Here’s a thought. Attach a carabiner to the opposite side and your water bottle to that, if the water bottle provides some means by which you could do that.)
 
The one thing that bugs me, and I found it to be somewhat of a nuisance on Think Tank's Signature 13 as well, is the tuck-away interior flap that has been added to the new Retrospective bag. As I’d commented previously, I would have preferred a double-zip system. But I’m not sure that would have helped. And here’s why… The pliable shell of the Retrospective, while imbuing the bag with that retro-chic feel, makes it difficult to close the flap.
 
I recommend either not zipping the inner lid all the way once you arrive at your destination, or not using it entirely. If you take the latter route, it means using the noisy and somewhat resistant Velcro system to keep the bag closed. There are noise-silencers built in, but using them (and not closing the inner flap) means you leave the bag entirely open – not a smart move in a crowded bus or subway, or while dashing around town, or putting your bag down on an uneven surface where it may topple over. So you’ll have to use one or the other once you start shooting. But let me make myself clear: Until  you arrive at your destination, unless you expect to stop along the way to shoot, use both means to keep the contents secured. You’ll keep dust and dirt out, as well as prying hands.
 
It may be picayune to quibble over this, and I’m sure you’ll get the hang of it, one way or the other. But, hey, I like to quibble over the small stuff. If the world smelled entirely of roses, we wouldn’t have carnations. Okay, not sure what that means, but maybe you do. Anyway, none of that matters in the long run. The bag does the job it’s designed to do.
​
Conclusions
Oddly enough, I find myself lately taking a shoulder/sling bag out, even on my nature walks, preferring it over my backpacks for immediate accessibility to my gear, provided I’m not toting a heavy load or very long lenses, and don’t need to carry a trail kit or light jacket.
 
Would I use this new Retrospective V2.0? In a heartbeat. Regrettably, I miscalculated. I thought I’d be able to fit my D500 with attached Tamron 100-400, but it didn’t prove to be a comfy fit. A deeper bag would have done the trick. So I’ll stick with my Exposure 15 for that rig. It wouldn’t be a problem if I carried body and lens separately, but I prefer having my gear at the ready – hence my rationale for using a shoulder bag in the first place.
 
All in all, as with its progenitors in the Retrospective lineup, the Retrospective V2.0 looks classy, feels classy, and, in short, is a class act. You’ll look good with this bag hanging off your shoulder or sling-style and you’ll feel good knowing your gear is well protected and within your grasp when the moment counts.

Test Report: Tamron 70-210 F/4 Di VC USD Model A034 (for Nikon) – A Multi-Dimensional Zoom That Delivers - at the Right Speed, Right Feel, Right Price

8/20/2018

 
PictureBokeh is beautifully rendered, with the lens delivering pleasingly soft backgrounds. No cropping. 210mm; ISO 100, f/4, 1/320 sec, flash. ©2018 Jack Neubart. All rights reserved.
​The new Tamron 70-210mm f/4 telephoto zoom (Model A034) won’t break the bank to own or break your back to carry. Cost and heft aside, what really matters is performance. I used the lens with my Nikon D610 – a full-frame DSLR matched to a full-frame lens (although the lens could also be used with my DX/cropped-sensor Nikon DSLRs), photographing a variety of subjects large and small. How well did the lens perform? Let’s see. But first…
​

​Why Do You Need an F/4 70-210mm Zoom?
Well, let’s imagine for the moment that you already own a variable-aperture tele zoom. What’s to be gained? We’ll put aside consideration of an f/2.8 lens, given that glass’s relatively high price and heft.
 
An f/4 lens is a workable compromise. Popularly priced variable-aperture telephoto zooms weigh in at a zoom range of 70-300mm with a corresponding variable aperture range of f/4-5.6, or, worse, f/4.5-5.6. These lenses are more than you need for that portrait session you’re shooting outdoors. Not to mention, those variable maximum apertures can be a royal pain when using a handheld meter to check exposures, especially with studio flash or manual shoe-mount flash. Knowing where you stand with your F-stops always gives you a leg up on your exposures.
 
The story doesn’t end there. Zoom out and that variable-aperture f/4-5.6 lens loses more and more light in the process. At just under 200mm, it’s at f/5, hitting f/5.3 at 200mm and f/5.6 at around 250mm. In other words, an f/4 lens is nearly a full stop faster at 200mm.
 
Photographing kids? You’ll definitely appreciate having a maximum aperture of f/4 to blur out annoying backgrounds as you zoom in, while shooting at relatively faster shutter speeds without having to crank up the ISO. But beyond that, autofocusing is faster with an f/4 lens when trying to capture a precocious toddler in an outdoor setting than with your other zoom, given that focusing sensors are designed around faster maximum apertures, for the most part. 
​
​Zooming and Focusing
I had no complaints when it came to zooming or focusing. Well, only one, which I’ll get to in a moment.
 
What I usually concern myself most with on today’s autofocusing (AF) lenses is manual focusing, since many do not manually focus as smoothly as did strictly manual-focus lenses of the past. That said, focusing on this lens was quite smooth – no complaints there, with manual focus (MF) working well both during AF operation and dedicated MF operation. Zooming was equally smooth.
 
My sole complaint comes with the focusing ring moving past the near and far distance points as you continue to rotate it. I really wish Tamron would make it a point to physically prevent the lens from rotating further at each end. I often don’t feel the resistance during the heat of the moment and have to check to make sure where I’m at. And that means taking my eye off the subject.
​
Where can I get more info, tech specs?
Tamron USA 70-210 f/4 (model A034)
 
Manufacturer:
Tamron USA
 
How much is it?
$799
Available in Nikon & Canon mounts.

​And Now for the Nitty-Gritty – Optical Performance
I’ve used this lens on things you wouldn’t normally use a 70-210, as well as the expected. I shot street candids, landscape, and even birds, bugs, and flowers. With birds and bugs there is a caveat: you keep the subject near or at the center of the frame, expecting to do some tight cropping in post. And for that reason, the lens has to be really sharp, especially toward and at the center.
 
Still, I want good performance out to the corners and edges as well. And let’s not forget that vignetting and distortion, as well as chromatic aberration (color fringing), also have to be taken into account.
 
While we can use vignetting to frame the subject on rare occasion, for the most part we’d prefer to live without it. And shooting without any pronounced distortion would be welcome as well. So, to cover my bases, I also set up some test targets, in addition to my field shooting.

​​Vignetting. I primarily tested for vignetting by shooting at a uniform area of blue sky in the afternoon (with the included petal-shaped lens shade attached). On my full-frame DSLR, with the lens set to 70mm, vignetting was readily observable at maximum aperture (f/4), diminishing as you stopped down – until you reached the magic number – 2 full stops down (the sweet spot for many lenses), where it practically vanished. (Expect performance to be even better with a cropped-sensor camera, which cuts out much of the offending vignetting from the get-go.) However, the picture was a bit different as I zoomed out. At 210mm I noticed a faint trace of vignetting even at f/8. At f/11 it was no longer a practical concern.
 
In day-to-day shooting, I focused more on my subject than on vignetting, and often found myself shooting wide open, or close to it. Vignetting was not a practical consideration – or a problem. Where necessary, I was able to address it to my complete satisfaction in Capture One using the Light Falloff slider. (I found the lens profile in Lightroom less than optimum for this correction.)

​
Edge-to-Edge Sharpness. I was quite surprised at how well this lens held sharpness across the frame. While you could see a slight loss of sharpness at the corners at maximum aperture, it wasn’t readily apparent. I had to look really hard to see any loss of sharpness, which, in practical terms, means it didn’t enter into the equation when shooting. And, again, count on lens performance to improve beyond that when stopping down. In fact, I was happy with sharpness across the zoom range, especially considering I had to rely on some very tight cropping with my small, skittish subjects.
 
Chromatic Aberration. A bad case of chromatic aberration can make your pictures look blurry, and many of us tend to overlook this aspect of lens performance. You have to view the image at 100% - actual size, to clearly see these colorized ghost images. So, yes, it was there, but the beauty of using Capture One is that it tackles chromatic aberration so effortlessly, with one click, that I also let this aspect of lens performance slide. Or more to the point, color fringing was faint to begin with and absent after RAW processing in Capture One.
 
Distortion. Yes, it’s present, but to a minimal degree, and is easily corrected – even manually (as was necessary in Capture One, given that profiles for this lens are lacking). This lens aberration goes from very slight barrel distortion (outward bowing) at 70mm to very slight pincushion distortion (inward bowing) at the long end of the zoom range, with this inward (pincushion) bowing beginning but barely apparent at around 100mm.
 
Flare and Ghosting. I intentionally pointed the lens toward the sun to see how strong lighting will affect the picture. Flare was very well controlled. Flare ghosts did reveal themselves but not to the point where they haunted me. They were mild. In fact, those of you who like flare and ghosts in your pictures may be disappointed by the degree of control experienced with this lens. Clearly this is a testament to the various coatings used by Tamron.
​

Who Should Use This?
Street photographers, portrait shooters, wedding photographers, photojournalists. Landscape may be a stretch, with wildlife & birds, bugs & flowers even more so, but they all are doable.
 
Capsule Comments
Working with this lens reminded my of my Canon 70-200mm f/4 (when I shot with the 5D). The Canon lens carries a heftier price tag. But just comparing the overall feel and handholdability of this Tamron lens, I felt equally at home with this glass - albeit on my Nikon D610, and equally confident of the results.
Build
The lens certainly felt solid in my hands. All operations were smooth. If you’re fishing for more details, we should note that, despite its relatively low cost, the lens also boasts moisture-resistant seals (get it, fishing, seals?).  Beyond that, the front element features the same smudge-resistant barrier incorporated into Tamron’s costlier lenses, such as the 150-600mm G2 and 70-200 f/2.8 G2, via a fluorine coating. As I’ve pointed out in the past, I wish Tamron would add the fluorine coating to the rear element as well. Still, the front element is the one that fingers, flying insects, and the elements target first and foremost, so having this as a first line of defense, together with that moisture seal, is a welcome step.
​
My Tamron 70-210mm f/4 Experience
I’m not going to rehash all the specs. You can read that on Tamron’s website (link above). But I will mention those things that made a difference to my picture-taking.
 
For starters, I wondered why Tamron had left out the lens lock here. Then I did one of those (picture me hitting myself upside the back of my head) as I was walking along a bike trail in hopes of spotting some White-tailed Deer, thinking to myself, Of course, it doesn’t need it. Zooming on this lens is entirely internal, as is focusing.
 
By the way, I did spot that deer, but this lone deer proved more skittish than others I’d photographed in the past. Is it impossible to shoot a deer successfully with a 70-210? Suffice to say, I managed to capture deer in the same park with my Tamron 90mm f/2.8 macro. You just have to be prepared to do a bit more cropping in the end, but not always, as some deer in often-visited locations may approach to within 10 or 15 feet (no doubt people have been feeding them, despite restrictions to the contrary).
 
Back to the lens. These internal zoom and focus movements have several advantages. With the lens length remaining fixed, you’re less noticeable in a crowd. When someone sees you with a zoom extended all the way out to Mars, it gets noticed – and that’s not something you necessarily want.
 
What’s more, the lens has a more balanced feel on the camera in this configuration. On top of that, front-mounted accessories don’t twist and turn as you twist and turn the zooming and focusing collars. So your polarizer setting remains exactly where you left it, no matter how much you zoom and focus.
 
And the coup de grâce, no lens creep! So a lens lock becomes moot. Which brings us full circle to where we entered this discussion.
 
All this translates to a lens that eminently lends itself to handheld shooting. I did attach the camera to a tripod with the bare lens (sans optional tripod mount), and in theory would have felt more comfy had I opted for the mount. Yet, as I found out, my Nikon D610 with metal lens mount bore the weight with no ill effect. The only time you begin to feel the weight of the lens (it is heavier than my Tamron 70-300, if only marginally) is during extended handheld shooting, such as when waiting for that bird to land on a nearby branch. And, yes, I even photographed birds – hummingbirds, no less - with this lens, not to mention bees, butterflies, and dragonflies. Admittedly, cropping was often required during RAW processing. 

Conclusions
The Tamron 70-210mm f/4 lens did not disappoint. It may not be constructed to the same standards as Tamron's SP glass, but, in day-to-day shooting, that did not faze me in the least. I pointed the lens at a variety of subjects, confident I would get the shot.

I did not rely on Tamron's proprietary Vibration Compensation (or VC, Tamron-speak for image stabilization in the lens) to prevent camera shake, although I did test for it and achieved admirable results. For the most part, I employ VC to steady the viewfinder image and keep focus on critical areas of my subject, usually the eyes in people and wildlife.

I came away from the experience wanting to buy this lens, and would have - if I didn't already own an f/2.8 lens in a comparable focal-length range. 

The subjects I photographed bear repeating, if only to emphasize the utility of this lens: street photography, cityscape, landscape, flowers, butterflies, bees, dragonflies, and hummingbirds - with my smaller subjects relying on tight cropping in post. Still, you have to give it to this lens for delivering where it counts, cropping and all.

Test Report: MindShift Gear Impresses Us with Two New Outdoor Bags - BackLight 18L Photo Backpack and Exposure 15 Shoulder/Sling Bag

5/6/2018

 
When it comes to outdoor photography, we’re used to seeing photo backpacks from MindShift Gear, but we usually turn to sister company Think Tank Photo for our shoulder bags. Think Tank does have some nice shoulder bags, but they’re really not optimized for the great outdoors, which is also true of their backpacks – great utility and construction, but aimed more at the streetshooter, than the nature photographer, which also applies to their shoulder bags.
 
Well, not surprisingly MindShift decided to divert a little bit of their attention to the shoulder bag, while not sitting idle where backpacks were concerned, and introduced a one-two punch in the new Exposure bag, practically alongside the smaller BackLight.
 ​

Where can I get more info, tech specs & order this product? (click on a bag)
BackLight 18L 
Exposure 15 
 
Manufacturer:
MindShift Gear
 
How much is it?
BackLight 18L: $199.99
Exposure 15: $169.99

A Quick Look at the New MindShift BackLight 18L
I’ve previously written extensively about the BackLight series, which, until now, consisted of two larger bags, first the 26L, followed by the 36L – the model number reflecting capacity, in liters. That makes this bag half the size of the largest version, at least in carrying capacity.
 
I still use the 26L, having gifted the 36L to a friend who routinely carries a load of gear, and when the 18L arrived, I thought it would be too small for my Tamron 150-600mm G2. I first tried the 18L out with my Nikon D500 attached to the new Tamron 100-400 (look for a review of this lens shortly). It was a perfect fit. Next came what I thought would be the impossible task.
 
On its own, the 150-600 settled in comfortably. But could I say the same when attached to the camera? Well, I did have to move a couple of the padded divers out of the way, but I managed a good fit. Of course, that shift in the partitions negated the use of the other half of the bag for a second camera with attached lens. Well, I could always carry a second body and lens separately – plenty of room for that.
 
In the backpack's factory configuration, when situating the camera with 100-400 attached (at the top of the bag, lens downward), there was plenty of room for that second body with attached lens (cradled from the bottom of the bag, lens upward). Long and short, I’ll still use my 26L for that monster glass and relegate the 18L for the D500/100-400 combo riding side-saddle with, say, a D610/90mm macro attached – and still have room for a Nissin flash.
 
You can read my earlier reviews by clicking these links:
 
BackLight 26L review 
 
BackLight 36L review 
 
I should point out that I was so happy with the BackLight 18L that I gave my trusty TrailScape 18L to a friend in favor of the new bag. I prefer the interior layout of the BackLight 18L, considering it will hold two cameras with attached lenses right from the get-go.

MindShift’s Exposure 15 Shoulder Bag
When it comes to shoulder bags, my preference runs to smaller bags. I find it more fatiguing when wearing even a small shoulder bag or sling bag than when carrying a fully loaded backpack. Still, a shoulder bag does come in handy on occasion. You won't carry a backpack to a formal occasion, or even when visiting friends. Not to mention, it's so much easier to stow a shoulder bag on the floor underneath  or alongside your seat when dining.
 
I already own and use the perfect shoulder bag, Think Tank’s Signature 13 – elegant styling, functional, and small enough to carry just what I need for streetshooting. So I wasn’t about to make that bag redundant with the Exposure 13. Besides, the larger Exposure bag sported more spacious pockets – and I love pockets.
 
Still, the Signature bag lacks one thing that, to my mind, would have made it perfect: a waist belt to take the weight off my shoulder. It would have been very easy for Think Tank to have fitted the bag with a removable waist belt, but that probably would have run counter to the fashion statement that bag makes.
 
Fast forward to the Exposure series. These bags don’t feature a waist belt, but they come with the next best thing: a security tether, or what MindShift calls a "cross-body stabilizer strap." This keeps the bag from slipping off your shoulder – or swinging around and in your way when you bend down to shoot something low to the ground. It also prevents someone from pulling the bag off your shoulder. You can also wear the bag sling-style, which is how I’d been using it, and how it was primarily designed to be worn. The neoprene shoulder pad is sewn in and runs much of the length of the strap, rendering the strap well suited to either mode of portage.
 
This bag also features new materials that make it practically impervious to the elements, and the lid has flaps at either end to keep out dust, flying debris, and rain/snow. It does not have a zipped inner lid, a trademark of the Signature bags. However, the Exposure uses only a single plastic buckle for fast access. Some Velcro-type closure system wouldn’t have hurt, so you wouldn’t have needed to constantly snap the buckle shut. It’s a noisy prospect when you’re trying to remain quiet while focusing on birds or other wildlife.
 
As for the interior of the bag, it too lacks the finesse of the Signature bag, but, having said that, it does provide the needed protection. I was able to fit my D500 with attached 100-400, standing the rig lens downward inside the bag. With a shorter lens, the camera could have been supported by the dividers along both sides. Still, even with this long lens, the flap closed without any unruly bulge. BTW – carrying this combo was another reason, perhaps the main one, I’d opted for the larger Exposure 15. The Exposure 13 would have been too small.
 
I should also note that the Exposure 15 will carry a 15” laptop, along with a tablet. There are numerous other pockets, along with a luggage-handle pass-through so you can piggyback the bag on your roller luggage. A tripod is carried at the bottom – straps included. Also included is a rain cover, not that you’ll need it in a light rain, since the bag is sufficiently weatherproofed on its own. Oh, and if that’s not enough, there’s also a water-bottle pocket that will comfortably hold your average-size water bottle.

​Conclusions
One advantage a shoulder or sling bag has over a backpack is that it allows immediate access to your camera gear. That precisely is what drives me to use a bag such as the Exposure 15 on occasion. With a backpack, you normally have to find a place to lay the bag down when it comes time to access or stow gear.
 
Well, not so with the BackLight series. You can still wear the bag, open the rear (main) flap, and access your gear. On paper, at least. As I found out with the earlier iterations of this design, this doesn’t really fit my shooting routine – and a reader concurred vis-à-vis her style of shooting. I find it faster and easier to lay the bag down. And if the ground is wet or muddy, then I’ll simply stow the lenses and flash I may later need in accessory pouches or in the pockets of a photo vest. MindShift may not have a photo vest (why not, guys?), but they do have a full line of pouches for pretty much anything you need to access on the trails.

I found myself using both bags in a variety of situations, not least of which was for bird photography. Both bags are thoughtfully designed, practical and durable, to say the least. And each should easily fit in the overhead bin, if not under the seat, on most commercial aircraft.

Who Should Use the BackLight 18L and Exposure 15?
Travel, nature, and wildlife photographers.
 
Capsule Comments
When traversing rough terrain or for long, strenuous hikes, the BackLight 18L is the clear choice, with its extra-comfy backpack harness system. On public conveyances, crowded streets, and travel involving a lot of walking on sidewalks or dirt paths in city, town, or village, the Exposure 15 shoulder bag would be my choice, for fast access, along with added security thanks to the tethered strap.

A rain cover is included with each bag, and both bags will carry a tripod, as well as a laptop (13" in BackLight 18; 15" in Exposure 15), plus tablet. And for those hot days, don't worry - each bag holds a water bottle.

​And, they are very reasonably priced for the top quality you're getting.
​

Test Report: Think Tank Photo's Airport Advantage Plus - Keep Camera Gear Protected and Organized in a Smaller Profile Roller

1/1/2018

 
PictureThink Tank Photo's Airport Advantage Plus. Photo courtesy Think Tank Photo.
​When I stand Think Tank Photo’s new Airport Advantage Plus up next to the Airport Security v3.0, the Advantage Plus looks svelte by comparison. In fact, even when standing on its own it looks  slim and trim.

​Unfortunately, you can’t say it looks stylish as is, but Think Tank has some accessories to lend it a hand in that department, such as colorful wheels with Roller Flair, which also adds other color accents ($35).

Carrying Capacity
When the Airport Advantage Plus arrived, I did more than stand it side-by-side with the Security. I immediately transferred much of my gear into the new case from the Airport Security to compare capacity. One marked difference: the Security is deeper, which means that lenses can stand on end, and that translates to greater storage capacity. But that didn’t trouble me. I actually prefer the cleaner layout with greater visibility in the new Advantage Plus.
 
While I couldn’t get everything that I’d originally packed in the older Security transferred to the new case, I did manage to fit quite a number of items: cameras with attached lenses, additional lenses, and several shoe-mounts, and then some. Afterwards, I removed a couple of the flash units and replaced them with lenses.


Where can I get more info/order this product?
Think Tank Photo (use this link to order direct and get a gift/priority service)

Manufacturer:
Think Tank Photo
 
How much is it?
$289.75

Airline-Friendly
If the slimmer build troubles you, think of it this way. The new Advantage Plus would be more airline-friendly in a variety of overheads. What’s more, you might find this a blessing, limiting you to only the gear you know you’ll need.
 
I also owned the  Airport TakeOff v2.0 backpack roller. I used that case for my Photogenic monolight system (one head plus ion converter, along with reflector and cables). I of course had to move the dividers around to make room, but, once I did that, it was a great fit. Then when a friend needed a backpack roller for a trip to Australia, I emptied the TakeOff contents to another roller I had sitting in my closet and handed him the TakeOff, fondly bidding him bon voyage.


Who Should Use This?
Travel, nature, and wildlife photographers (but I would recommend a photo backpack or shoulder bag once you reach your destination, unless you’re working out of a vehicle or staying put in one location).

Capsule Comments
Thoughtfully constructed with practicality in mind; durable but not, in my view, as baggage-handler friendly as the Airport Security (so don’t stow it in baggage); fully customizable interior with movable padded dividers; holds a practical quantity of camera gear, plus laptop/tablet; also includes a handy satchel for your personal items (satchel occupies a section of the case, replacing some camera gear – if you really want to travel light).
​Soft-Sided Luggage
All Airport cases are considered soft-sided luggage, in contrast to hard-shell cases made of ABS, resin, or metal. As such, they utilize a zipped closure system, but are lockable. I keep TSA-compliant combination locks on hand for this purpose. The only thing to watch for is that you don’t over-expand the case with stuffed outer pockets. One added advantage to practically any soft-sided luggage is the addition of outer pockets to stow anything from a laptop (inside a protective sleeve) to a pair of flip-flops. The flip-flops might even serve to cushion the laptop against bumps, to a degree.
 
Each of these cases has a weather-resistant fabric outer layer, but also comes with a rain cover for torrential downpours. With the rare exception of 4-wheelies, each is two-wheeled, offering an exceptionally quiet ride, with sturdy telescoping handle, plus additional handles to make sliding the bag in and out of the overhead easier.
​Conclusions
Once fully loaded, no camera luggage feels light. Still, if you can shave a few ounces off your burden, it should be welcome over the long haul. While you can’t go wrong with any of the Think Tank Airport luggage, the Advantage Plus has the advantage of a more compact size that affords you greater visibility of your gear, while keeping a lid on how much you carry. The point being, you take what you need and nothing more. Makes sense to me. It’s called planning.

Test Report - MindShift Gear's BackLight 36L Photo Backpack - The BackLight Supersized

11/17/2017

 
Picture
​It was nearly a year ago that I tested the progenitor to the BackLight series, the BackLight 26L, from MindShift Gear. That pack has become a staple in my stable of carrying gear, which includes a variety of MindShift and Think Tank Photo products. I’ve grown to rely on them for their utility and durability. And these days, I’ve been leaning toward smaller bags that limit what I carry. I prefer to arrive home after spending hours on my feet little worse for wear, and lighter loads allow me to do that. I also find I work faster and more efficiently if I can work economically.
 
Anyway, so this BackLight 36L arrives on my doorstep. It’s a full 10 liters bigger than the previous model, which I use mainly when shooting with my Tamron 150-600mm G2. In fact, what that translates to is, the 36L is taller, wider, and deeper. So the question you have to ask yourself when choosing between the two versions is, how much backpack do you really need?
 
But even before you go there, take a closer look at the pack and you’ll notice something different – something that sets it apart from other MindShift (and competitor’s) backpacks. Hint: it has to do with camera access. The name should give you a hint.

The Design - The Good and the Bad
In contrast to typical backpack designs, the BackLight employs a rear-access panel, rather than a front panel. (Front outer pockets hold a variety of other stuff, as we’ll see.). It’s a zipped, drop-down panel, but by giving you access to your gear from the rear, you keep prying hands away from your precious cameras and lenses. It may take a little getting used to at first if you’ve been using a more traditional pack, but, provided you’re not switching back and forth, as I am wont to do, you should have a firm handle on it after one or two outings.
 
MindShift will try to tell you that you can change lenses on the fly, without removing the bag from your body, thanks to this rear panel and a short neck cord found inside the bag. I tried it with the 26L. It didn’t fly. And with an even bigger and heavier bag, I’m not even going to attempt it. Frankly, I wish they would have removed that cord, since it always came undone on the smaller bag. And it was not very comfortable.

​The Backpack Harness - Designed for Comfort
As is true with every component of each bag they make, MindShift doesn’t skimp when it comes to shoulder straps and other parts of the harness system. The shoulder straps are contoured and well padded for a comfortable fit.
 
Another feature of a well-designed backpack, the contoured and padded waist belt hugs your hips, ensuring a stress-free ride. The waist belt is supposed to take much of the weight off your shoulders, while preventing the bag from shifting around, which is important when negotiating rough, uneven terrain, but even simply for long stretches without a break. And there’s also a sternum (chest) strap, which further prevents the bag from moving around. A stable bag means you’re less inclined to lose your balance and tip over.
 
Another nice aspect of this bag, given its relatively large size, the bag reaches from your hips to your shoulders, with shoulder compression straps for added comfort and stability. I see too many people wearing backpacks that hang down like a loose sack. No chance of that happening here, since the bag just naturally lends itself to being worn properly.
​

Where can I get more info?
MindShift Gear
 
 
Manufacturer (use this link to order):
MindShift Gear

​ 
How much is it?
$289.99 (in woodland green or charcoal)
 

​Who Should Use This?
Hikers and backpackers, bird photographers, wildlife photographers, nature and landscape photographers; professionals and serious amateurs.
 
Capsule Comments
Well designed; solid construction – made with high-quality hardware and materials; weather-resistant; customizable to fit around your gear; protective; comfortable.
 
​The Customizable Interior
Inside, there’s plenty of room for two bodies with lenses attached (a 70-300mm or maybe a 70-200mm on one, a 24-70mm or fast 50mm on the other, for example). If you attach a long, fast lens or something like the aforementioned 150-600mm, sorry, you’ll only have room for one body/lens combo. But you can store a second body by itself, or with a pancake lens.
 
I should point out that the bottom of the bag is a bit more spacious than it needs to be. You might want to stick some foam at the bottom to take up the slack. You may be able to use the included rain cover, but I tend to think the material is a bit on the scratchy side for the LCD. Besides, a better place for the rain cover is in an external pocket, where it’s easily and quickly accessible.
 
The depth of the bag easily accommodates gripped DSLRs. More than that, you can stow some lenses on end. If you’re a glutton for punishment, that means you can carry more gear. There’s plenty of room. While the padded dividers employ a hook-and-loop system so you can customize the interior around your gear, I wish MindShift had used hook-and-loop-covered padded dividers here, as they do in some other bags. That system just gives you an added edge in fitting the bag exactly to your needs.
 
And again, let me point out that my fantasy dividers are closed-cell foam sandwiched between open-cell foam layers, for the ultimate in shock and vibration protection. But no manufacturer is paying attention.
 

KEY FEATURES per MindShift Gear
  • Daisy chain, ice axe loops and additional lash points for expanding carry capacity
  • Includes tripod/monopod mounting system on front or side
  • Padded waist belt for all day comfort with webbing rail for attaching MindShift accessories
  • Quick-fit waist belt adjustment for rapid and convenient fitting
  • Side compression straps with locking SR buckles for additional lash points
  • Air channel and lumbar support on rear-panel for all-day comfort
  • Ergonomic zipper pulls are easily gripped with gloves or chilled fingers
  • Highest quality YKK RC Fuse zippers, 420D Velocity and 420D high-density nylon for long lasting durability and strength
  • Front stuff pockets for trail essentials: headlamp, gloves, chargers
  • Adjustable dividers for large telephoto lenses, traditional photo gear, or personal items
  • Top zippered pocket for quick access to essentials
  • Interior mesh pockets for storing filters, batteries, cables, etc.
  • Seam-sealed rain cover included
  • Compatible with MindShift’s Tripod Suspension Kit, Filter Nest, Filter Hive and Switch Case
​Room for a Laptop, a Tablet – and a Tripod
Rear access means you can carry a tripod centered over the front of the bag for better balance on uneven terrain. All the accoutrements are in place, but neatly tucked away top and bottom. Or you can carry the tripod on either side, with a water bottle on the opposite side. If you’re mostly traveling over flat terrain, side-carry is not a problem.
 
Keeping the tripod over the center makes more sense for the long haul, but it does get in the way when laying the bag down to get at gear. And if you carry a tripod, you definitely do not want to use that neck cord to change lenses while still wearing the bag.
 
I don’t know about you, but I never take my laptop into the field. Still, if that’s your preference, this bag lets you do that – inside a padded sleeve. Not only that, but you can also carry a tablet. The tablet sleeve isn’t padded, but the surrounding pocket is so voluminous that you’ll likely keep a jacket and other stuff in there to cushion against bumps.
 
​Conclusions
This bag has a lot going for it. Added features not covered above include side compression straps and a padded carry handle – more a padded loop, than a handle, really. The hardware is, as always, uncompromising. And the airflow cushioned back with lumbar support ensures comfort under trying conditions. Plus, there are additional pockets outside and inside.
 
Some may argue, and justifiably so, that carrying the laptop up front is not the best way to go, especially on long treks. Where’s the best place? At the rear of the pack, against your back – and this is something that MindShift fails to recognize, with one or two bags being the exception. Granted, that would be extremely difficult in a bag of this design, but I do think it’s doable. On the other hand, perhaps wiser heads prevailed here.
 
If you think you’d be comfortable with a backpack that grants access to camera gear from the rear, and you need something bigger than the 26L, then the BackLight 36L is your ticket to ride. You’ll find it comfortable and your gear will be well-organized and thoroughly protected. It’s a win-win!
 

MATERIALS per MindShift Gear
Exterior: For superior water resistance, all exterior fabric has a durable water-repellant coating, plus the underside of the fabric has a polyurethane coating. Features the highest-quality abrasion-resistant YKK RC-Fuse zippers, 420D velocity nylon, 420D high-density nylon, 320G UltraStretch mesh, 350G airmesh, nylon webbing, 3-ply bonded nylon thread.
 
Interior: 210D silver-toned nylon lining, hexa-mesh pockets, high-density
closed-cell foam, PE board reinforcement, 3-ply bonded nylon thread.
 
 
PRODUCT SPECIFICATIONS per MindShift Gear
Exterior Dimensions: 13.8” W x 22.4” H x 10.2” D (35 x 57 x 26 cm)
Interior Camera Compartment: 12.6” W x 21” H x 7.1” D (32 x 53.5 x 18 cm)
Laptop Pocket: 11.2” W x 16.1” H x 1” D (28.5 x 41 x 2.5 cm)
Tablet Pocket: 10.6” W x 10.2” H x 0.6” D (27 x 26 x 1.5 cm)
Total Volume: 36L
Weight: 4.9 lbs (2.2 kg)

Test Report: Think Tank Photo's Spectral 8 Shoulder Bag - Stylish and Practical

9/11/2017

 
PictureSpectral 8. Courtesy Think Tank Photo.
​While the Spectral series from Think Tank Photo may not share the same elegance as this company’s Signature series, the new shoulder bags do weigh in with a couple of nice features I would have liked in the Signatures. On the other hand, a few of the trademark elements found in the Signature would have been welcome additions to this bag. (Click this link for my review of the Signature Series.)
 
Still, all in all, the new bags have much going for them. I chose to review the smallest of these, the Spectral 8, since it’s primarily aimed at the mirrorless camera (as well as compact DSLR) user and I wanted to address a market segment I tend to overlook. The two larger bags, Spectral 10 and Spectral 15, address more robust DSLRs, but without grips.

​The Exterior
The Spectral 8 has a fairly slim profile. There’s only one outside pocket on this bag beyond the cover flap – elastic mesh for a small water bottle. The larger bags in the series have a full width/full depth outer sleeve as well. Not sure why this was omitted on the smallest bag. You can never have too many outside pockets.
 
There’s also a small padded handle on top, but the main mode of carry is obviously the shoulder strap. Sadly, the Spectral series returns to the more conventional sliding pad, in contrast to the narrow, elongated sewn-in-place pad on the Signature. The pad is wide and stiff, but you can still wear the bag cross-body (sling-style). However, the non-slip strip could have been extended for a larger gripping surface.
 
In contrast to the Signature series, the Spectral bags can carry a tripod. A pair of tripod straps are included. They attach on the bottom. Granted, this does make setting the bag down on any surface somewhat cumbersome, but it sure beats having to carry a tripod by hand or in a separate bag. You’d do best with compact tripods, especially for this small bag.
 

Where can I get more info?
Think Tank Photo Spectral Series
 
Manufacturer (use this link to order):
Think Tank Photo


​Going Undercover
The cover flap has a magnetic clasp. Nice touch. Pull a tab to release; just drop the flap back down and it should close on its own. I would have preferred this mode of closure to the metal buckles used on the Signature, although it doesn’t reflect the same level of chic. (I’m always afraid the metal buckles will come crashing down on the camera’s LCD when I use the Signature.)
 
Lift the flap and you come to a small outer sleeve that will hold a cell phone of any popular size. Behind that is a zippered pocket designed to hold an 8” tablet, or accessories, such as maps, a guide book, and such. Sleeves within the pocket will hold spare batteries and a memory card wallet. (The larger bags will carry 10” tablets, and the 15” bag will carry a laptop.)
 
Before we go inside, we encounter a secondary cover flap. As on the Signature, this one is zippered and designed to keep out prying hands, as well as the elements. Unlike the one on the Signature, it’s not pleated (which would have been nice – to accommodate lenses that protrude just a bit when standing on end).
 
Open this second flap to access your gear. You can leave it open and fastened to the cover flap via a Velcro-style hook-and-loop attachment, or tuck it into a sleeve inside the cover flap. To be practical, don’t tuck this inner lid away. Instead, use that additional pocket as a “secret” compartment for valuables (it closes with hook-and-loop fastener). By the way, I prefer this arrangement to the one used in the Signature bags.
 
If you use a sling strap that fastens to the camera’s tripod socket, you may be able to leave it attached, since there is enough room for it.
 
One convenience feature carried over from the Signature line of bags is the trolley sleeve (luggage-handle pass-through). This lets you easily piggyback the bag on your roller luggage.
 
​The Interior
The inside of the Spectral may not be as tricked out as that of the Signature series, but it certainly is functional.
 
The bag easily supports a body with attached lens, and because the camera with lens is suspended from a platform consisting of two padded dividers, it’s an easy grab on the run. There’s also room for an extra lens or two or three (depending on size), and possibly an external flash. There is certainly room to squeeze in a sub-compact flash.
 
Additional dividers let you stack small items. All the dividers are movable, making the interior fully customizable.


How much is it?
$99.75/Spectral 8
 
$119.75/Spectral 10
 
$139.75/Spectral 15


In Use
I gave the bag to a friend with an Olympus mirrorless outfit. She cradled the super-compact Pen E-PL6 with attached 14-42mm lens atop the supporting dividers and stowed the 40-150mm lengthwise bottom left. The 9mm fisheye found a secure berth as well, along with a variety of accessories, including a sling strap.
 
Her one complaint: the bag was too wide for a camera this compact. But she found a way around that, securing the camera in place with one or two pouches filled with accessories. Still, from her expression, she would have been happier with a slimmer bag.
 
Next came the Manfrotto Compact Action tripod.
 
I attached the tripod straps (included) to the bottom of the bag and my friend fastened the tripod in place. As she shouldered the bag and started walking around with it, she did note that the tripod didn’t appear to be held as securely as she would have liked. In fact, she’d resolved to carry the tripod separately, just to be safe. Perhaps, with time, we could have figured out a way to secure the tripod to the bag that would have made her more comfortable, but time was short and we had to be somewhere.
 
I should note that she otherwise found the bag a good fit, even when worn sling fashion. My initial impression was that the stiff, wide shoulder pad might lead to some discomfort, but she found it quite comfortable. The Spectral 8 suited her well.

​​Who Should Use This?
Amateur photographers; photojournalists, news photographers, documentary photographers, street photographers, and travel photographers carrying a light load; the Spectral 8 in particular is ideally suited to mirrorless and compact DSLR systems with small to modest-size lenses (larger Spectral bags for pro-size DSLRs without grip).

Capsule Comments
Affordable, well designed, and somewhat fashionable; a practical shoulder bag; weather-resistant on its own, with rain cover (included) for serious downpours; Spectral 8 is well suited to a mirrorless or compact DSLR system with a smattering of lenses, albeit a bit roomy for sub-compact mirrorless bodies.

Conclusions
Unlike the much more costly Signature series with its leather accents, the comfortably-priced Spectral series is low-key. Yet the Spectral does carry a certain degree of panache with it.
 
More important than looks is functionality. The bag wears well and is easy to work out of.

KEY FEATURES per Think Tank Photo
  • Tablet pocket (Spectral 8: 8”, Spectral 10 & 15: 10”)
  • Phone pocket sized for today’s large phones
  • Tripod attachment points and straps
  • Highest quality materials (metal hardware, YKK RC Fuse zippers, 420D velocity nylon) and the highest quality construction
  • Luggage handle pass-through
  • Comfortably padded non-slip shoulder strap for all day comfort
  • Customizable divider layout with dividers for stacking short lenses
  • Water bottle pocket
  • Seam-sealed rain cover included
  • 15” Laptop compartment (Spectral 15 only)
 
 
MATERIALS per Think Tank Photo
Exterior: All fabric exterior treated with durable water resistant coating while fabric underside is coated with polyurethane for superior water resistance. The bag also has YKK RC Fuse (abrasion resistant) zippers, 420D velocity nylon, double PU coated P600D, heavy-duty nylon tarpaulin, UltraMesh pockets, antique plated metal hardware, Fidlock mangetic buckle, 350G 3D air mesh, 3-ply bonded nylon thread
 
Interior: PE board reinforced removable closed cell foam dividers, 200D liner, PU backed nylex liner, 2x PU coated nylon 210T seam-sealed taffeta rain cover, 3-ply bonded nylon thread
 
 
PRODUCT SPECIFICATIONS  per Think Tank Photo
Spectral 8
  • Internal Dimensions: 10.2” W x 7.5” H x 4.9” D (26 x 19 x 12.5 cm)
  • Exterior Dimensions: 11” W x 8.3” H x 6.1” D (28 x 21.2 x 15.5 cm)
  • Tablet Compartment: 8.3” W x 5.5” H x 0.6” D (21 x 14 x 1.5 cm)
  • Weight: 1.7 lb (0.8 kg)
 
Spectral 10
  • Internal Dimensions: 13” W x 9.1” H x 4.9” D (33 x 23 x 12.5 cm)
  • Exterior Dimensions: 13.8” W x 10” H x 6.1” D (35 x 25.5 x 15.5 cm)
  • Tablet Compartment: 10.4” W x 7.6” H x 0.6” D (26.5 x 19.2 x 1.5 cm)
  • Weight: 2.2 lb (1.1 kg)
 
Spectral 15
  • Internal Dimensions: 15.3” W x 9.8” H x 5.1” D (39 x 25 x 13 cm)
  • Exterior Dimensions: 16.1” W x 12.6” H x 6.3” D (41 x 32 x 16 cm)
  • Tablet Compartment: 12.6” W x 7.6” H x 0.8” D (32 x 19.2 x 2 cm)
  • Laptop Compartment: 14.1” W x 9.6” H x 1” D (36 x 24.5 x 2.5 cm)
  • Weight: 2.5 lb (1.2 kg)
 

Test Report: Tamron 150-600mm Di VC USD G2 (Model A022)

7/26/2017

 
PictureTamron SP 150-600mm f/5-6.3 Di VC USD G2 (Model A022). Courtesy Tamron USA.
​This is how I ended up buying, and testing, the Tamron 150-600mm G2 lens.
 
My interest in bird photography took a decided turn earlier this year. Over the past few years, I’d been photographing deer, mostly with a Tamron 70-300mm on my Nikon D610. However, aside from the occasional waterfowl, birds were largely out of the question. Then I wrote a column for Shutterbug Magazine on the amazingly talented bird photographer Alan Murphy and I’d found the impetus I needed. 
 
Alan’s bird photography is largely reminiscent of the paintings of John James Audubon. His images have this clean, uncluttered look, with a unique depth to them. I could only hope to achieve a modicum of his success. Anyway, you really should check out Alan Murphy's bird artistry on his website.
 
Alan conducts workshops on bird photography, and I had asked him what lens focal length he recommends to workshop attendees. He answered, 600mm. Numerous factors come into play that may affect that choice (species, time of day, situation, for example), but that 600mm is normally the go-to workshop lens for many scenarios.
 
And that got me thinking. My longest focal length until recently was 300mm (in a 70-300mm zoom for my Nikons, as well as a Canon 300mm f/4 fixed-focal lens when I was shooting Canon). Not nearly enough for those birds I wanted to photograph. Even attached to my Nikon D300, that only gave me 450mm – respectable reach, but not ideal, keeping in mind that birds in the wild keep a buffer zone between you and them – and that buffer zone translates to: I need a longer lens!
 
So I explored my options, namely, the cost of a long lens, its size and weight, and how I’d primarily be using it. I usually shoot handheld with most lenses, and largely by available light, resorting to flash only occasionally. When I’d finished crunching the numbers, the choice was obvious.
 
I bought the Tamron 150-600mm G2.
 
Poor AF with fast-moving subjects on the cameras I then owned, namely the Nikon D610 and D300, also meant I needed to update to a more responsive DSLR, and one that could easily work with the maximum f/6.3 aperture on this Tamron zoom. That soon resulted in the purchase of the Nikon D500 (look for a test report on this camera soon). Attached to a DX camera - specifically the D500 (APS-C format with a cropped sensor factor of 1.5x), this lens would give me 900mm out of the gate, and 1170mm when I applied the additional in-camera 1.3x crop factor without adding any converters. That gave me considerable reach, although I’d discover that capturing flighty subjects at nearly 1200mm would prove to be largely a frustrating task.


The Tamron 150-600mm G2: Overall
This lens picks up where the original Tamron 150-600 (introduced December 2013) leaves off. According to Tamron, the new version (G2 = second generation) adds better optical and AF performance, image stabilization enhancements, fluorine coating, and a Flex Zoom Lock, with optional matched teleconverters.
 
While I only checked it out once and have yet to actually use it (haven't found a need for it), the Flex Zoom Lock lets you lock in any zoom setting with the aid of a clutch-type mechanism. And it works easily enough. There is, of course, the more traditional zoom lock at the minimum zoom setting, although I didn’t experience any lens creep with the lens left in a ready (unlocked) state.


How much is it?
$1399 (Canon/Nikon/Sony A mount)
 
Distributor/manufacturer
Tamron USA

More Info:
Tamron 150-600mm G2
​
A Note About the TAP-in Console
This accessory lets you update the lens's firmware and customize the lens. I bought it but haven't found a need for it yet. There were no firmware updates at this time. The link is obscure, so here it is, for your convenience: TAP-IN CONSOLE.
​The Tamron 150-600mm G2: Optics
Optically the lens features low-dispersion glass to deliver crisp images, with proprietary coatings to counter flare and ghosting. Whereas both old and new versions of this lens feature moisture-resistant construction, only the new G2 can boast fluorine coating.
 
While not new in a Tamron lens, and certainly not exclusive to Tamron, fluorine coating, according to the company, makes the lens surface “easier to wipe clean and less vulnerable to the damaging effects of dirt, dust, moisture, and fingerprints.” I try desperately to avoid anything coming in contact with the surfaces of my lenses, so thankfully I didn't have to test for this feature.
 
The one question I have for Tamron is: Why fluorine-coat only the front element? Why not also the rear element? A lens can easily get smudged at either end. (A question I’ve asked before with regard to Tamron’s 15-30mm f/2.8.)
 
Tamron also improved close-focusing on this lens. The original 150-600 focused down to just over 106 inches for a 1:5 reproduction ratio. The new G2 version takes that down to under 87 inches (1:3.9), which is a considerable difference that you may not fully appreciate just from the numbers. Not a true macro lens, but very respectable – and it would prove to come in handy. I managed to capture some fairly tight shots simply by zooming all the way out to the 600mm setting and bringing the lens in as close as possible.

​Adding a Matched Converter
This Tamron lens does have the option of a matched converter. The available converters are 1.4x (TC-X14) and 2x (TC-X20). Keep in mind that adding a converter effectively slows down the lens, by one and two stops, respectively, leading to slower AF response times.
 
I held off adding the converter because I was buying the D500 primarily for its AF responsiveness and didn’t want to hamper the camera in any way. One day I might yet entertain buying the Tamron converter. But not today.
 
In combination with the 1.5x and 1.3x crop factors built into the D500, a 1.4x converter would take this lens to over 1600mm. On top of that crop factor combo, the 2x converter would effectively give me a 2340mm lens. Either would also require a bright, sunny day and birds that remained fairly stationary for less than optimum shutter speeds or which I could photograph in flight, while I panned with the camera. And don’t get me started on handholding limitations. Suffice to say, a sturdy tripod with a  gimbal head would be a practical addition to your field outfit at this point.
 
While this lens does employ Tamron’s proprietary Vibration Compensation (VC) technology, image stabilization only takes a lens so far. Although, it often comes to the fore in situations where neither a tripod nor monopod is a practical solution.

In Use: Handholding the Tamron 150-600mm G2
I own a Canon 300mm f/4 IS lens. I used to complain about handholding that lens. No more. This Tamron lens makes that one feel like a featherweight. Okay, I exaggerate. Still, the Tamron is about 2 lb. heavier, and when held for long periods, that literally begins to weigh on you.
 
I’ve taken to doing curls with a 10-lb. dumbbell to build up endurance and resistance in my left arm, the one supporting the lens – and I’m happy to say, it’s worked, though I don’t feel I’m quite there yet. Still, I’ve been able to reduce shutter speeds at maximum focal length and still achieve sharp results.
 
After all that handholding, I’d decided to make things easy for myself and bring a monopod into the picture. What a difference that made! Granted, it slows me down somewhat and now I have to be careful when moving about, unless I collapse the leg or, better yet, detach the monopod from the camera entirely – two steps guaranteed to slow me down further.

​In Use: Image Stabilization
The lens offers three VC (Vibration Compensation) image stabilization modes. Mode 1 stabilizes the image when the shutter is released, but also maintains a stable viewfinder image while the shutter button is pressed halfway, or the AF button is activated. Mode 2 is used when panning. And Mode 3 foregoes the stable viewfinder image to deliver more certain stabilization of the image (which means, you’ll have to hold really steady to keep critical areas in focus). FYI – according to the official number crunchers, Tamron’s VC will deliver 4.5 stops of optimized shutter speed performance against camera shake when set to Mode 3.
 
In practice, I largely kept the lens in Mode 1. If you have trouble holding the lens steady, your compositions and focusing may be thrown off in Mode 3. Mode 1 at least gives me a good shot at controlling both.

One thing I’ve discovered is that I do much better getting sharp shots with the lens tilted downward to some degree, rather than straight on or upward. Apparently, there’s less tension exerted on the supporting arm this way. I did manage to get a camera-shake-free picture of a flower with the lens at 600mm (= 900mm/full frame) at 1/60 second, which translates to roughly a 4-stop gain for a handheld exposure – in Mode 3. The optimum for a handheld exposure at this focal length would be 1/1000 second.
 
When I was testing the Tamron 70-300mm some years back, I was able to go 5 stops slower than the recommended shutter speed to prevent camera shake, though not consistently. I really don’t like to rely on any image stabilization technology if I can avoid it, but I will resort to it in a crunch. When shooting with the 150-600mm, especially at the longest zoom setting, I often kept to fast shutter speeds, at most stretching to one stop slower. But these settings were also based largely on the fidgetiness and movement of my subjects, which mandated fast shutter speeds to begin with.

​In Use: The Dual Role of the Tripod Mount
The lens comes with a removable tripod mount. Do not remove the tripod mount. You know what will happen if you do: you won’t find it when you need it. More to the point, I use the tripod mount as a grab handle when carrying the lens. And I’ve attached a sling strap to the mount.
 
Also, for better balance, at least with my D610 and D500 (without battery grip), I’ve used the rear screw thread on the tripod mount for this purpose. The lens's tripod mount comes with a built-in Arca-Swiss-style quick-release (QR) plate. There are two tiny screws (provided) that you should attach at the base for added security (hex wrench included). Periodically check them and tighten if required. (A little bit of clear nail polish should keep the screws in. A trick I learned from one of the nicest people in the industry, the camera repair maven, Marty Forscher.)
 
So, why do I carry the camera by the lens’s tripod mount if I’m using a sling? Whenever I use a sling, I always grab hold of the camera as I’m moving about so I can more quickly bring it to my eye. I usually grab the camera by the grip, but that’s not a prudent step with a long, heavy lens such as this. Hence my use of the tripod mount as a handle. (I strongly recommend that you steer clear of picking the rig up by the camera body, and especially in sudden, jerky movements, which may exert sufficient torque force to damage the camera.)

​In Use: Zooming and Focusing
Zooming, while smooth, is not as fast as I might like. You have to grab the lens’s zooming ring with your whole hand when zooming from one extreme to the other, and it takes several turns or one or two really good twists if you’re a contortionist. When I’m running around, I often prefer to retract the lens so it doesn’t protrude as much and bump into things. But I’ve gotten used to it. A push-pull mechanism option would have proved handy, although I’m not sure that might not play havoc with the lens’s mechanics and long-term durability.
 
For minor focal-length adjustments, by cradling the lens in the palm of your hand and then using both your thumb and index or middle finger, you can easily zoom. The way you position the tripod mount will affect how you zoom. Without it, you may find zooming goes more smoothly.
 
Manual focusing or manual focus override with AF is more to my liking, and quite smooth. I can manage that operation with a finger or two on the focusing ring.
 
Autofocus operation in and of itself is reasonably good. That is, of course, due in large measure to the D500 that I’m primarily using with this lens now. It was not nearly as good with the D610.
 
The old and new 150-600 feature Tamron’s USD (Ultrasonic Silent Drive) ring-type motor, but Tamron does claim better AF performance with this lens. How much of that is a function of the lens itself is difficult to measure, but I’ll take Tamron’s word for it that it’s improved over the previous iteration of this lens, since I can’t compare them side by side. Either way, the G2 is fast but sometimes doesn't seem fast enough with flighty subjects. But I could also be to blame for not responding as quickly as I should in these situations.

​Who Should Use This?
Wildlife photographers, bird photographers, nature photographers, sports photographers – from amateur to seasoned pro.
 
Capsule Comments
A beautifully crafted lens with weatherproofing and protective coating on the front element; takes a bit of getting used to; may be easier to handhold for some than for others; not as fast as I’d like, but the price is right; delivers crisp results.

Conclusions
I made the right decision buying this lens. Granted, knowing I was getting a heavy, bulky lens didn’t entirely clue me into how to manage working with the lens, and that’s something I’m still working on. In the interim, I’ve stared using a monopod to ease the burden. The removable tripod mount is a great asset, both for improved balance when mounted on a monopod (or tripod) and while carrying with the aid of a sling strap.
 
One of my early concerns was finding the photo backpack to use with this lens, but, as it turned out, I had numerous options. I've carried the lens attached to the camera in Think Tank Photo’s StreetWalker Pro V2.0 backpack, and in Mindshift Gear packs, namely, TrailScape 18L, Moose Peterson MP-3 V2.0 pack, and even the new PhotoCross 13 sling pack (a snug fit, but manageable - see photo below).
 
Weight and size aside, the quality of images this lens delivers makes me as happy as the proverbial clam.
 
I just wish it were a faster lens so I wouldn’t find myself resorting to ISO 6400 as often as I do.
 
Still, the close-focusing capabilities and the amazing reach of 900mm on my Nikon D500 combine to give me a very versatile lens. Not only have I used it for birds, deer, and small mammals, but I found it works well when photographing flowers and other plant life that would have been out of reach, as well as with more intimate landscape views, all with nice, soft backgrounds when shot at or near maximum aperture.
 
So what it all comes down to is this: This lens was a great buy. I highly recommend the Tamron 150-600mm G2 to anyone interested in bird photography and wildlife photography in general. Just take the time to get to know the lens and especially the various image stabilization modes before venturing out on that once-in-a-lifetime adventure.

SELECTED PRODUCT SPECIFICATIONS (per Tamron)
Model: A022
Focal Length: 150-600mm
Maximum Aperture: F/5-6.3
Angle of View (diagonal): 16°25' - 4°8' (for full-frame format)
: 10°38' - 2°40' (for APS-C format)
Optical Construction: 21 elements in 13 groups
Minimum Object Distance (min. focusing distance): 86.6" 
Maximum Magnification Ratio: 1:3.9
Filter Size: Ø95mm
Maximum Diameter: Ø108.4mm
Length: for Canon 10.2 in / for Nikon 10.1 in
Weight: for Canon 70.9 oz / for Nikon 70.2 oz (incl. tripod mount)
Aperture Blades: 9 (circular diaphragm up to 2 stops down from maximum aperture)
Minimum Aperture: F/32-40
Image Stabilization Performance: 4.5 stops (using VC Mode 3) CIPA Standards Compliant (For Canon : EOS-5D Mark III is used / For Nikon : D810 is used)
Standard Accessories: Lens hood, lens caps, soft lens case
Compatible Mounts: Canon (w/VC), Nikon (w/VC), Sony A-mount (w/o VC)
Specifications, appearance, functionality, etc. are subject to change without prior notice.


Test Report: MindShift Gear's PhotoCross 13 Sling Bag Is a Natural for a DSLR with Attached 150-600mm Zoom

7/11/2017

 
PicturePhotoCross 13 sling pack (orange ember). Courtesy MindShift Gear.
​If the PhotoCross 13, from MindShift Gear, can hold my Nikon D500 with Tamron 150-600mm G2 attached, imagine what other combinations of gear it can carry! That’s the surprising discovery I made on the third day working with this bag. But first allow me to detour for a moment with some thoughts on choosing between a sling and backpack for your photo gear.

​Sling vs. Backpack
I routinely prefer a backpack for my photo adventures into the wilderness, and even on the streets of Chicago. More to the point, I’ve never been one to wear or even favor a sling bag when carrying camera gear, except when testing these bags. They are favored by the younger generation, I’ll give you that.
 
Granted, when I wear a shoulder bag, namely the Signature 13, I do so largely sling-fashion, but that’s only because the strap on that bag lends itself to easy portage in this manner. And I carry a light load (read more on the Think Tank Photo Signature 13 here.) 
 
The problem with bags that carry the moniker “sling” is, in my experience, that the strap always cuts into my neck, largely due to a shoulder pad that is too stiff and inflexible. And many of these bags try to be a photo pack minus the backpack harness, meaning they strive to fit as much gear as possible, to the point where your neck and shoulder will hate you 15 minutes into your trek.
 
So when MindShift announced the PhotoCross, I approached it with some trepidation. Little by little, the bag started to grow on me. In the end, I may have found the one sling that fits me to a tee.
​
PicturePhotoCross 13 (with orange accents) on the left; PhotoCross 10 on the right. Courtesy MindShift Gear.
​Choosing the Right Size
I immediately opted for the larger of the two new PhotoCross sling bags. In determining what would be a good fit, I began with the product photographs on MindShift’s website – the pictures showing the bags decked out with a complete array of gear.
 
The second thing I did (and do routinely) before requesting a sample bag for testing and evaluation is to watch the product video. MindShift (as well as Think Tank) keeps the introductory video short and sweet. I try very hard to read between the lines, but, I have to admit, they keep the dialog tight and to the point. So the only thing left for me to do was to order the bag I felt would be the right fit. And that was the PhotoCross 13. It proved to be the right choice.
 

​PhotoCross on the Surface
Aside from a choice in size, you have a choice in color schemes. More realistically, it comes down to a choice in color accents. I chose Orange Ember, the other choice being Carbon Grey (hey, MindShift – this is the USA; we spell it “gray”! No need to get hoity-toity on us.). I would have been happier still with a bag that was predominantly orange, with gray (not “grey”) accents.
 
The color accents around the front of the bag key us into the zipper locations. There is an outside pocket, which I wish would have been pleated to accommodate a light jacket. But, as is, it’s still functional enough to hold any non-bulky extras you may need. There’s also a pair of smaller pockets inside this outer pocket. The other zipper leads to the main camera section, with additional pockets.
 
There’s also some accent stitching on the back – not that anyone will notice while you’re wearing the bag. Still, a nice touch. And there are other subtle color accents besides.
 
Okay, color schemes aside, let’s get down to the nitty-gritty. The body of the bag maintains a fairly svelte appearance. That’s not a fashion statement. That’s a practical feature. In the woods there’s less likelihood that the bag will hinder your progress in tight spaces and it won’t bump into people on buses and trains. Well, the tripod hanging off the back might, but you can always hand-carry it till you reach a clear path.

​The PhotoCross Harness System
This sling pack features a one-piece, adjustable shoulder strap, with thin, air-circulating, mesh-covered padding lining much of the strap. There’s a stretch of similar padding extending out from the base of the bag, which falls against your lower back. I wish this padding ran the entire length of the strap for added comfort.
 
That same mesh lines the back of the bag. However, lacking the raised shoulder and lumbar pads usually found on a backpack, this really didn’t provide much cooling. But there’s a way around that (read on).
 
The shoulder strap has no buckles to fasten and unfasten. While fasteners do make it easy to remove the bag when you’re seated, in every other conceivable situation, they’re a nuisance – and a potential hazard. With gravity and inertia taking over, you may lose your grip on one or both straps when trying to snap the ends together, or when unsnapping them, with the potential for the bag to come crashing to the ground.
 
And to sweeten the deal, there is even a set of compression straps – one at the top, another at the bottom – so you can better tailor the shoulder strap and ultimate fit to your comfort level. By this means you can separate the bag from your back a bit more for improved air circulation.
 
What’s more, there’s no sliding shoulder pad that you constantly have to readjust. The padding is part and parcel of the strap, so it moves with the strap. And, again, the soft padding on this bag ensures your neck won’t chafe from a stiff shoulder pad. You may still find yourself adjusting the strap to optimize your comfort level, but that’s something one does normally when wearing any bag.
 
There’s also a tuck-away waist belt. It’s largely there in case you’re negotiating treacherous terrain and want to prevent the bag from shifting and throwing you off-balance.
 
Couple that with a pair of hand straps to help you get a better grip on the bag. Add to that, the bag employs reinforced box-X stitching at stress points on the main handle. And the stitching on the bag overall is immaculate, with nary a loose thread that I could find.

PicturePhotoCross 13. I pulled out the dividers, positioning one as a "floating cushion" beneath the lens, then parked the D500 with attached Tamron 150-600mm G2 cozily in the bag.
​The PhotoCross 13 in Use
The bag is meant for a casual walk in the woods or on city streets, with a modicum of gear. You’re not going to get a gripped DSLR and long, fast lenses in here.
 
The main camera section has three, fully adjustable modules, with movable padded dividers (via Velcro-type hook-and-loop fasteners). What will that fit? I’ve carried a 70-300mm attached to the camera, a flash in the second module, and various accessories including sling strap in the third. Actually, you’ll be surprised at how much you can squeeze into this bag.
 
What’s more, I was pleasantly surprised when I was able to load my D500 and 150-600 zoom into this bag. It was a tight fit and getting this combo back in the bag while I was wearing it required a bit more of an effort than when removing the gear. It was also fairly easy to load this combo into the bag before donning it. I also managed to fit the Nissin i60 in a soft pouch on top when I'd started out.

If you’re wondering, if I had to remove the tripod mount on the 150-600, the answer is no. I inserted the camera into the bag lens first, camera grip upwards (portrait mode). And I rotated the tripod mount so it rested facing upwards, making it easy to grab the mount as a handle and pull up. Once out of the bag, the tripod mount was returned to its original position.
 
There’s also a tablet sleeve inside the camera section, lying against your back. I say “tablet,” not “laptop,” because I can’t see anyone schlepping a laptop of any size, unless it weighs no more and is no bigger than a tablet (contrary to specifications). I’m not even sure I’d carry a tablet, certainly not with the long-lens rig just described. Perhaps I would with a smaller, lighter load.
 
Because I wear hats, the hat does get in the way, requiring its removal when donning the pack, or removing it. A sling camera strap proved equally annoying when wearing this sling pack. I may try to sling the bag to the left and carry the camera at my right (for a fast grab – really, the only way to use a sling strap) and see how that works. Although I’ll probably just keep things as they are, being right-handed.
 
Given that the bag’s hand strap on top falls naturally in position for an easy grab with your right hand when the bag is carried to the left, I’m beginning to wonder if that wasn’t the intended carrying method. I gave it a quick try, but it didn’t feel natural, so back to the tried and true (subject to change without prior notice).
 
A third strap on the bottom would equal the score in terms of making it easy to grab and swing the bag around, but that may interfere with the integrity of the bottom panel, which is designed to be better resistant against wear to vertical placement and scraping of the bag on rocks and dirt.
 
All that aside, what’s important is that the entire time I wore the PhotoCross, I never felt as if it were choking me or cutting into my neck.
 
One thing I should point out. It may take a bit of trial and error to get the shoulder strap just the right length, while adjusting the compression straps for maximum comfort. For now I have the bag flush against my back at the top, but looser at the bottom, which seems to work for me.

Look for a review of the Nikon D500 and Tamron 150-600mm G2 soon.

Who Should Use This?
Hikers and nature enthusiasts; tourists; amateur photographers on a regular basis and even pros on vacation.
 
Capsule Comments
Fairly comfortable and protective; durable construction; customizable; thoughtfully designed; room for a tripod and full-size water bottle; weather-resistance aided by included rain cover; barely room for a jacket in the outer pocket but can be carried in place of a tripod, or perhaps with the tripod; holds a small laptop (PhotoCross 13) or tablet (if you must); PhotoCross 13 was surprisingly roomy – carried my DSLR with attached 150-600mm zoom.
 
Conclusions
On one outing, after detaching the sling strap from the camera, I put the camera down in preparation for returning it to the bag. Then it dawned on me: Hey, this is a sling bag! No need to take that extra step. Of course, I could have left the camera attached to the strap, but who knows how the mind works sometimes? (Either way, I often prefer to separate strap and camera till I reach my destination.) Anyway, I brought the bag around to the front and unzipped it, picked the camera up, tucked it safely into the bag, followed by the sling strap, zipped the bag, and returned it to its resting place against my back. The story doesn’t end there.
 
Going home I boarded a crowded Chicago “L” (subway) train, resigned to stand for much of the trip, when I spied a seat. I shifted the bag to the front, against my stomach, grabbed onto an overhead hand strap, and gingerly swung myself into the seat for a perfect landing that didn’t jostle the passengers on either side. Had I been carrying a backpack, this story would have ended quite differently.
 
Now here’s my full itinerary for the first three days of testing. It went something like this.
 
Day 1: Sweltering heat and humidity, but I managed a short walk around the neighborhood without feeling stressed out by the adverse conditions. Gear: Nikon D500, Nikon 18-200mm attached to camera, Nissin i60A shoe-mount; Custom SLR Glide One sling strap.
 
Day 2: This day saw me on a walking tour of Chicago Riverwalk for several hours, in the evening – cooler, but considerably more walking. Gear: D500 with attached 18-200mm, ultra-compact Sirui T-025X carbon fiber tripod; Giottos compact head carried inside the bag (so the tripod wouldn’t extend out from the bottom); Nissin i60A flash; Glide One sling.
 
Day 3: I headed into the woods sans tripod to photograph deer and wildflowers for a few hours – a mild hike on undulating paths, on a fairly muggy day. Gear: D500, Tamron 150-600mm G2 lens attached; Nissin i60A (although after packing away the camera with sling strap attached, couldn’t find room for the flash so ended up carrying it in a vest pocket); Glide One strap.
 
On that last day, as I set out on the bus, it also dawned on me that I would never have to put the bag down while on a bus or train. I could simply slide it around so that it reposed gently, without the full weight falling on my knees, allowing me to sit comfortably.
 
At this point, I’ve pretty much dedicated the PhotoCross to carrying my D500 and 150-600. Well, until this Sunday, when I hit Chinatown for a festival and will likely switch lenses – but not bags.
 ​

MATERIALS
Exterior: All fabric exterior is treated with a durable water resistant coating while fabric underside is coated with polyurethane for superior water resistance, YKK weather resistant zippers, 420D high-density nylon, heavy-duty nylon Tarpaulin, 350g air mesh, nylon webbing, 3-ply bonded nylon thread.
 
Interior: Removable closed-cell foam dividers, P210D liner, polyurethane backed Velex liner, 2x polyurethane coated 210T seam-sealed taffeta rain cover, nylon binding tape, 3-ply bonded nylon thread.

Where can I get more info/order this product? (Click on highlighted link.)
MindShift Gear (use this link to order direct)

 
Manufacturer:
MindShift Gear

 
How much is it?
$129.99/PhotoCross 13
$114.99/PhotoCross 10

​FEATURES (per MindShift Gear)
  • PhotoCross 13 fits an ungripped DSLR, 2 - 4 lenses including a 70-200mm f/2.8 and some 13” laptops
  • PhotoCross 10 fits an ungripped DSLR + 1 - 2 lenses + 10” tablet or mirrorless body + 3 - 5 lenses + 10” tablet
  • Weatherproof zippers and materials
  • Tripod or jacket carry with included straps
  • Dedicated, padded pocket fits a tablet or a laptop (10 = 10” tablet, 13 = some 13” laptops)
  • Easy rotation for rapid access to gear and accessories
  • 3-point harness for stabilization with tuck-away waist belt
  • Secure your bag by linking the zipper pulls together
  • Water bottle pocket locks in most 1 liter bottles
  • Breathable 320G air-mesh back panel keeps your back cool during long days
  • Internal zippered pockets for batteries, memory cards or other small accessories
  • Easily accessible front pocket for filters, snacks, or a light layer
  • T-pulls are easily gripped with or without gloves
  • Top and side carry handles
  • Fully customizable interior dividers for photo or personal gear
  • Seam-sealed rain cover included for downpour conditions

​SPECIFICATIONS
 
PhotoCross 13
  • Internal Dimensions: 9.4” W x 14.2” H x 5.5” D (24 x 36 x 14 cm)
  • External Dimensions: 12.6” W x 17.7” H x 7.1” D (32 x 45 x 18 cm)
  • Laptop compartment: 9.1” x 13” x 1” (23 x 33 x 2.5 cm)
  • Maximum weight (with all accessories): 2.4 lbs (1.1 kg)
  • Shoulder strap length: 42.5–62.2” (108–158 cm) (includes length of product)
  • Waist belt length: up to 63.8” (162 cm) (includes length of product)
  • Volume: 11 liters


​

PhotoCross 10
  • Internal Dimensions: 7.1” W x 12.5” H x 4.8” D (18 x 31.8 x 12.2 cm)
  • External Dimensions: 11” W x 15.9” H x 6.3” D (28 x 40.5 x 16 cm)
  • Tablet compartment: 8.2” x 11” x 0.6” (20.8 x 27.9 x 1.5 cm)
  • Maximum weight (with all accessories): 2.1 lbs (1.0 kg)
  • Shoulder strap length: 42.5–62.2” (108–158 cm) (includes length of product)
  • Waist belt length: up to 61” (155 cm) (includes length of product)
  • Volume: 7.5 liters


Test Report: Nissin i60 Compact, Multi-Mode Shoe-Mount Flash for On-Camera and TTL Wireless Operation, Including Radio TTL Wireless

7/7/2017

 
PictureNissin i60A. Courtesy NEIDLLC.
​Nissin introduced TTL radio wireless capability with the Di700A shoe-mount and Air 1 transmitter (reviewed here). Now this same wireless capability comes to Nissin’s latest flash, the i60A.
 
What sets the i60A apart from the Di700A is the new shoe-mount’s compact size and more extensive feature set. Does this mean it’s a better fit for you and your style of shooting? Let’s see…
​

But First a Few Words about Nissin TTL Radio Wireless Flash
Nissin labels its proprietary 2.4GHz TTL radio wireless technology NAS, for Nissin Air System (not to be confused with NAS, or network-attached storage, drives). Hence the “A” designation in both the Di700A and i60A – for Air-compliant. Out of the box, and without accessories, both shoe-mounts support on-camera and wireless TTL operation – but without radio triggering. It takes one key additional component to activate radio triggering, the Air 1 transmitter.
 
“Air” represents a key link in the system. An integral component (albeit optional) is the Nissin Air 1 transmitter, which sits in the camera’s hot shoe. The Air 1 controls and triggers the Air-compliant off-camera flashes, which are said to be slaved to the Air transmitter, or master.
 
All output and zoom settings are made on the Air 1. Only Group (and, where applicable, channel) settings are made on the remote units. You might want to designate different remote flashes under separate groups for better lighting control of subject and background. (Channel settings are rarely required and usually only come into play to prevent interference with devices on the same channel.)
 
If you use a TTL-dedicated, non-Air-compliant flash, whether Nissin or another brand, simply attach the optional Nissin Air R remote receiving module to the flash by way of the hot shoe and you’re in business, with camera, Air 1, and all remote components talking to each other to deliver reliable TTL flash exposures.
 
Radio control in this wireless system, according to Nissin’s specifications, will work with off-camera flash units to roughly 100 feet. Typically, radio triggering has the added advantage that it works even when those remote strobes are situated around corners or behind obstacles, in contrast to photo-optical and infrared triggering, which require a direct line of sight. And radio triggering is more reliable outdoors.
 
Keep in mind that these A-designated flashes will not trigger TTL dedicated strobes in any fashion (not even other Nissin strobes). They require a separate Master module, whether radio or optical/infrared, to trigger them in order to produce TTL flash exposures. However, they will trigger any flash that has a built-in photo-optical sensor, for conventional flash operation using manual exposure control.
​
​Nissin i60A: A Closer Look
The i60A is rather odd-looking. Seated in the camera’s hot shoe with head down (default position), the i60A presents a remarkably low profile. It manages to fit 4 AA batteries and all the circuitry into a squat little form factor.
 
So, what’s odd about it. Sitting on that compact battery housing/control center is a ginormous flash head. At least that’s how I’d describe it. The base of the i60A measures roughly two-thirds that on the Di700A in height. But the flash head itself is a tad longer than the head on its older sibling – by about 1cm. The depth of the head on the i60A (measured at the face, top to bottom), is about 2cm less (not including that odd bump toward the back of the i60A - possibly housing the capacitor). But when you add it all up, the head looks out of proportion, judging by its size relative to the base. Nothing wrong with that, but the overall size does warrant closer examination.
​
​Small, Yet Packs a Punch
Getting past the look of the flash, let’s see what this little shoe-mount is all about. For starters, the i60A is pimped up with all the shooting modes found on the Di700A, but with even more control. That means full TTL flash operation on camera and remotely. Remote operation extends to optical/infrared TTL wireless, photo-optical non-TTL wireless, and TTL wireless radio operation.
 
While we rarely use Guide Numbers (GN) in this day and age of TTL dedicated flash, the GN does give us a sense of the effective reach and power of the unit. And in that sense, it serves as a practical guide, hence “Guide” Number.
 
At ISO 100, the i60A will cover a distance of 89 feet (27 meters) at the 24mm zoom setting. At the 200mm setting (ISO 100), that jumps to 198 feet (60 meters). Compare that to any camera’s built-in flash. The i60A’s built-in diffuser panel and included dome diffuser will knock these numbers back a bit.
 
By the way, the i60A is a bit more powerful than the larger Di700A. At the 200mm zoom setting, the GN for the Di700A is 178/54 (ISO 100, ft/m). And the new flash is considerably more capable than the even smaller and older Nissin i40. The i60A is also the most expensive flash in the current Nissin lineup, even more than the flagship Di866 Mark II. The i60A draws on much of the functionality from the 866 Mk II while replacing more esoteric features and expanding on others.
 
The i60A adds one more feature not found on most shoe-mounts: a video light. This light, consisting of two LEDs (diffused), can be adjusted in brightness. And it’s bright! I didn’t realize it at first, but this video light would really come in handy at some point in a studio setup. And, if nothing else, it makes a great flashlight in a pinch. (You’ll also find this feature on the earlier i40.)
​
​The Interface – User-Friendly… to a Point
The interface on the i60A consists of a color LCD panel, dials, and buttons. The LCD panel is small but easily readable, if you have fairly good eyesight, that is. It is, however, difficult to read under bright lighting. I recommend you shade the display outdoors when changing settings.
 
Somewhat disconcerting, the panel dims almost immediately and there’s no way around this. But you can bring it back to full brightness by a press of any button, except, obviously, the on/of switch, or when changing modes.
 
The control dials may be a bit harder to read for some, especially if you suffer from astigmatism. The lettering is tiny and the detent marker on the mode dial doesn’t precisely align with the mode settings - nor is it clearly marked (it's raised), so you may do better paying close attention to the LCD display to get a better sense of the flash mode than to the mode dial itself. And in dim light, that may be the only way to read flash modes, unless you bring a flashlight or a cell phone with you.

Picture
Nissin i60A interface showing flash in full TTL mode (non-wireless), at -2 EV. To use the TTL wireless modes, shift the mode dial down to the Group settings: A, B, or C (with matching settings on the Master controller/transmitter/trigger). Courtesy NEIDLLC.
Picture
Nissin i60A interface showing flash in Manual mode, at reduced output, with zoom set at 105mm (zoom setting uses dial on the right). Courtesy NEIDLLC.
​Speaking of Those Control Dials
The dial on the left is for flash modes, with the following options. For on-camera (hot-shoe) usage: the green “A” is for fully auto TTL flash, whereas “TTL” gives you more complete TTL flash control, with the added option of onboard flash exposure overrides (to +/-2, in 1/3-step increments).
 
For remote operation, the dial offers SD (for pre-flash digital), SF (non-TTL-flash exposures with any optical flash/trigger), and A/B/C. The A/B/C settings are used with the Nissin Air radio-controlled system. (More on wireless operation below.)
 
The dial on the right provides settings for wireless radio channels (1 to 8) and manual zoom. The other settings control audio (beeps) and high-speed sync for cameras that don’t have that option built-in (not applicable to Nikon DSLRs). The key problem with these controls is that they’re so small that you need a fingernail to access them. Hold down the button until the display changes to the required parameter, for example, zoom focal lengths. Then turn the outer wheel, which is also used to change output settings for the applicable modes. The central button locks in settings.
​
​Wireless Operation
By the way, and this may confuse the issue somewhat, my D610’s built-in flash can be used to trigger the i60A in any wireless mode. In the absence of the Air 1 trigger, the A/B/C settings can also be used for non-radio (that is, optical/infrared) wireless TTL operation of either or both the i60A and Di700A, in the current example, with Nikon CLS controlling exposure.
 
You should also be aware that the i60A (and the Di700A) respond to the built-in flash on the Nikon D610 regardless of channel setting made in the camera or on the i60A. (There are no channel settings on the Di700A.)
 
In the final analysis, what’s really important is that TTL wireless control works reliably, whether via radio or optical/infrared control.
​
​Now More on That Flash Head
The flash head itself raises, lowers, and swivels without the use of a release button. The detents appear to be well enough engaged that the head won’t drop easily when you’re running around with the flash head up at an angle. Adding heavy bounce panels or other accessories to the head may, however, cause a precipitous and unexpected drop if you jostle the flash too much. However, the flash appears constructed well enough to tolerate a bit of mistreatment.
 
We should point to one practical consequence of this disproportionate head on the i60A. When you raise the head fully erect and position it on the mini-stand, the flash will topple over backwards, owing to a high center of gravity. Either lower the head two or three notches or, better yet, reverse-mount the flash on the stand for better support while still maintaining the original stance.
​
​Size Matters
The raison d’etre for this flash is its compact size. Compactness is one thing. But we do have to evaluate how this shoe-mount’s size affects performance. As it turns out, size does matter. But not as much as you’d think.
 
One of the reasons we avoid using the camera’s built-in flash with people (and sometimes animals) is because the on-axis light produced by the flash results in red-eye, where the pupils take on a pronounced blood-red color (due to bounce-back of light off the back of the retina). To mitigate against this possibility, we prefer to use flash off camera, or at the very least use a full-size shoe-mount flash. You could use a red-eye reducing pre-flash, but that destroys the spontaneity of the shot – not to mention the likelihood that your subject will move during that interval.
 
The i60A sits low enough that it could conceivably result in that same red-eye effect encountered with a pop-up flash. We can’t say that categorically, since numerous factors come into play – but I’m just throwing it out there as a possibility, perhaps even a strong probability.
 
We also have to consider the lens barrel and/or lens hood (lens shade) getting in the way and blocking the light. The good news is that tests with my Tamron 70-300mm lens, with and without lens shade, on my Nikon D610, bore out that, at normal shooting distances, you don’t get that arc-shaped shadow at the bottom of the screen, which would typically occur when the lens blocks the flash. So I decided to push it further. It proved to be true even when I moved in close with the lens.
 
I had even used a Tamron 90mm macro lens with attached lens shade on my Nikon D500 with no observable ill effects, shooting some very tight close-ups, I might add. I also tested the flash with my Tamron 15-30mm f/2.8 lens (with built-in lens shade), which has an 82mm filter diameter – a wide schnoz going up against a compact head – with no ill effects to report in terms of light blockage.
 
However, and this is not directly related to size, further tests revealed that light coverage was uneven at very wide lens focal lengths, as tests with the aforementioned 15-30mm lens on my D610 bore out. In fact, I’d recommend you shoot no wider than 24mm, even with the diffusion attachments. You may not notice this in everyday subjects, unless you’re shooting a wall or other uniformly toned flat surface.
 
PictureNissin i60A shown seated atop the included mini-stand, in bounce mode, with both panels in place, along with the included soft box (dome diffuser). Photo @2017 Jack Neubart. All rights reserved.
​No Confusion about Diffusion
In contrast to the Di700A, the i60A does come with a dome diffuser (diffusion dome), or “soft box,” in Nissin’s parlance. There is also a built-in diffusion panel that you pull out of a slot (for use with ultra-wide lenses) – but, in contrast to other shoe-mounts, here this panel extends from the floor, as it were, not from the roof of the unit.
 
What’s more, Nissin cleverly separated the bounce/kicker panel so that it slides out from the top of the unit, somewhat like an awning. On most flashes, trying to extract this panel means first withdrawing both the diffusion and bounce panel together, then returning the diffusion panel to its default position. Much simpler this way when you quickly want to add a catch light to someone’s eyes when using bounce flash.
 
Take all this to the next level. Let’s say you want to diffuse the light further. Simply raise the diffusion panel in place, then snap on the diffusion dome.
 
Now let’s take this one step further. Shooting with bounce flash but feel you’re losing too much light? Simply slide the bounce panel in place – without even removing the plastic dome. This flash opens up a world of opportunities in lighting, and we haven’t even taken it off the camera yet or added other strobes to the mix.

​In Use
Even after a few days, I’m learning new things about this flash. That’s not to say that there’s a long learning curve. Quite the contrary. I put the i60A to use as soon as I pulled it out of the box and installed batteries. But that may be easier for me, since I’ve only recently worked with the Di700A, not to mention a spate of Nissins in the past.
 
I first set about creating a tabletop set with a musical jewelry box in the form of a grand piano, with twirling ballerina on top. The initial setup used the i60A and Di700A as off-camera flashes triggered by the Nissin Air 1 transmitter seated in the Nikon D500’s hot shoe. I’d set the background flash – the Di700A – as Group B with a lower output setting, with the i60A at full power as the key light from in front and to the side. Everything worked as expected. Now came the next phase, capturing the ballerina performing a pirouette atop the piano. But, as is, there wasn’t enough ambient light to record the movement.
 
So the next day, I made a few changes. First, I draped black velvet inside the light tent. Black velvet has a way of catching the light as undulating waves, which adds depth to any still life set.
 
Then, just when I was about to set up the i60A as the key flash, with the Di700A again playing a supporting role, a voice in my head loudly chastised me, saying, Hey, use the video light! So I did. A few tests later and I had the light at the right brightness level.
 
I don’t know that I would call either shoe-mount the key light in this instance. After all, the contribution made by the video light was just as important to the shot as the flash illumination provided by the Di700A. By the way, to soften the light from the flash, which does not come with a diffusion dome, I added a small bounce panel.
 
What did the video light do? I set the exposure for slow-sync flash. That means, I used a relatively long exposure. At first I tried a half-second, then a full second. Still not quite what I wanted. So I pushed it to two full seconds – and that did the trick. The spinning figurine recorded as a soft blur of movement by the video light (which we’ll consider our ambient lighting) and was at the same time frozen in time by the flash.
 
I also added a silver panel directed at the front of the piano, notably for the legs and foot pedals (see the set shot). And if you’re wondering why I raised the piano lid all the way up, that’s because the ballerina kept bumping into it and getting knocked off balance – and the rod supporting the lid partially blocked the dancer.
 
I also took the flash outdoors. But I’ll let the pictures and captions tell the rest of this story.
​
Who Should Use This?
Any amateur just starting to use flash or who wants to add something extra to an existing flash setup.
 
Capsule Comments
Fairly easy to use and compact; multiple operating modes for both on-camera and off-camera use, including TTL optical/infrared and TTL radio wireless flash; digital LCD plus an array of dials and buttons (which may be difficult to see/use for some); dome diffuser included, along with built-in diffusion and kicker panels; powerful for its size; built-in adjustable video light. 
​
​Conclusions
The i60A represents a step up for Nissin. This flash builds upon the flagship Di866 Mark II and improves upon it, while doing all that in a smaller form factor.
 
For starters, the i60A is a complete package. It offers full TTL flash operation on camera and TTL wireless operation off camera, including radio triggering (as a slaved unit). The only thing missing is being able to use this flash to trigger remote strobes in a TTL configuration. Hopefully that will come in the next generation Di866, which is due for a refresh, complete with that “A” (Air) designation and radio control (both transmitter and receiver).
 
A welcome first for a Nissin flash, when the i60A is set to a non-wireless mode, which includes the video light, the flash enters standby when the camera is switched off, and is re-animated when the camera comes back to life. Previous Nissins failed to be put to sleep or awakened by the camera. (Wireless operation mandates that the flash remain in a ready state.)
 
Complete mastery of the controls does involve a bit of a learning curve – considerably more so than with the Di700A – but you’ll get the hang of it soon enough. I’d say this unit is better suited to younger individuals. Those with failing eyesight and arthritic fingers would do better with the Di700A.
 
Finally, Nissin stands head-and-shoulders above those cheap knockoffs of OEM (original equipment manufacturer) shoe-mounts. Some may argue over whether these Nissin flashes can go toe-to-toe with gear from the original manufacturer. However, given a very inviting price point combined with a full feature set that includes every practical mode of TTL wireless flash operation, Nissin gear can’t be beat. And the Nissin i60A shoe-mount is certainly a step in the right direction.
​
Compatibility
The Nissin i60A is available for Nikon, Canon, Sony, Micro Four Thirds, and Fujifilm systems.
 
SELECTED PRODUCT SPECIFICATIONS (per Nissin)
Guide no. (at ISO 100): GN60 (in meters, at 200mm zoom head position)
Focal length coverage: 24mm – 200mm (16mm when using built-in diffuser)
Power source: 4 size-AA batteries
Recycling time: 0.1- 5.5 sec
LED video light operation time: 3.5 hours
Flash Duration: 1/800- 1/20,000 sec
Color temperature: 5,600K
  Wireless mode: 2.4Ghz Nissin Air System radio wireless, Optical wireless TTL slave, non-TTL Slave (SD, SF mode)(*4)
EV compensation on flash: +/- 2EV in increments of 1/3 EV
Bounce/swivel: Up: 0°- 90°, left/right: 0°-180°
Operation panel: Color LCD with dial control
Manual mode power ratio: 1/256 - 1/1 (1/3-step increments)
Mode: Auto, Manual, SD, SF, Wireless with A, B, C & channel selection (2.4Ghz Nissin Air system & optical) (*4)
Dimensions: 112 (H) x 73 (W) x 98mm (D) / 4.4 (H) x 2.9 (W) x 3.6” (D)
Weight: 300g/ 10.8oz (excluding batteries and soft box)
​
Manufacturer
Nissin
 
Distributed by/Order From/More Info:
www.neidllc.com (order from authorized resellers)
 
How much is it?
$339.99
​
Additional Reading (click the highlighted link)
Read my introductory feature story on TTL wireless flash in Shutterbug Magazine (online).
 
Read my feature story on No Strings Attached With Wireless TTL Flash for multiple-flash photography in Shutterbug Magazine (online).
<<Previous

    Reviews

    TECHNICAL EDITOR
    Jack Neubart

    This website uses marketing and tracking technologies. Opting out of this will opt you out of all cookies, except for those needed to run the website. Note that some products may not work as well without tracking cookies.

    Opt Out of Cookies

    Archives

    May 2025
    April 2025
    January 2024
    December 2023
    December 2019
    September 2019
    August 2019
    July 2019
    May 2019
    April 2019
    February 2019
    November 2018
    September 2018
    August 2018
    May 2018
    January 2018
    November 2017
    September 2017
    July 2017
    June 2017
    May 2017
    April 2017
    February 2017
    December 2016
    November 2016
    October 2016
    August 2016
    July 2016
    May 2016
    April 2016
    March 2016
    February 2016
    January 2016
    December 2015
    August 2015
    December 2014
    August 2014
    July 2014
    April 2014
    November 2013
    October 2013

    Categories

    All
    13x19-inch Printers
    35mm-style Digital Cameras
    Acratech
    Adler Planetarium
    Adobe
    Adobe Bridge
    Adobe Creative Cloud
    Adobe Firefly
    Adobe Lightroom Classic
    Adobe Photoshop
    Adobe Photoshop Lightroom
    Adobe Photoshop Lightroom Classic
    Adobe Photo Software
    Adobe Software
    Affinity Photo
    Affinity Photo 2
    AI
    AI-assisted Photo Software
    AI Image Editing
    Artificial Intelligence
    Austin
    Backpacks
    Ballheads
    Berlin
    Bird Photography
    Black-and-white
    Black & White
    Bokeh
    Butterflies
    Butterfly Photography
    Camera Backpacks
    Camera Bags
    Camera Cases
    Camera Holsters
    Camera Luggage
    Camera-M
    CameraPixels
    Camera RAW
    Camera Supports
    Canon Cameras
    Canon Lenses
    Chicago
    Chromatica
    Close-up Photography
    Compact DSLRs
    Compact Photo Printer
    Compact System Cameras
    Desktop Printers
    Digital Image Editing
    Digital Image Editor
    Digital Image Processing
    Digital Imaging
    Digital Negative
    Digital Projectors
    Digital Retouching
    Digital SLR
    DNG
    DSLR
    DSLR Photography
    DxO
    DxO Labs
    DxO Photolab
    DxO PhotoLab 8
    DxO PureRAW
    DxO PureRAW 5
    Epson
    Exposure Control
    Fashionable Bags
    Fast Lenses
    Film Emulation
    Flash Photography
    Generative AI
    Generative AI Image Editing
    Generative AI Photo Software
    Great Blue Heron
    Hawaii
    HDR Plug-in
    HDR Software
    HD SLR
    HD-SLR
    High-resolution DSLR
    Holster Bags
    Illinois
    Image Editing
    Image Editing Software
    Image-editing Software
    Image-stabilized Lenses
    Inkjet Printers
    Insect Photography
    IPhone Photography
    Lake Arlington
    Landscape Photography
    L Bracket
    L-bracket
    Lens Blur
    Lens Cases
    Lenses
    Lens Pouches
    Leveling Base
    Lightroom
    Lightroom Classic
    Long-lens Bags
    Luminar Neo
    Macphun
    Macro
    Macro Flash
    Manfrotto
    Masking
    Mega-zoom Digital Camera
    MindShift Gear
    Mirrorless Cameras
    Nikon
    Nikon Cameras
    Nikon Digital Cameras
    Nikon Mirrorless
    Nikon Pro Digital Cameras
    Nissin
    Nodal Rail
    Nodal Slide
    Olympus
    Outdoor Photography
    Panorama Head
    Panoramas
    Panoramic Photography
    Peggy Notebaert Nature Museum
    Photo Accessories
    Photo Backpacks
    Photo Belts
    Photo Editing
    Photo Editing Software
    Photographing Birds
    PhotoLab
    PhotoLab 8
    Photo Luggage
    Photo Rollers
    Photoshop
    Photo Software Review
    Plug-ins
    Point-and-shoot Zoom
    Portrait Retouching Software
    Prague
    Printer
    Pro Cameras
    Pro Digital Cameras
    Radio Remote Flash
    Radio TTL Wireless Flash
    Rain Covers
    Rain Hoods
    RAW Conversion Software
    Raw Image Editing
    Raw Image Processing
    Raw Processing
    Review: Photo Accessories
    Review: Phottix Odin Radio Remote
    Review: PocketWizard ControlTL
    Review: Software
    Ring Flash
    Rolling Cases
    Samsung Cameras
    Serif
    Shimoda Designs
    Shoe Mount Flash
    Shoulder Bags
    Shutterbug.com Review
    Shutterbug Magazine
    Sigma Lenses
    SKB Cases
    Skokie
    Skylum
    Sling Bag
    Sling Bags
    Sling Pack
    Snapshot Printer
    Software
    Software Effects
    Software Reviews
    Split-toning
    Super Wide Lenses
    Super-wide Lenses
    Superzoom
    Tamron Lenses
    Telephoto Zooms
    Tenba
    Texas
    Think Tank Photo
    Tripod Heads
    Tripods: Carbon Fiber
    TTL Radio Wireless Flash
    TTL Wireless Flash
    Ultra Wide Lenses
    Ultra-wide Lenses
    Ultra-zoom Digital Camera
    Valley Of Fire
    Wide Format Printers
    Wireless Flash
    Zoom Lenses
    Zoo Photography

    RSS Feed

    All products and services are the trademarks or registered trademarks of their respective owners.
    Use or mention of any product or service is not an endorsement - compensated or otherwise.
    However, manufacturers, distributors, vendors & services may provide products or services for use.

    Your purchase and/or use of any product or service tested, reviewed, listed or mentioned is solely at your discretion and you release us from any and all liability associated with such purchase and/or use.

Your satisfaction, our expertise. They go hand in hand.
Bringing over 35 years' experience into everything we create.

Entire contents of this website is comprised of original works created by Jack Neubart, including but not limited to photographs, digital work, musical compositions, stories, humor, poetry, and any other artistic or textual material, unless otherwise noted. 
Contents Copyright ©2025 Jack Neubart. All rights reserved. Protected under United States and International laws and treaties.
None of the contents may be copied, extracted, abstracted, adapted, transmitted, digitally altered, or otherwise used or published without express permission of the Copyright owner.
All products and services are the trademarks or registered trademarks of their respective owners.
Use or mention of any product or service or vendor/supplier is not an endorsement - compensated or otherwise.
However, manufacturers and distributors may provide product for use.
Webmaster: Jack Neubart (building on a Weebly.com template).