
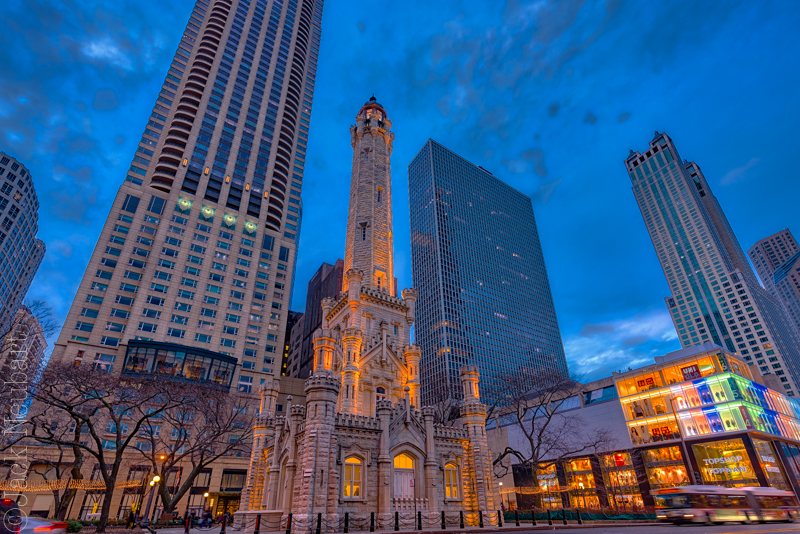
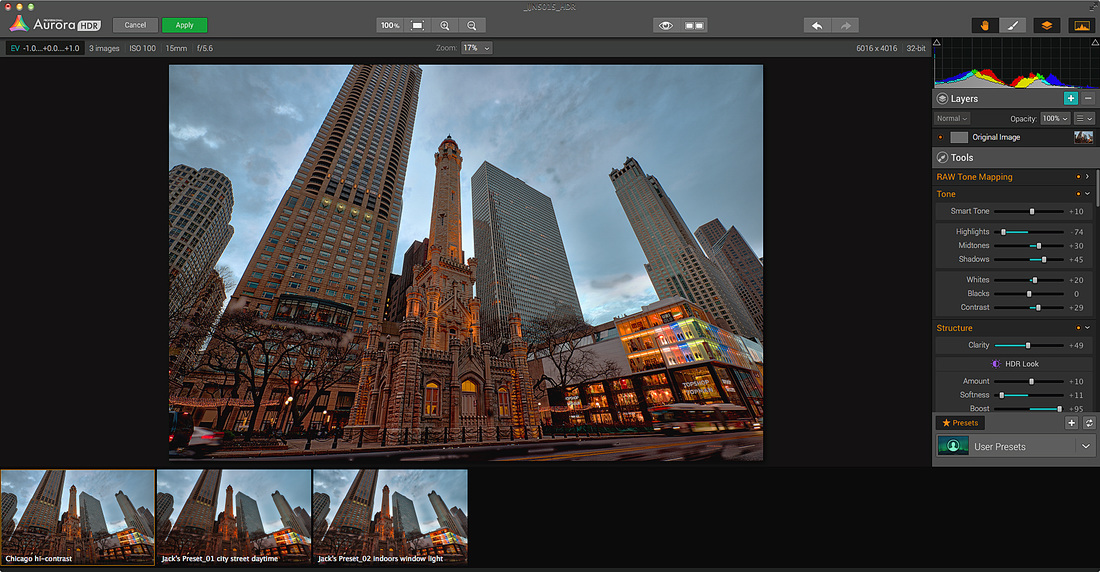
I wanted this shot to have more of a Magic Hour feel, so I built the HDR from TIFF files processed in Lightroom, instead of using the original RAW files. This is a view from Michigan Ave. of Chicago's historic Water Tower.
Before creating an HDR, you have to ask yourself: Is the process adding something of value to the picture? Am I rescuing key highlight and shadow information that would otherwise be lost? Am I adding something of aesthetic value to the picture?
Each time I export images to an HDR application, I ask myself these questions. Or I should. Sometimes, in the excitement of trying to do more, I end up doing less, and then I go back and chastise myself for forgetting to address these questions.
I’ve worked with numerous HDR apps, most often as plug-ins to Adobe Lightroom, always in search of the ultimate HDR solution. When Adobe endowed Lightroom with an HDR merge function, I thought, bye-bye plug-ins. I was wrong. Lightroom’s HDR is nice, but it’s bland and unimaginative in comparison to the independent third-party apps out there. The one thing Lightroom HDR has going for it is that all the processing remains under one roof.
But you have to step out the door every once in a while. And Aurora HDR Pro – for Mac only, co-developed by Trey Ratcliff and available through Macphun Software, is a nice breath of fresh air when you do step across that threshold.
Of course, as with any HDR app, when you do step outside, you may still encounter the odd cloud or two that unleashes anything from a drizzle to a downpour, destroying that carefully coiffed ‘do. But if you cover yourself with a simple umbrella – no overly elaborate steps needed, you’ll step back in with a more lustrous head of hair than when you started.
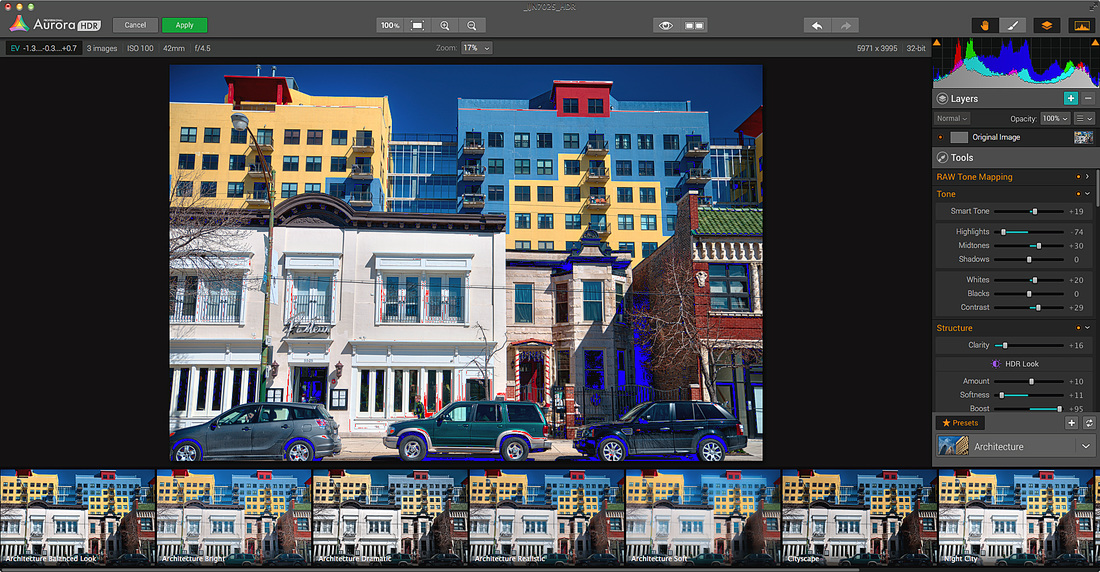
Aurora HDR Pro interface. I've enabled highlight and shadow clipping, which show up as scene tones marked by red and blue, respectively. The presets are the frames at the bottom; the settings panel is on the right, including a histogram. The application has practically all the settings you need for tone control, even when used as a standalone application with RAW files.
Aurora HDR Pro’s Interface and Settings
Each HDR app brings to the table certain features and foibles. To begin, they all like to think they’re the flavor of the month. And that is true to a degree, because when they’re new, we all flock to them. But for some, that flavor soon fades or even sours. And just in time, another steps in, in this instance Aurora HDR, to pick up the gauntlet.
One of the things I look at is the set of presets and settings each app uses to create an HDR. Some use esoteric settings couched in an exotic language that doesn’t readily fall off the tongue. Not so with Aurora HDR.
First, the interface is clean and simple. Presets are shown along the bottom of the screen, with a settings panel on the right. My only complaint here is that the preset image is truncated – I’d like to see the full preview image.
The settings themselves are largely readily understood, but if any are new to you it just takes a few tweaks to see what they do. Just remember to Undo them afterwards, unless they’re to your liking, or hit the preset to start over. And if you’re really enthralled with your tweaks, save them as a User preset, so you can use them next time.
The one thing missing here is User Preferences. I may want one preset to initially apply to my HDR merges when launching Aurora HDR or perhaps I’d like to use the previously used preset, but, for now, I can’t dictate that. Also, you may want to default to a specific file format when exporting the HDR image. And you may want to customize the filename extension added to the resulting HDR image (although I’m sure most would be happy with the default).
Step One: Choose RAW or TIFF Files
You can work with the standalone app or the plug-in (Lightroom, Photoshop and even the now defunct Apple Aperture). I prefer the plug-in, since I do my RAW conversions first – in Lightroom. A wide range of file types is supported. The standalone version has the advantage of being able to export the HDR to social media and to a broad range of applications, including Photoshop, Lightroom, and Macphun’s own Creative Suite.
Aurora HDR Pro installed itself effortlessly in Lightroom and Photoshop. In Photoshop, it’s listed under Filters. In Lightroom, the plug-in pops up in the list of export options: choose to work with the original, meaning RAW, files or adjusted (converted) TIFF files. I’ll be discussing the plug-in’s use in Lightroom.
As with any HDR app, the first thing to do is to select the bracketed exposures that will contribute to the merged image. When I shoot handheld with my Nikon D610, the maximum number of exposures for auto-bracketing is 3, and that’s worked well so far, usually at +/- 1 EV increments.
To minimize the possibility of shooting long exposures, I often set an ISO that will deliver relatively fast shutter speeds. The benefit there is in minimizing the gap between exposures, with the camera set to capture sequential frames at the highest rate, which minimizes camera and subject movement and possibilities for ghosting.
Working in Lightroom, I’ve worked with both RAW and TIFF files. In some instances, surprisingly or not, the TIFF files worked best. For the most part, though, my first choice is to merge RAW files. That means that none of the adjustments made in Lightroom carry over – and hence can’t taint – the resulting merged HDR.
The down side to using RAW files, at least when working with some lenses, is that the HDR image that Aurora returns to Lightroom doesn’t carry complete or entirely accurate EXIF data. For example, when I try to apply a lens profile in Lightroom, the profiles for images shot with Tamron and Sigma lenses are all wrong, judging by the ones tested so far. I’ve had to use a different lens profile, then further adjust that, or make the adjustment from scratch. Not a big deal, per se, just a minor annoyance. (And this quirk is not exclusive to Aurora HDR.)
When you work with converted TIFF files, you first apply the lens profile, so that’s written in stone. In other words, there’s no longer a need to concern yourself with that aspect of the editing process.
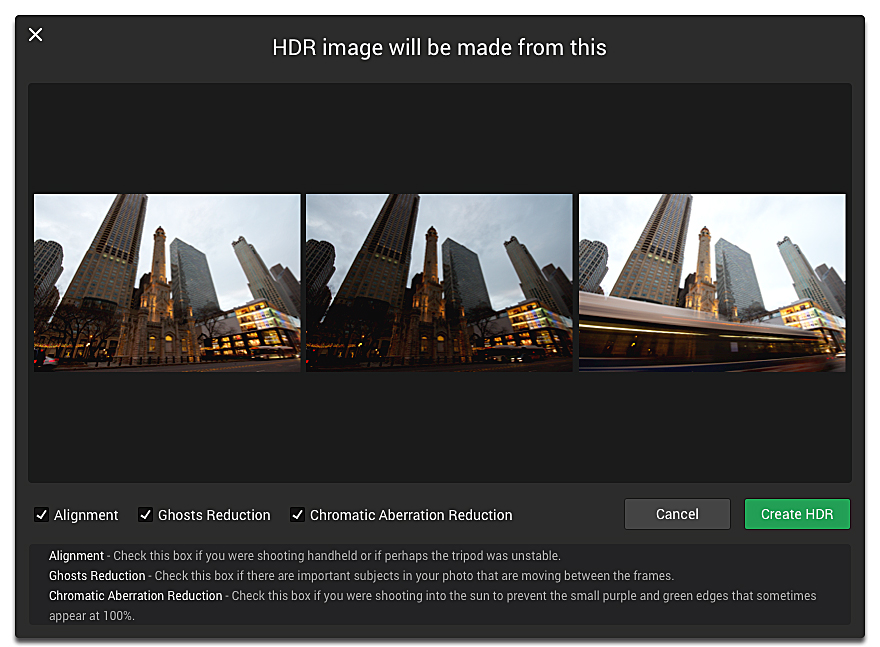
Once the files are uploaded to Aurora HDR Pro from Lightroom, you are greeted with this window. Check off the corrections you want the app to make, then proceed to the next step.
Step Two: The Opening Dialog Window
When you export the files for the HDR from Lightroom to Aurora HDR Pro, you’re greeted by a dialog box, which gives you three options: alignment, ghost reduction, and chromatic aberration (color fringing) correction. When working with RAW files, I check all three. Alignment is especially important when shooting handheld, on a monopod, or even with tripod shots that show even the slightest discrepancy between frames. Note: when working with RAW files, even though you are using chromatic aberration correction in Aurora, you should also enable Remove Chromatic Aberration in Lightroom, since there may be a residual amount of color fringing that remains in the HDR.
When ready, click Create HDR.
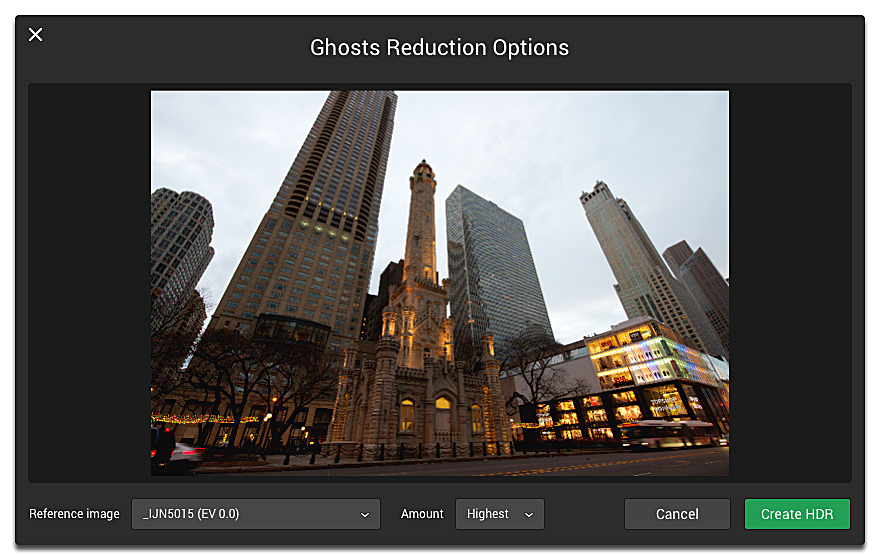
Note that the Reference Image is the base (camera metered) exposure. Because there was a constant flow of traffic, I opted for the highest level of deghosting.
Step Three: Choose a reference Image and Deghosting Strength
Moving on, now you have to choose a reference Image and the amount of deghosting (ghost removal) to be applied. I’ve found that selecting an overexposed frame that involves movement as the reference Image tends to result in ghosting that can’t be corrected by the software (this applies to Aurora and other HDR apps). So choose the metered exposure or the one below it.
If you’ve come this far, take the next step: click Create HDR (same command, different dialog box).
This is the HDR generated when using RAW files. As you can see, the sky is not nearly as dramatic as the earlier HDR, which used converted TIFF files. Also note the apparent ghosting, which showed up as dark patches in the asphalt. I cropped that out in the final rendition of the TIFF-based HDR shown at the top.
Step Four: Making Your HDR Shine in Aurora HDR Pro
You’re now on the main screen, the Aurora HDR interface. It takes a few moments to get here while the program is processing the HDR, so be patient.
The easiest way to start is to select a preset. I find the ones labeled “realistic” are the best place to start. You can then tweak the settings in the panel on the right.
Presets have cute and clever names – a bit too cute and clever for my taste, but, hey, that’s me. What I would have liked is if each preset, when scrolled over, would offer a brief description that differentiates it from its neighbors. You can, of course, create your own presets, and the nice thing here is that presets are grouped by the overall impression they’re designed to make or a subject or situation they address, or by the person who customized them (Trey Ratcliff or User). There’s also a Favorites group, and a way to get more presets off the Web.
To Aurora’s credit, however, when you click on a preset, you’re presented with a slider that globally modifies the HDR look of the image. Specifically, this slider addresses the Layer Opacity (not to be confused with other Opacity settings, such as Denoise Opacity).
More to the point, changing this Opacity setting directly affects the histogram. For instance, you can use this setting to reduce clipping (lost highlight and shadow detail). Click on the two triangles top left and right above the histogram to see shadow and highlight clipping, respectively, which are shown as blue and red in the image.
You may find that you’re overwhelmed by all the settings. Don’t be. Creating an HDR image that’s worth sharing is worth the effort. You can use the presets for a quick fix, but step through all the settings to show that you really care about the image, at least initially. Over time you’ll discover that certain settings are more relevant to delivering the look you’re after.
The Final Step
Next, export the image back to Lightroom. Here you can make the necessary lens corrections that weren’t previously applied, add sharpening, and finesse the image further to deliver the look you want.
Next, export the image back to Lightroom. Here you can make the necessary lens corrections that weren’t previously applied, add sharpening, and finesse the image further to deliver the look you want.
| Pros
Capsule Comments/Aurora HDR Pro User-friendly, with lots of presets; very competent HDR application and plug-in, with numerous creative options; does a nice job whether shooting on a tripod or handheld; one foible: deghosting algorithms may not fully address subject movement. Conclusions: I may have found my new favorite HDR plug-in. Aurora HDR Pro delivers on many levels. I found the settings fairly easy to understand and use and the results compare favorably against the existing frontrunner in this arena. In fact, I’d say, the king is dead, long live the king. There were fewer troubling artifacts, aside from ghosting, which only cropped up in extreme cases. Add to that, Aurora HDR Pro adds layering and painting of effects to a degree defined by the user, so they don’t overwhelm the image and instead contribute to restoring the scene to what you saw with your mind’s eye. I found that the resulting HDR images, when not taken to excess, were truly representational of the scene I originally envisioned. | System Requirements Mac requirements:
Image formats:
Supported devices:
Tested Platform/Hardware: Mac OS X 10.9 (Mavericks); 21.5” iMac equipped with a 3.1 GHz Intel Core i7 processor, 16 GB RAM, NVIDIA GeForce GT 650M 512 MB. Where can I get more info? Aurora HDR Pro Who publishes it? Macphun Software How much is it? Aurora HDR Pro is available for $99 Aurora HDR (the basic standalone version, which does not include the plug-ins) is available for $39.99 via the App Store. Free trial available: Yes (click here) |
To HDR or Not to HDR - That Is the Question
Read more about the in's and out's of HDR and how to produce the most effective HDR.
Read more about the in's and out's of HDR and how to produce the most effective HDR.
 RSS Feed