Each time I export images to an HDR application, I ask myself these questions. Or I should. Sometimes, in the excitement of trying to do more, I end up doing less, and then I go back and chastise myself for forgetting to address these questions.
I’ve worked with numerous HDR apps, most often as plug-ins to Adobe Lightroom, always in search of the ultimate HDR solution. When Adobe endowed Lightroom with an HDR merge function, I thought, bye-bye plug-ins. I was wrong. Lightroom’s HDR is nice, but it’s bland and unimaginative in comparison to the independent third-party apps out there. The one thing Lightroom HDR has going for it is that all the processing remains under one roof.
But you have to step out the door every once in a while. And Aurora HDR Pro – for Mac only, co-developed by Trey Ratcliff and available through Macphun Software, is a nice breath of fresh air when you do step across that threshold.
Of course, as with any HDR app, when you do step outside, you may still encounter the odd cloud or two that unleashes anything from a drizzle to a downpour, destroying that carefully coiffed ‘do. But if you cover yourself with a simple umbrella – no overly elaborate steps needed, you’ll step back in with a more lustrous head of hair than when you started.
Each HDR app brings to the table certain features and foibles. To begin, they all like to think they’re the flavor of the month. And that is true to a degree, because when they’re new, we all flock to them. But for some, that flavor soon fades or even sours. And just in time, another steps in, in this instance Aurora HDR, to pick up the gauntlet.
One of the things I look at is the set of presets and settings each app uses to create an HDR. Some use esoteric settings couched in an exotic language that doesn’t readily fall off the tongue. Not so with Aurora HDR.
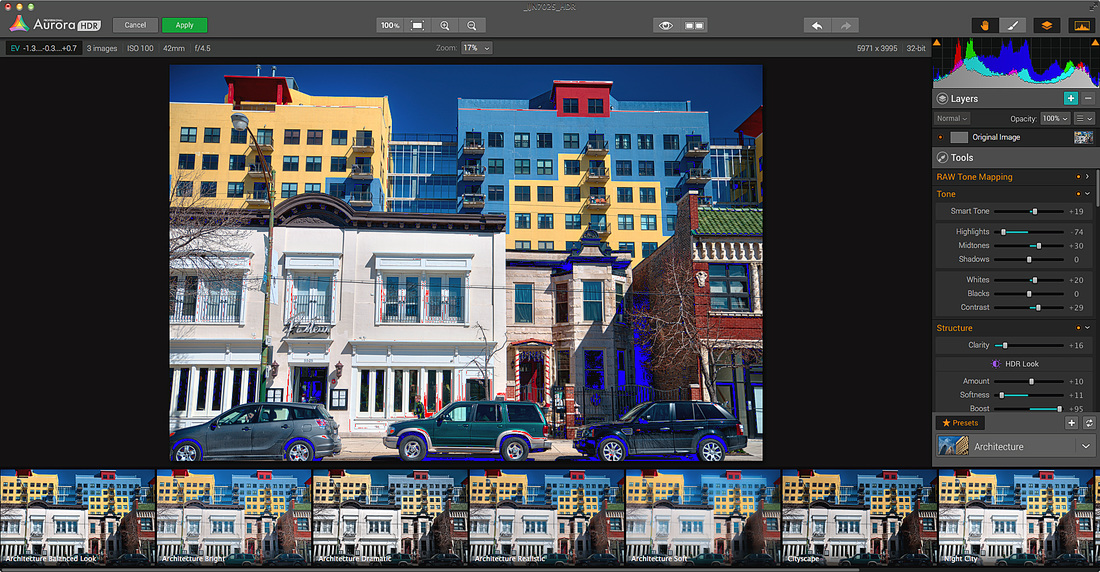
First, the interface is clean and simple. Presets are shown along the bottom of the screen, with a settings panel on the right. My only complaint here is that the preset image is truncated – I’d like to see the full preview image.
The settings themselves are largely readily understood, but if any are new to you it just takes a few tweaks to see what they do. Just remember to Undo them afterwards, unless they’re to your liking, or hit the preset to start over. And if you’re really enthralled with your tweaks, save them as a User preset, so you can use them next time.
The one thing missing here is User Preferences. I may want one preset to initially apply to my HDR merges when launching Aurora HDR or perhaps I’d like to use the previously used preset, but, for now, I can’t dictate that. Also, you may want to default to a specific file format when exporting the HDR image. And you may want to customize the filename extension added to the resulting HDR image (although I’m sure most would be happy with the default).
You can work with the standalone app or the plug-in (Lightroom, Photoshop and even the now defunct Apple Aperture). I prefer the plug-in, since I do my RAW conversions first – in Lightroom. A wide range of file types is supported. The standalone version has the advantage of being able to export the HDR to social media and to a broad range of applications, including Photoshop, Lightroom, and Macphun’s own Creative Suite.
Aurora HDR Pro installed itself effortlessly in Lightroom and Photoshop. In Photoshop, it’s listed under Filters. In Lightroom, the plug-in pops up in the list of export options: choose to work with the original, meaning RAW, files or adjusted (converted) TIFF files. I’ll be discussing the plug-in’s use in Lightroom.
As with any HDR app, the first thing to do is to select the bracketed exposures that will contribute to the merged image. When I shoot handheld with my Nikon D610, the maximum number of exposures for auto-bracketing is 3, and that’s worked well so far, usually at +/- 1 EV increments.
To minimize the possibility of shooting long exposures, I often set an ISO that will deliver relatively fast shutter speeds. The benefit there is in minimizing the gap between exposures, with the camera set to capture sequential frames at the highest rate, which minimizes camera and subject movement and possibilities for ghosting.
Working in Lightroom, I’ve worked with both RAW and TIFF files. In some instances, surprisingly or not, the TIFF files worked best. For the most part, though, my first choice is to merge RAW files. That means that none of the adjustments made in Lightroom carry over – and hence can’t taint – the resulting merged HDR.
The down side to using RAW files, at least when working with some lenses, is that the HDR image that Aurora returns to Lightroom doesn’t carry complete or entirely accurate EXIF data. For example, when I try to apply a lens profile in Lightroom, the profiles for images shot with Tamron and Sigma lenses are all wrong, judging by the ones tested so far. I’ve had to use a different lens profile, then further adjust that, or make the adjustment from scratch. Not a big deal, per se, just a minor annoyance. (And this quirk is not exclusive to Aurora HDR.)
When you work with converted TIFF files, you first apply the lens profile, so that’s written in stone. In other words, there’s no longer a need to concern yourself with that aspect of the editing process.
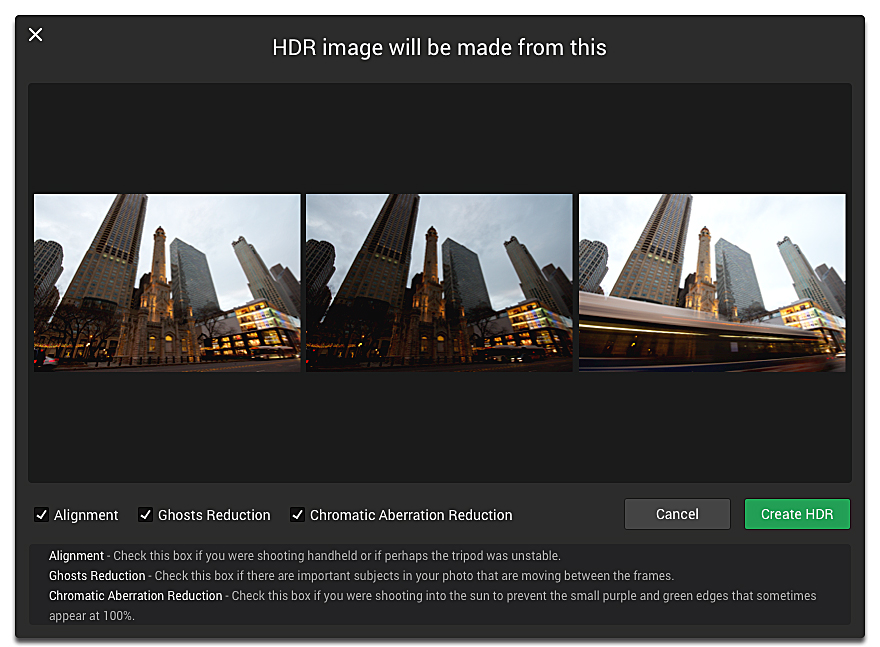
When you export the files for the HDR from Lightroom to Aurora HDR Pro, you’re greeted by a dialog box, which gives you three options: alignment, ghost reduction, and chromatic aberration (color fringing) correction. When working with RAW files, I check all three. Alignment is especially important when shooting handheld, on a monopod, or even with tripod shots that show even the slightest discrepancy between frames. Note: when working with RAW files, even though you are using chromatic aberration correction in Aurora, you should also enable Remove Chromatic Aberration in Lightroom, since there may be a residual amount of color fringing that remains in the HDR.
When ready, click Create HDR.
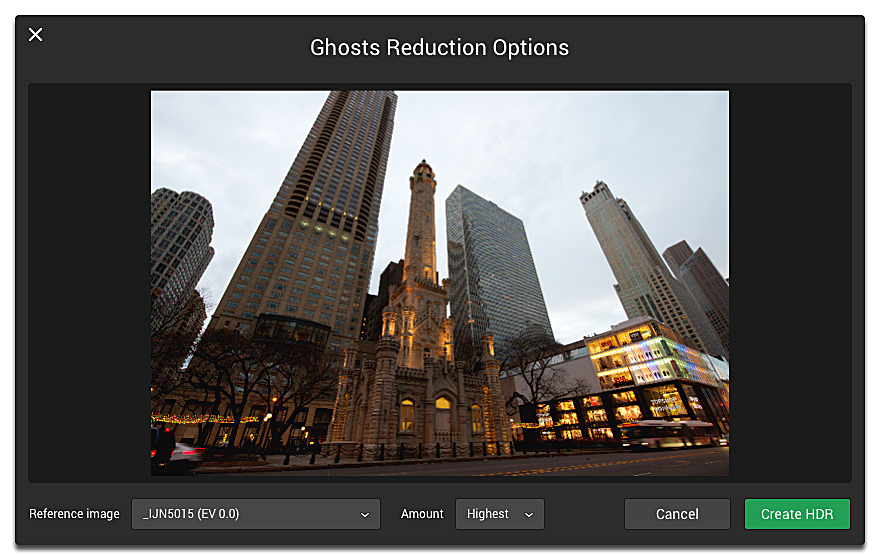
Moving on, now you have to choose a reference Image and the amount of deghosting (ghost removal) to be applied. I’ve found that selecting an overexposed frame that involves movement as the reference Image tends to result in ghosting that can’t be corrected by the software (this applies to Aurora and other HDR apps). So choose the metered exposure or the one below it.
If you’ve come this far, take the next step: click Create HDR (same command, different dialog box).
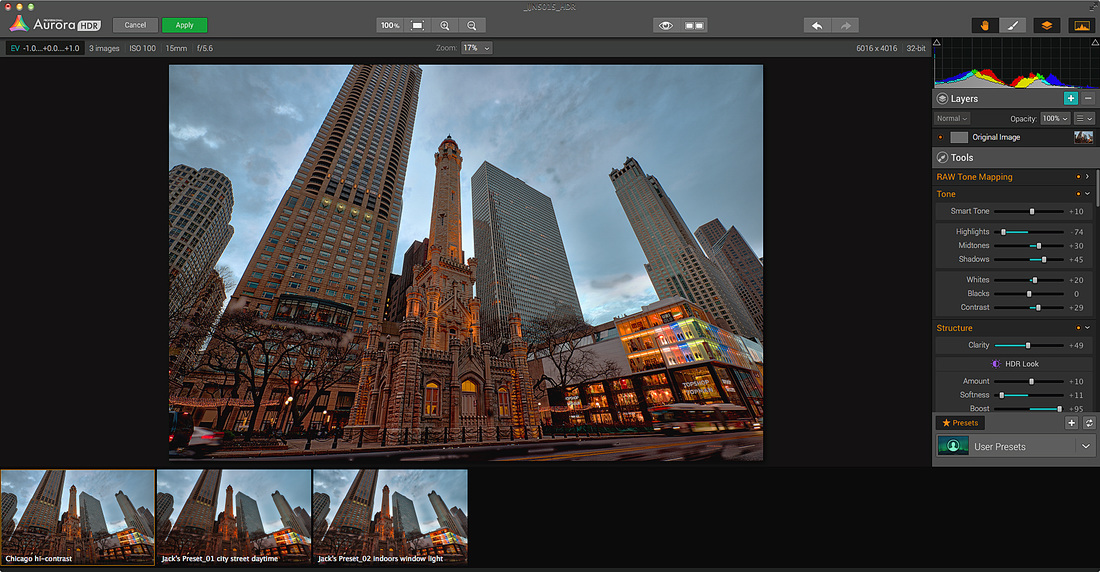
You’re now on the main screen, the Aurora HDR interface. It takes a few moments to get here while the program is processing the HDR, so be patient.
The easiest way to start is to select a preset. I find the ones labeled “realistic” are the best place to start. You can then tweak the settings in the panel on the right.
Presets have cute and clever names – a bit too cute and clever for my taste, but, hey, that’s me. What I would have liked is if each preset, when scrolled over, would offer a brief description that differentiates it from its neighbors. You can, of course, create your own presets, and the nice thing here is that presets are grouped by the overall impression they’re designed to make or a subject or situation they address, or by the person who customized them (Trey Ratcliff or User). There’s also a Favorites group, and a way to get more presets off the Web.
To Aurora’s credit, however, when you click on a preset, you’re presented with a slider that globally modifies the HDR look of the image. Specifically, this slider addresses the Layer Opacity (not to be confused with other Opacity settings, such as Denoise Opacity).
More to the point, changing this Opacity setting directly affects the histogram. For instance, you can use this setting to reduce clipping (lost highlight and shadow detail). Click on the two triangles top left and right above the histogram to see shadow and highlight clipping, respectively, which are shown as blue and red in the image.
You may find that you’re overwhelmed by all the settings. Don’t be. Creating an HDR image that’s worth sharing is worth the effort. You can use the presets for a quick fix, but step through all the settings to show that you really care about the image, at least initially. Over time you’ll discover that certain settings are more relevant to delivering the look you’re after.
Next, export the image back to Lightroom. Here you can make the necessary lens corrections that weren’t previously applied, add sharpening, and finesse the image further to deliver the look you want.
| Pros
Capsule Comments/Aurora HDR Pro User-friendly, with lots of presets; very competent HDR application and plug-in, with numerous creative options; does a nice job whether shooting on a tripod or handheld; one foible: deghosting algorithms may not fully address subject movement. Conclusions: I may have found my new favorite HDR plug-in. Aurora HDR Pro delivers on many levels. I found the settings fairly easy to understand and use and the results compare favorably against the existing frontrunner in this arena. In fact, I’d say, the king is dead, long live the king. There were fewer troubling artifacts, aside from ghosting, which only cropped up in extreme cases. Add to that, Aurora HDR Pro adds layering and painting of effects to a degree defined by the user, so they don’t overwhelm the image and instead contribute to restoring the scene to what you saw with your mind’s eye. I found that the resulting HDR images, when not taken to excess, were truly representational of the scene I originally envisioned. | System Requirements Mac requirements:
Image formats:
Supported devices:
Tested Platform/Hardware: Mac OS X 10.9 (Mavericks); 21.5” iMac equipped with a 3.1 GHz Intel Core i7 processor, 16 GB RAM, NVIDIA GeForce GT 650M 512 MB. Where can I get more info? Aurora HDR Pro Who publishes it? Macphun Software How much is it? Aurora HDR Pro is available for $99 Aurora HDR (the basic standalone version, which does not include the plug-ins) is available for $39.99 via the App Store. Free trial available: Yes (click here) |
Read more about the in's and out's of HDR and how to produce the most effective HDR.
| What Is HDR? The world is becoming increasingly familiar with HDR TV. And the funny thing is, when they talk about HDR TV, they reference HDR in still photography. And now we’re doing just the opposite, because HDR TV will soon become a household concept, whereas HDR in photography will still be known as an esoteric technique that often leads to fanciful results. That word “fanciful” is part of the problem with HDR photography. HDR stands for High Dynamic Range. We may refer to it more correctly as HDR imaging or HDR photography, and sometimes as HDR merge or merge to HDR, but simply say HDR and everyone knows what you’re talking about. HDR in still photography addresses a shortcoming inherent in digital image sensors – those devices that, in place of film, capture and form the image in our cameras. The problem is that these image sensors are not capable of capturing the full range of tones we see with our eyes, from bright highlight to deep shadow, and hence the details found in that range of tones. The tonal range we see or which the image sensor captures is known as the “dynamic range.” When confronted with a high-contrast scene, one with deep shadows and bright highlights, the digital image sensor (and the firmware that governs it) tries to make the best of a difficult situation. Owing to the sensor’s limited dynamic range, some digital information is lost – it could be shadow detail, it could be highlight detail, it could be both. That’s where HDR steps in to save the picture – literally. This is a process that blends several bracketed exposures together, pulling important highlight information from the underexposed image and shadow detail from the overexposed image and imbuing one selected image – often referred to as the “reference image” - with all that digital information. This process can be done purely mechanically, where we manually superimpose one image over the other and painstakingly blend the result. Or it can be done more simply and more quickly using software such as Aurora HDR Pro designed to largely automate this task. How Does HDR Work? When we encounter a situation where we expect to lose important digital information in the highlights and shadows, we shoot a bracketed series of exposures. That usually means shooting one exposure at the nominal (camera-metered) exposure, a second exposure with increased amount of light (greater than the nominal exposure) hitting the sensor, and a third exposure with less light reaching the sensor than at the metered exposure. You can shoot these bracketed exposures in any order you wish. And as you’ll see further on, you can bracket more extensively. That option is yours, although it may be governed by existing conditions and the camera at hand. Normally, these brackets are in equal increments above and below the metered exposure. So we might bracket at Normal, +1 EV (Exposure Value), and -1 EV, opening up and closing down the exposure by one step, respectively. Now, you may be wondering why I’m using the term “step” and not “stop” for f-stop, or F-stop. That’s because the f-stop (hence depth of field) remains constant. It does not change. The only thing that should change is the shutter speed, and changes in shutter speed are correctly referred to as “steps,” not stops (although the two are often used interchangeably, if incorrectly). We of course keep the ISO the same throughout. (ISO is light sensitivity, or what was once thought of as “film speed” or “ASA.”) You can manually adjust the exposure settings, but it’s easier to let the camera do it. Many cameras can be set to automatically shoot bracketed exposures (this is known as “auto-exposure bracketing,” or simply “auto-bracketing”), in increments and to the extent that you define. The camera may fire the entire sequence as soon as you press down fully on the shutter button, or you may have to hold the button down manually (or with a cable/remote release when working with a tripod) for the duration. Oddly enough, the same camera that makes you hold down the button may shoot the entire sequence on its own when set to self-timer mode. How Many Exposures Do We Need? That’s a good question. It really depends on the scene and your interpretation of it. In tests, I haven’t seen any substantive advantage to creating an HDR with 9 images as opposed to 3 images. But something seemed to be lost when just using two images, dropping out the camera-metered exposure and just using exposures above and below that nominal exposure. You can shoot as many bracketed exposures as you wish, if you have room on your memory card and on your hard drive back home, but at some point all this gives way to the law of diminishing returns. Some cameras will auto-bracket up to 9 exposures; others will only do 3. However, if you’re shooting handheld, limit yourself to 3. On a tripod, you can go wild, unless there’s considerable movement in the scene, which can later lead to “ghosting” in the HDR process, as we’ll explain below. Which is also why I recommend limiting yourself to 3 exposures when shooting handheld. (Briefly, ghosting appears as phantom images when elements within the bracketed series do not coincide perfectly, owing to movement within the frame, from one frame to the next.) Where Do We Start? I normally start with the metered exposure. When it comes to sunsets, where I want to capture the more subtle tapestry of color down to the deepest oranges and reds, I’ll begin by using the Exposure Override (Bias) function so that my initial shot is underexposed – that may be at -1 EV, or more. I’ll then launch the auto-bracketing series around that, using that adjusted setting as my metered (nominal) exposure. (I’ll determine my starting point after previewing the series on the LCD, looking for those deep colors.) And How Far Do We Go? I’ve gone as much as +/- 4 or +/- 5 EV when shooting sunsets, in 1 EV increments. But normally, you can suffice with +/- 2 EV, again in 1-step increments. I often auto-bracket to +/- 1 EV with success, although some may argue with that. Do we need to go in smaller increments than full steps? Again, you decide. I personally don’t see a need to. You should do your own tests under different lighting and contrast situations to see what works best for you, with the software you’re using. Keep camera and subject movement in mind. If you’re shooting on a tripod with little or no discernible subject movement, you have more leeway in terms of time. You can be more calculating and manually bracket exposures. One more thing I should point out. Shooting more exposures in the bracketed sequence gives you some insurance, in case one of the exposures doesn’t work out. For instance, a person or car may have entered the scene unexpectedly, or a frame may have gotten corrupted. With additional exposures at your disposal, you can often drop the one or two affected shots without undue consequence and without worrying about ghosting. Fanciful? What Does that Mean? At the top, I mentioned that HDR is largely known as an esoteric technique that often leads to fanciful results. Often the problem we encounter with HDR is that we get swept away with the fancy trimmings. Bold colors, dreamy effects. But when we dig beneath the surface, or more precisely, view the resulting HDR image at 100% magnification, we see the underpinnings of what amounts to a distorted image filled with HDR artifacts (such as digital noise and tonal distortions). Sure, the image looks fine at resolutions we use for sharing on social media. When we see those images, we go Wow! That’s gorgeous. But up close and personal, at or near 100%, a sad truth reveals itself: The HDR image is worse than the original. It may have a broader tonal range, but the introduced artifacts destroy the integrity of that image. So, how do we counter that? By using HDR for what it was intended – to expand the tonal range and see the heretofore hidden detail in shadows and highlights. Sure you can liven the image up with bolder colors and dreamy effects. But not at the expense of its integrity. Pull back on the effects and create an HDR image that truly stands out. The Reference Image The “reference image” (“reference frame,” “reference exposure”) is the base exposure the HDR builds upon. All the digital information that’s extracted from the surrounding exposures is blended into this frame. You should be able to choose which frame is the reference image. However, not every HDR software app gives you a choice. Lightroom’s HDR merge function is a case in point, and that is one of its drawbacks. Why should you have a choice? Usually the reference image is the metered exposure around which the bracketed series is executed. Why not use the metered exposure as the base exposure? You may find that an alternate reference exposure does better to prevent ghosting or digital noise, or other artifacts. Another reason to choose a reference image is when there is movement in the frame. Your key subject may be optimally positioned in one of the bracketed shots above or below the metered exposure, but poorly positioned in the metered exposure. So you want to have the choice as to where to position that subject in the frame. Hence, you select the reference image and build on that. Or, when shooting handheld, you find you didn’t hold the camera as steady as you thought you did, and you need to select an alternate image as the reference frame to avoid building a blurry HDR. You may find it necessary to reselect a reference image after much painstaking work if you suddenly find disturbing artifacts in the resulting HDR. Or you may be forced to abandon the HDR entirely and use a different method to improve the image, such as working from only one image. What Is Single-Shot HDR? Single-shot HDR, or, more correctly, LDR, for low-dynamic-range imaging, involves working with a single image to bring out shadow and highlight detail. But this is not an optimal methodology. You do avoid some of the pitfalls inherent in typical HDR processing involving multiple images, notably ghosting, but you may still encounter others, such as pronounced digital noise. And often LDR is used more for effect than to bring out an extended tonal range, which, in point of fact, is not really possible, given it’s only a single image. Any way you look at LDR, it’s a tradeoff which you have to decide is or is not worth it. Many software applications, especially HDR apps/plug-ins, will deliver an LDR image in one fashion or another. LDR doesn’t really apply to Lightroom itself, since any detail extraction is already part of the RAW conversion process and Lightroom lacks one key setting that is often used in LDR, namely “Structure.” Structural enhancements emphasize local contrast, or edge contrast. | Battling Artifacts Artifacts are the bane of every HDR application. The most notorious are digital noise, in the form of luminance noise (that gritty feel), chrominance/color noise (which looks like someone dropped a box of minutely-sized sprinkles on the picture), and haloing (an amorphous band of white or gray surrounding dark subject tones adjacent to bright tones, such as sky and clouds). I’ve even seen really disturbing banding in a competitive HDR product, but not in Aurora HDR. Another artifact is what I call the “edge contrast effect.” Instead of a broad halo band with diffuse edges, this is a distinct bright outline, similar in appearance to a sharpening artifact, in this case a sign of overly ambitious use of local contrast, as when using Structure to excess. And it may also crop up when a sky is toned down dramatically to give it a quasi-polarized look. (Some may also refer to this as haloing, but I suspect that, while related, these are two different phenomena.) Various settings can trigger these artifacts, and the sad thing is, some are even found in presets. Aurora does not lie entirely blameless here. The key is to pull back on some settings, and to its credit, Aurora HDR’s user manual repeatedly advises you to go easy. Sadly, we’re not as resistant to the eye candy as we’d like to think we are. Especially when sharing the resulting HDR images on social media, at a size and resolution that hides all the blemishes. But go in closer – at 100% - and these blemishes stare back at you like a zit in the mirror on prom night. Other serious artifacts include ghosting, misalignment, and introduced chromatic aberration. Introduced chromatic aberration you say? Yes, I’ve seen color fringing added by one fairly popular HDR app, which shall remain nameless, and it wasn’t always easily dealt with back in Lightroom. Misalignment occurs when the sequence of frames was shot with a handheld camera with even just a smidge of movement from frame to frame or on a rickety tripod or on a monopod. Think of an old coincident image rangefinder, where the two rectangles had to coincide for the subject to be in sharp focus. They had to align for you to get a sharp picture. Misalignment results in blurry-looking images. Ghost artifacts result when there’s movement within the frame itself from one frame to the next, so that image contents/elements fail to register. The culprit can be a person crossing the street, a vehicle moving across the frame, a bird flying through the scene, or as subtle as a leaf fluttering in the breeze. The ghost image appears as a secondary phantom image as evidence of that movement. It may be fairly distinct, it may be a blur, or even appear as a shadow. To make matters worse, it can be very subtle, and only becomes visible when the image is enlarged. If it’s that subtle, is it worth worrying about? That’s for you to decide. Again, not so much when sharing on social media. But decidedly yes when you’re about to hang the picture on a wall. The easiest approach to counter misalignment and ghosting is to shoot with a tripod-mounted camera, and to find subjects that are fully stationary. Good luck with that. Something is always going to move, unless it’s a studio still life and you have rock-solid floors far removed from vehicular traffic. The practical solution for avoiding ghosting, especially when shooting handheld, is simple. Set the camera to high-speed continuous advance, use fast shutter speeds, and limit the number of bracketed exposures, thereby minimizing frame-to-frame movement. |

 RSS Feed