
 "Wizard"
 A plug-in application fills in the gap where a host application falls short, or it gives you an easier way to do things or otherwise expands your digital editing universe.
Nik software was once my go-to for many effects in the plug-ins cosmos. In my workflow, plug-ins enter the picture by way of Adobe Lightroom or Photoshop, but mostly Lightroom.
Then, at some point in the timeline, Google decided to swallow up Nik, the way a black hole swallows up surrounding space, phased out parts of it, and bundled other parts as the Google Nik Collection. And before anyone knew it, Google took the next step and made the bundled software free. That, in my view, spelled the death knell for Nik, which, once a nova, is now a dying star. And the fact is, we are no longer seeing support in terms of updates for the software, which has begun to fade and show its age. I won’t stop using it, but, without support – meaning regular updates, a new OS (operating system) will likely herald the demise of this software sooner or later, as has happened with software apps in years past. The plug-ins cosmos is ever changing.
So it was time to find a viable substitute. After all, why wait till the last minute? It takes time to learn, let alone master, new software. And I wasn’t about to be caught with my proverbial pants down.
Finding a Replacement
Nik software offers something no one else does, namely, control points. And if you’ve ever sampled them, you know how delectable they are, letting you add just the right amount of flavor and texture.
Still, one has to move on. When you put down a favored pet, you eventually find one to replace it. It might never be the same, but over time it keeps you happy and helps you forget.
And I expect that will be true of Macphun’s Creative Kit. I’m not crazy about all the apps, which, again, I used strictly as plug-ins primarily in Lightroom. But they do provide enough satisfaction that I expect to keep them around and use many of them.
The ratings: a strong like or dislike has an exclamation point following the verdict (“Use it!”; "Skip it!"); a period denotes the app has its good and bad points, but is useful (“Use it.”); a question mark questions the efficacy of an app and indicates my ambivalence toward it, although you may find some redeeming qualities (“Use it?”)
 "Chewbacca"
 Creative Kit 2016 – App by App (Overall Verdict: Use It.)
My recommendation for the Creative Kit as a whole is based on the strengths of those apps that delivered consistently reliable and effectively creative results, with enough user settings that I was able to fine-tune each app as needed.
Each software application in the Creative Kit has “CK” added to the title, to distinguish it from the unbundled version. We’ll look at the strengths and weaknesses of each app individually.
I should point out one advantage to using the CK apps in standalone mode. Once you’re done with one app, you can seamlessly carry over the modified image to another app in the CK suite. That saves time and increases efficiency, creating a smoother workflow – and that’s worthy of consideration. Although, I should add that there is one flaw in this plan, as we’ll soon uncover.
But first let me point out that the interface from one to the next is similar, but not entirely or necessarily largely identical. It would be nice if Macphun standardized on the interface, considering all these apps have been bundled into one suite, sharing a number of features.
Specifically, there’s no uniformity when it comes to the location of the presets, from one app to the next across all Macphun apps. While Aurora HDR remains outside the mix of the Creative Kit, I don’t mind that it has a different look, but the same can’t be said for those apps that are part of the suite. Granted, bundling them was an apparent afterthought, but it would be nice if Macphun took the next big step to present a unified front. (I’m told some improvements are in store. However, I’m not privy to the extent of these enhancements, but would hope they’d extend to the interface.)
On the plus side, you can customize a preset and save it as your own preset. Each preset includes a density slider, to apply the effect at full or lesser strength.
Two of the apps support layers, while others support masking, except Noiseless. The masking functions are also not consistent among the Creative Kit applications, where they exist, and masks can’t be saved for future use. Worse still, if you were to use the standalone versions of these apps, the mask is not carried over from one to the next. You have to paint a fresh mask each time you plan to use one. Also, only Intensify and Tonality have fully functioning histograms, with clipping indicators and a full set of adjustment sliders.
When upgrading to Adobe Photoshop CC 2015.5, Adobe, in their infinite wisdom, forces you to re-install all the third-party plug-ins from scratch, which I refused to do until I was ready to upgrade to a new iMac. You can’t even import these plug-ins from another location (say an older version of the Plug-ins folder) in Preferences the way you could in the past.
So, long story short, my review is based largely on my experience with this set of plug-ins in Adobe Lightroom. And, while I did test the waters with the standalone apps, I prefer working in Lightroom first and foremost.
When working with each CK plug-in, I use the Edit in option in Lightroom (under “Photo” in the menu, or accessed via the mouse). When using Edit in with a RAW file, a new TIFF or JPEG file is first generated, so use Lightroom to make initial adjustments before generating this new file. All effects/editing in the plug-in are then applied to the newly created file, which is itself imported back into Lightroom complete with enhancements when you’re done. The original RAW file is never affected.

Tonality CK. (Verdict: Use it!)
What it does: black-and-white conversion and film emulation.
I found this app inviting for the most part. Among the available settings are the usual suspects, namely color filters, tone curve and tonal adjustments, color temperature (yes, this affects the tonal outcome), vignetting, and split toning. You also get various structure settings to give the picture more texture and depth.
Two features that bring this app home for me are the Zone System display in the histogram and the ability to layer and paint effects, as well as add a graduated mask. The Zones fall a bit short at either end. Still, they do prove useful and can easily be adapted to your black-and-white workflow. The layering masks let you make adjustments locally – to selective parts of the picture, where needed. However, you can’t selectively leave the original colors in the picture, as you can with other apps.
The photo frames option is kind of lame and best avoided, unless and until Macphun can beef up this feature substantially. For starters, these are not frames but borders. And there’s no variability or even a realistic feel to them. A randomizing (random seed) function would be nice, with improvements as noted. By the way, if you’re looking for real frame effects, you can find them in the FX Photo Studio app, which is part of the suite.
To spice things up you can add a texture overlay, where you can set the blending mode and amount, using numerous textures. However, you can’t vary the pattern of the textures. Here, too, a random seed option would help immeasurably.
Everyone turns to a black-and-white plug-in/app for its film emulators. You may be disappointed on this score. I didn’t find the film emulators very realistic or broad enough in scope. If you want a more faithful look and more film options (especially if you’re into pushing and pulling black-and-white film), then go elsewhere. But you can overlook this failing, since I haven’t seen any film emulator convincingly imitate any film. So we can cut Tonality some slack in this area.
As a final note on film emulation and black-and-white conversion in this plug-in, the grain setting is adequate, although not very realistic. I would have preferred an additional setting that varies grain clumping (the Roughness setting in Lightroom). In the interim, I can simply add grain, with the precise qualities I want, after importing the image back into Lightroom.


Intensify CK. (Verdict: Use It!)
What it does: adds structure and detail enhancements.
There are numerous settings for you to infuse the image with just the right amount of structure and detail, along with tonal adjustments.
A histogram with highlight and shadow clipping heads the adjustments palette. You can also paint in the effects and add a graduated adjustment filter. What’s more, Intensify supports layers, in the sense that you can layer one effect over the other. So, for example, you can add one effect to the background layer and paint a layer mask with a second effect (in a new layer) over another part of the frame.
While some of you may welcome the wide array of available presets, others, such as myself, find them just a bit too much. The available adjustments let you tailor the presets to your needs, and create your own custom presets. On the plus side, you can delete presets or move them into a new folder you created, which I’d label “junk folder” (in case you change your mind later). I would also like the option to rename the presets, so I could use more descriptive names that actually tell me what a certain preset does. This would apply to all the apps in the suite.


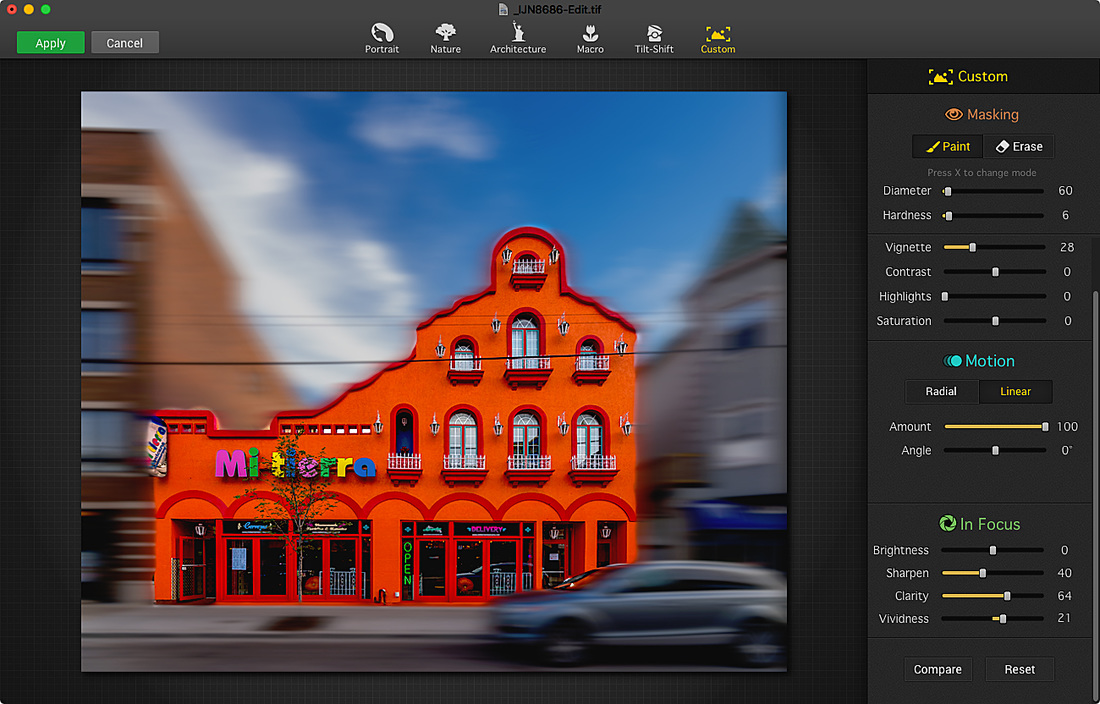
Focus CK. (Verdict: Use It.)
What it does: lets you selectively blur parts of the image anywhere within the frame while bringing other parts more into focus.
There are five presets (Portrait, Nature, Architecture, Macro, Tilt-Shift) plus Custom. Each preset presents you with options to strengthen or soften focus. The mechanisms in place give you plenty to work with. However, just to clarify, Tilt-Shift does not emulate a tilt-shift lens. In fact, it’s misleading. What it is really is, the graduated filter mask is skewed at an angle. That’s it, thereby controlling focus/blur, not depth of field. You can skew any of the masks, I should point out.
In Custom, you paint a mask over the areas you want to retouch. To fine-tune the mask, use low Diameter and Hardness settings, then gently push outward or inward when painting or erasing. The process is tedious, but you can get some nice results with practice. I would have liked it if the paintbrush could have been adjusted for shape as well, since a rectangular brush would have helped considerably. And the paintbrush in general needs further refinement, down to one or two pixels.
Focus won’t pull the proverbial rabbit out of the hat. Meaning, if it’s not sharp, this won’t fix it. But, you know those situations where something in the same plane of focus competes with your subject? Well, this will apply a graduated mask so the sharpness tapers off naturally, when done right. You do have to be vigilant that the effect is gradual, not like falling off a cliff.


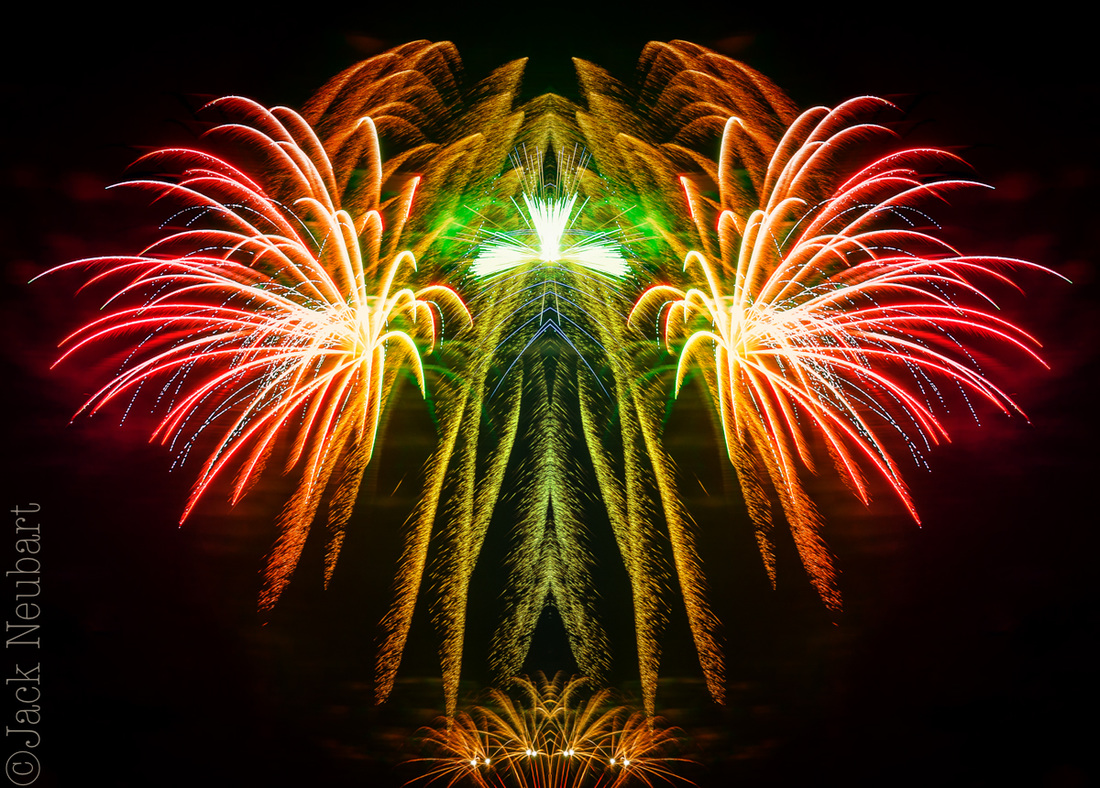
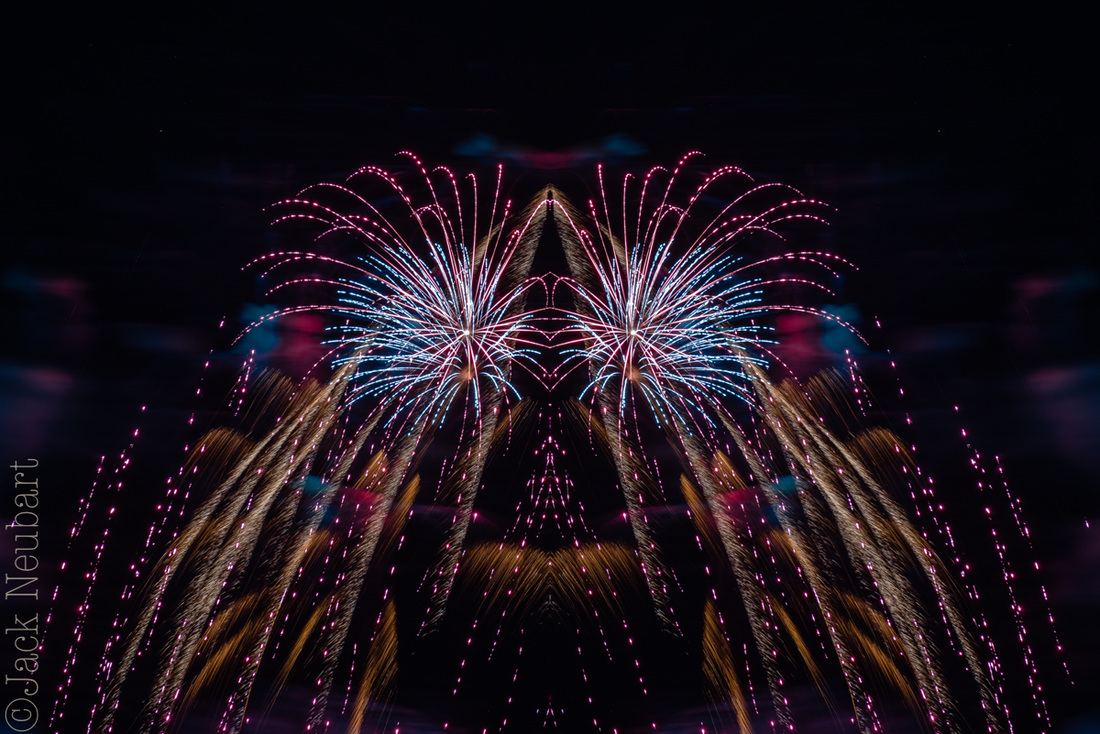
FX Photo Studio CK. (Verdict: Use it.)
What it does: enhances the image with all kinds of color and tonal variations, but also adds picture frames and quasi-kaleidoscopic effects.
There are a number of fun effects here, many of which you’ll find, in one form or another, in Photoshop. My favorite is “Symmetry,” where the app mirrors the image in quasi-kaleidoscope fashion. As in other apps in the suite, you can edit the mask that you use to apply effects, invert it, and turn it on (applying effects to selected portions of the image) or off (applying the effect to the entire picture). Also, you can make selected adjustments to the settings used.
Unfortunately, you can’t edit all the parameters that you use. For instance, I might have liked to create a true kaleidoscopic image, but there are no settings that let me do that. Elsewhere, where a preset adds a vignette, you don’t have the option to modify the vignetting, even when the effect itself adds vignetting. The same applies to modifying flare ghosts and the array of colors in effects where splashes of color are added. In short, a complete palette of settings as found in Intensify would help tremendously, with additional settings for the esoteric and exotic effects added. To that add a randomizer (random seed) for utmost variability.
A couple of quirks that I’d uncovered, among them: (1) After making adjustments following masking, the mask clears. You can backtrack by undoing the steps and thereby restore the mask. So I recommend that you make adjustments first, mask second. (2) This app has a stability issue and has crashed on more than one occasion.
The bottom line? I like the app. I’d just like to see it elevated to the next level. I want not just effects I can do with Photoshop but a whole new set of effects involving fractals – to go where Photoshop can’t take you on its own, or at least not without a lot of user entanglements. And that’s especially important if I don’t step outside the Lightroom universe.
Noiseless CK. (Verdict: Use It?)
What it does: noise removal.
Digital noise blurs detail. But, when done to excess, noise removal (NR) can blur the image even worse, to the point where the picture has a plastic toy quality. So there’s a fine line we have to tread. This plug-in has proved more effective with some images, less so for others, and in at least one instance that I tested, made things worse. It does offer some advantage over using Lightroom’s own NR filters, in that there are more ways to customize NR here. Of course, if you don’t use Lightroom, and especially if you’re shooting JPEGs, then this would be the way to go. This is often a better choice than using NR on JPEGs in camera, which later cannot be undone. Simply stated, if you’re unhappy with the results in Lightroom (or Photoshop), or if you shoot JPEGs, then try Noiseless, since you’ve already paid for it.
Snapheal CK. (Verdict: Skip It!)
What it does: healing, cloning, and retouching tool.
This app hasn’t changed much, if at all, since it came out. I wasn’t thrilled with it then; I’m even less thrilled with it now. The process of healing and cloning is so time-consuming and laborious here that the app tries to entertain you with fun facts. The time it takes for one fun fact to flash on the screen is the time it should take to complete the process. Instead, you find yourself reading one after another after another—to the point where you just have to throw your hands up in the air and terminate the process. But when you do allow the process to finish, you’ll discover artifacts cropping up. I’ll stick to Lightroom and Photoshop when it comes to cleaning up my images. There are other problems with this app, among them a distorted histogram, which is really a bad sign.
| Capsule Comments 6 apps (standalone and plug-in); most worthwhile apps are Tonality and Intensify; FX Photo Studio is good but glitchy; Noisless is passable; skip Snapheal. Conclusions You can have a lot of fun with Macphun’s Creative Kit 2016. It’s not the be-all and end-all in the digital imaging world, but I found myself seriously engrossed in several of the apps, namely Tonality, Intensify, FX Photo Studio, and Focus, using them as plug-ins in Lightroom, following RAW processing. Tonality adds Zone System steps to the histogram, making it an even more utilitarian black-and-white converter, although where film emulation was concerned, I found it wanting. Intensify, along with Tonality, supports layers and masking, bringing the involvement level up several notches. FX Photo Studio also supports masking, but has stability issues that can frustrate your efforts. Focus doesn’t really do much more than Lightroom’s graduated and radial filters do, yet I found myself taking my images in directions I hadn’t considered when working in Lightroom. I can take or leave Noiseless. The noise removal algorithms didn’t do a convincing job. And I wouldn’t even waste my time with Snapheal. This app hasn’t changed much, if at all, since it was first introduced, and it’s slow as the proverbial snail. However, given the price of the entire suite, I’d so go for it. You’ll have fun, challenge your creativity, and will likely come away with numerous images you’d be proud to hang in your living room. | System Requirements Mac OS 10.9 and above iMac/MacBook Pro/ MacBook Air/Mac Pro/Mac Mini late 2009 or later 4GB RAM and more 512 MB Graphic RAM and more Creative Kit is integrated as plugin with Lightroom 4,5,6 and CC; Photoshop Elements 10-14 (App Store version is not supported due to Apple Sandboxing); Apple Aperture 3.2 or later; Adobe Photoshop CS5, CS6 or CC 2014, СС 2015, СС. Photos extensions support - for 10.11 only Image Formats Supported RAW (.NEF, .CR2, .DNG, .ORF etc.) TIFF 8-bit, 16-bit PNG JPEG Tested Platform/Hardware: Mac OS X 10.11 (El Capitan); 21.5” iMac equipped with a 3.1 GHz Intel Core i7 processor, 16 GB RAM, NVIDIA GeForce GT 650M 512 MB. Where can I get more info? Click here. Who publishes it? Macphun Software How much is it? $129.99 (complete suite/6 apps) Free trial available: Yes |
 RSS Feed