pixelPERFEXION™
pixelPERFEXION.net
Site contents ©2021 Jack Neubart. All rights reserved.
  • Home
  • Reviews
  • News/Views
  • About
  • Contact

Test Report: Nissin MF18 Macro Ring Flash Revisited

6/29/2017

3 Comments

 
Picture
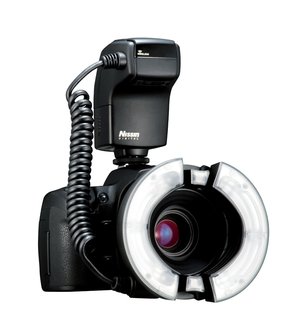
Nissin MF18 Macro Ring Flash. Courtesy NEIDLLC.
​I originally reviewed the Nissin MF18 digital ring flash several years back, for Shutterbug Magazine. I loved the flash back then, but, since I already had a ring flash that worked wirelessly with my Nikon D300, which at the time I’d paired with a 60mm Micro Nikkor, I had all the macro TTL flash lighting I needed.
 
Fast forward to today. We’ll skip past the phase where I was using the Nikon D610 also for TTL wireless macro flash photography and jump to the Nikon D500. But perhaps I should clarify. With the introduction of the D300, Nikon introduced CLS (Creative Lighting System), which involved TTL wireless triggering of off-camera flashes. The beautiful part of the system was that the camera’s built-in flash could be used as the trigger, or transmitter, without contributing to the flash exposure. But that worked great when the camera came with a built-in flash.

​The D500 “D”-lemma
Now, with the D500 in hand, I suddenly found myself without a pop-up flash that I could use to wirelessly trigger that remote flash. Hence no CLS, leaving my wireless ring flash orphaned.
 
Yes, I could use one of my existing Nikon flashes as the transmitter but that would be more of a nuisance. And buying the Nikon SU-800 Wireless Speedlight Commander wireless IR transmitter, which costs more than some shoe-mounts and slightly less than my wireless ring flash by itself, would be a pricey option. Not to mention, it would be one more thing that requires a battery and which could easily get misplaced or lost in a tiny nook or cranny.
 
What’s more, as is, I always found wireless shooting with the built-in flash somewhat precarious. You see, I like to wear hats, and my hats would always push down on the pop-up flash. The upshot of this was: the wireless flash would fail to be triggered. So, even though I liked not having cables that sometimes get in the way, having a flash that I could depend on to fire 100% of the time, what’s more, without worrying about moving the brim of my hat out of the way was more important. What’s the wireless ring flash I’m referring to? The Metz Mecablitz 15 MS-1.
 
So, when you do the math, it made good sense to switch to the Nissin MF18. (You can get all the particulars about the Nissin macro flash in my Shutterbug review and tips about using a ringlight in those other Shutterbug articles listed below). 
​In Use
Since the MF18 comes with a variety of ring adapters to fit all popular lens filter sizes, there was little doubt I’d find the right adapter for the Tamron 90mm I was now using. You just have to make sure to bring it with you, and the way I usually do that is either by first attaching it to the flash ring housing before leaving home, or to the lens itself. The only problem with attaching to the lens is that it may block reverse-mounting of the lens hood. In fact, once you attach the ring to the lens, there’s no room for a lens shade any way you slice it.
 
One of the unusual aspects to the MF18 ring is that it elongates to sort of an oval shape. The original design was to accommodate larger-diameter lenses, but I use it with larger subjects, so the light fully wraps around them.
 
In use, the bright color LCD display proved easy to see in practically any light, even outdoors on a bright day. If you have a problem with strong sunlight, for example, simply turn your back to the sun so the flash housing is in shade. The large numerical display made it easy to read and set flash exposure overrides for subjects that may need it – perhaps a tad too distant from the camera/flash or highly reflective so as to cause the flash to underexpose. It was far simpler than with other ring flashes I’d worked with – and more direct.
 
The color quality of the resulting images, while difficult to compare without side-by-side comparisons, could be evaluated as quite satisfactory on its own, if not exemplary.
 
One other nice thing about the flash. The ring is very well diffused, further ensuring an even wash of light surrounding the subject.
​Who Should Use This?
Any photographer interested in close-up and macro photography, from novice to advanced and professional.
 
Capsule Comments
Easy to use with a very user-friend interface (color LCD panel) and very few buttons; well designed; reliable; consistent; adapter rings are metal, not plastic, so they’ll last. Only negative I can think of, at least where my Nikons are concerned, the flash doesn’t enter standby when the camera is turned off – a minor point, but it still needed to be mentioned (the flash will power down on its own after a user-defined period).
 
Conclusions
Adding a ring flash takes your close-up and macro photography to a new level. You no longer have to shoot at large apertures. Given that depth of field is minimal the closer you get to your subject (the larger the reproduction ratio/subject magnification), it’s important to have the capacity to stop down considerably (short of encountering and being limited by diffraction at the smallest F-stops). The added light output gives you that ability to stop down.
 
What’s more, since it’s electronic flash, you can freeze both subject and camera movement while you’re at it. Admittedly, it won’t stop a breeze from blowing a flower out of frame, but if you wait for a lull, you’ll capture a sharp image now matter how minimal the existing lighting conditions are.
 
What’s more, another benefit of using a ring flash is that, by limiting the reach of the flash illumination (owing to the lower light output of a ring flash to begin with), combined with the use of a small F-stop, you can minimize background illumination. I’m often able to create a stark black backdrop behind my subject. And if you find the light is too strong, the MF18 gives you the ability to reduce that light output, as do other settings on the camera.
 
Also, and not to be overlooked, the MF18 features four powerful LED lights that will help you focus under the dimmest of lighting conditions. As you get closer and closer to your subject, the camera increasingly blocks ambient light. This continuous light source will prove invaluable in the field. Simply hold the Set button down for 2 seconds to switch it on.
 
In the final analysis, if your top priority is to photograph flowers, bugs, and other critters close up and personal, or even if you’re a forensic photographer or dentist, doctor, or engineer that needs to light small discreet areas for research or records, you won’t go wrong with the Nissin MF18 ring flash. In fact, you’ll find yourself looking for projects to go out and shoot once this flash is attached to your camera. Once you experience the MF18, you’ll wonder how you ever managed to shoot close-ups without it.

​PRODUCT SPECIFICATIONS (per Nissin)
  • Guide Number: GN.16 * (ISO100)
  • Focal length Coverage: 80°x80°
  • Power source: 4 x AA Alkaline, 1.2V NiMH battery
  • Recycle time: 0.1-5.5 sec. (Alkaline, NiMH)
  • Number of Flashes: 120-800 *Depends on the mode using
  • Flash Power Control System:
    Full Auto mode: E-TTL, E-TTL II (for Canon), i-TTL / i-TTL (for Nikon) 
    TTL mode: E-TTL, E-TTL II (for Canon), i-TTL / i-TTL (for Nikon) with Ev compensation adjustment
    Fine Macro mode: 1/128-1/1024, 1/6 Ev steps
    Manual mode: Full-1/64, 1/3 Ev steps
  • Rear curtain sync.: Yes
  • High speed sync.: Yes (available in TTL mode only)
  • Ev Compensation on flash : -0.3 - +3.0, 1/3Ev steps
  • My TTL setting : -0.3 - +3.0, 1/3Ev steps
  • LED modeling lamps: 4 units
  • Color temperature: 5600K at full power flash
  • Flash Duration:
    1/700 seconds at full power (When A and B tube flash together)
    1/300 seconds at full power flash (When A or B tube flash individually)
    1/700-1/30,000 seconds (When A and B tube flash together)
  • Wireless Remote flash:
    Wireless TTL: Master, 4 Channels, 3 Groups (A, B and C)
    Mode: TTL / Manual, TTL flash ratio is adjustable
    Slave flash: Digital (infrared) Slave / Film (photo-optical) Slave
    * In Wireless TTL mode, Group C is slave flash setting and EV compensation can be adjusted independently. MF18 only supports Group A or C as slave flash.
  • Energy Saving: 
    Auto power Off, 10, 15, 30, 45, 60 min
    Stand-by mode: 30 sec.
    Display off (Display screen switch off)
  • Operation Control mode: Color Display (Auto Rotation)
  • Firmware Update Terminal: USB
  • X terminal: Yes
  • Adapter Rings: Suitable for lens from 49 to 82 mm. Package includes 52, 58 , 62, 72, 77mm (49, 55 and 82mm are optional for purchase)
  • Accessories: Sturdy leather case
  • Dimensions: 
    Main body: 115 x 65 x 85mm (4.5 x 2.6 x 3.3”
    Ring flash: 120 x 134 x 41mm (4.7 x 5.3 x 1.6”)
  • Weight: 446 gr (15.7 oz) w/o battery


Compatibility
Dedicated versions for Nikon, Canon. Tested with Nikon.
​
Manufacturer
Nissin

Distributed by/Order From/More Info:
www.neidllc.com (order from authorized resellers)

​How much is it?
$439

Why You Should Use a Ring Flash for Close-up and Macro Photography
You may be asking, why use a ring flash? And, if you’re not entirely familiar with the concept, you may also be asking, what is a ring flash?
 
Simply, a ring flash is a circular flash housing that sits on the front of your lens. The advantage is that the flash now has a direct line of sight with your subject. In contrast, the flash seated in the hot shoe experiences a form of parallax – aiming past the subject to some degree, if not entirely, and possibly blocked by the lens itself.
 
The other advantage is that the ring flash bathes the subject in a wash of light, more or less evenly. On many ring flashes, such as the MF18, you can actually assign a lighting ratio between two halves of the circular flash tube (it’s actually two semi-circular tubes) – for shadowing and depth, as opposed to completely even lighting.
 
On some ring flashes the flash tube is fully circular. This also means there’s no way to proportionately adjust output from left to right (or top to bottom, if you rotate the ring). That also means it’s an inexpensive flash.
 
That Metz ring flash mentioned earlier features twin linear flash tubes on opposite sides of the flash head assembly. That means the so-called “ring” is not really forming a ring of light.
 
In my experience, with nature subjects, I’ve often found it best to simply leave the output even on both sides, without setting ratios, since time is not always on our side to make these adjustments and the situation itself may not warrant it. Anyway, by encircling the subject, the ring of light fills in shadows, leading to what many describe as “shadowless” lighting. In truth ring lighting is really virtually shadowless at best, since some shadows can be seen and help to create a sense of depth with any three-dimensional subject. Light-toned areas behind the subject may still exhibit shadows, although these shadows tend to be soft-edged, rather than distinct.
 
The ring assembly may clip directly onto the lens, but more often than not, an adapter ring (supplied in most popular filter sizes) is required. The adapter screws onto the front of the lens much like a filter. The ring housing then clips onto this ring, which has a grooved channel that allows the ring head to rotate. Why rotate the head? If you’ve set output ratios for the ring, that lets you control where the stronger light will fall, just as if you had a key light and supporting light.

​Additional Reading (click on highlighted links)
Read my review of the Nissin MF18 macro ring flash in Shutterbug Magazine (online).
 
Two reviews I wrote for Shutterbug on the Tamron 90mm macro lens.
- Tamron 90mm macro review 1
- Tamron 90mm macro review 2

An overview on macro ringlighting for Shutterbug (including LED and fluorescent lights – in short, don’t waste money on them; if you’re going to use a ringlight, make it a ring flash).

A more recent roundup of macro lighting tools for Shutterbug.

An early but very comprehensive introduction to using a ring flash for close-ups.
 
Read my introductory feature story on TTL wireless flash in Shutterbug Magazine (online).
 
Read my feature story on No Strings Attached With Wireless TTL Flash for multiple-flash photography in Shutterbug Magazine (online).
3 Comments

Test Report: Manfrotto Pro Light Bumblebee-230 Photo Backpack

6/24/2017

0 Comments

 
PictureManfrotto Pro Light Bumblee-230. Courtesy Manfrotto.
When Kata first introduced the Bumblebee photo backpacks (distributed by Manfrotto), they soon became a favorite – at least for a time. What I liked about one bag in particular – and forgive me for not recalling the exact name – was its light-gray reflective exterior and the bright yellow (or yellow-orange?) interior that revealed every piece of gear stored.
 
Fast forward to the present. These bags no longer come under the Kata brand, being instead not just distributed by Manfrotto, but manufactured under the Manfrotto brand as well. The Bumblebee backpack I received kind of resembles the old Bumblebee, but that’s largely superficial. So has Manfrotto improved the backpack in the redesign? (Spoiler alert: read past the first few paragraphs to find out how I really feel about the bag. Don’t be dissuaded by my introductory comments.)

​Preliminary Observations: New Pro Light Bumblebee-230
The reason I’d requested the larger Bumblebee-230 was because the 130 was touted for CLC mirrorless systems. And since I’d planned to use the pack with either with my Nikon D500, possibly with battery grip, or D610 and various lenses, the larger bag seemed the logical choice.
 
So the bag arrives. And now I remembered one thing that had always bothered me about the original bag. The design of the backpack harness adds depth to the bag and it extends out in front like someone who’s had a few too many beers. What that means is, this bag will very likely not fit in the overhead bin on any aircraft I’ve been on, despite claims to the contrary. OK, technically it may fall under carry-on guidelines. However, you can’t argue with airport personnel or airline crew, especially if you’re among the last to board – what they say goes, and if they say it’s not a good fit, it’s not a good fit. And this is not the time when you can turn around and shift gears to a sleeker, more airline-user-friendly bag.
 
Okay, forget about air travel. What about everyday use? Well, try using public transit with a backpack that sticks out as far as this one does. You won’t get many smiles from the people you’ve jostled. Then let’s head to the woods. As you attempt to negotiate narrow trails and dense thickets you realize it’s going to be a tight squeeze and you approach the hike with some trepidation.
 
That aside, the interior design is a bit odd. There’s an upper shelf with an aperture for a lens to stick through. But the aperture is not centered over the central channel in the lower part of the bag, so how exactly do you fit things properly? You have to shift one of the main dividers over to align everything.
 
What’s more, the interior is dark. And the foam is thick – too thick, in my opinion. Yes, I like my gear cushioned and cuddly in a pack, but the thick foam kind of imposes itself and gets in the way. It takes on a cavernous appearance.
 
Okay, you’re saying, pull out the upper shelf and stretch the two main red dividers to their full length. Well, guess again. These were apparently fitted for the 130 and they’re too short to extend fully top to bottom in the larger 230.
 
So, where does this leave us? Well, all is not lost. In fact, there’s quite a lot to be said for this backpack.
​Now, What I liked About the Bumblebee-230
The pack is well constructed and will deliver years of good use. The backpack harness works admirably. I especially like the padded pocket in the padded waistbelt – keep a lens or flash here (a 70-300 will fit, although a flash would be a better choice, just in case you hit a lot of bumps in the road).
 
And the bag is comfortable. Which brings us back to the backpack harness. The waist belt does a beautiful job of keeping the weight off your shoulders. More to the point, it puts it on the hips – exactly where it should be. Few photo backpacks (or I should say backpack manufacturers) understand this, or even among those that do, few follow it in all their backpack designs.
 
Carrying a tripod comes second nature to this bag. There’s even a laptop sleeve. And there are enough pockets to house all essentials. Well, except for a jacket. The outer front zippered pocket should have been pleated to allow more room. I tried getting a lightweight jacket in there without luck.
 
I should also mention that there are two ways to get inside the bag. The upper and lower sections zip open separately. However, there is a flap that stands between the zippers on one side. Lift this flap up (it uses Velcro-type hook-and-loop material) and you can gain access to the entire interior with one smooth zip movement.
​Who Should Use This?
Bumblebee-230: bird and wildlife photographers with long, fast lenses. (130: the smaller pack may be better suited to a wider range of applications, such as street and travel photography, as well as hiking).
 
Capsule Comments
Still a great concept, despite my nitpicking; comfortable harness system with airflow mesh back panel; protective; well padded throughout; water repellant, with rain cover providing added protection against torrential downpours; spacious but deceptively so since movable, padded dividers are quite thick; difficult to see inside bag, unless you zip it open fully; heavy for a Pro Light bag.
 
Conclusions
Manfrotto had an opportunity to take the Bumblebee and make it the photo backpack for the ages. They dropped the ball. At least when it came to the Bumblebee-230. I imagine the smaller 130 would have been more to my liking. Had I seen the bag up close or perhaps if I’d paid closer attention to the product pages, I would have realized that. The large bag is best if you have a fast, long lens attached to the camera. For anything else, I would likely choose the smaller 130 instead, which would have assuaged most, if not all, of my complaints.
 
So, is the Pro Light Bumblbee the photo backpack for you? Give it a shot. In the long term, you’ll find it has a lot going for it. Again, consider the size and fit (for your gear, as well as you) before you decide.
 
I will say one more thing for this pack. This is the most comfortable Bumblebee photo backpack of any I’ve used to date. More to the point, it should be easily wearable for an extended outing on the trails.

PRODUCT SPECIFICATIONS/Bumblee-230 (per Manfrotto)
Weight: 93.47 oz
Color: Black
Material: Nylon, RipStop, Synthetic Fabric
External Height: 20.9”
External Length: 12.6”
External Width: 10.2”
Internal main compartment height (H): 20.1”
Internal main compartment length (L): 11.8”
Internal main compartment width (W): 7.5”
Laptop Compartment H: 20.1”
Laptop Compartment L: 11.8”
Laptop Compartment W: 1.2”
 
Manufacturer
Manfrotto
 
Distributed by/Order From/More Info:
Manfrotto
 
How much is it?
$279.99/Bumblee-230

0 Comments

Test Report: Nissin Di700A with Air 1 Radio Commander and Air R Radio Receiver Shoe-Mount Flash System for On-Camera & Wireless TTL Flash Photography

6/23/2017

2 Comments

 
PictureThe Di700A offers full tilt/swivel control, TTL flash on camera, and wireless control, including optical/infrared and radio remote wireless TTL flash. It comes with built-in diffusion and bounce panels. Courtesy NEIDLLC.
I’ve reported on Nissin flashes for years (see Additional Reading below). And these strobes never disappointed. The one thing that always struck the right chord with me about Nissin shoe-mounts in the past was their system compatibility with my Nikon gear, or, more specifically, with Nikon CLS (Creative Lighting System).
 
Well, Nissin has upped the ante, bringing you a user-friendly, priced-right multi-mode wireless flash system that will take your flash photography to the next level – with radio remote TTL flash control as a featured mode in the Di700A. Don’t really care about radio control or wireless operation in general? Well, this flash doesn’t stop there.

​Di700A and Air 1 Commander Combo
Out of the box, the Di700A can simply be used as an on-camera flash. As with its predecessor, the flagship Di866 Mark II (which remains in the lineup), it features a tilting/rotating head and full TTL-flash integration. TTL flash practically guarantees usable exposures.
 
Unlike that found on the flagship model, the control panel on the Di700A is simpler, yet stylish in its simplicity, as it’s an uncluttered color display. It certainly beats the uninviting display found on the Di600.
 
You can purchase the Di700A ($259) and Air 1 ($89) separately. However, you’ll save about $50 when you order the combo package at $299. The Air 1 commander/controller is only necessary if you plan to use the Di700A as a radio-controlled remote (off-camera) TTL flash. Otherwise, the flash is fully functional on its own or in other wireless setups. (Note: you can’t mix and match radio and non-radio triggering and still achieve full TTL flash exposure control.)
 
Separately, the Di700A is actually less expensive than the Di866 Mark II, which sells for $275, and in my book a much better buy than the older flash, unless you need esoteric functions such as built-in sub-flash (for fill with bounce lighting) and stroboscopic mode. 
​Di700A TTL and Manual Flash Modes
The graphical user interface on the Di700A offers up numerous operating functions. A, for Auto, is the most basic TTL-flash setting and doesn’t allow you any additional options on the flash itself. The flash takes over, but it remains tied to the camera’s settings, where overrides (such as ISO, f-stop, shutter/sync speed, and flash exposure compensation) still come into play.
 
For more control, use TTL mode. At this setting, you’re presented with the option to increase or decrease flash output on the flash unit itself, up to +/- 2 steps, in half-step (but not third-step) increments. I’m not sure why, but I’ve always found that setting flash compensation on the flash proved more reliable than making similar settings in the camera. And since Nikon cameras only give you +1 flash compensation (albeit going as far as -3), the maximum override of +2 on the flash itself may prove handy.
 
M (Manual flash output) lets you set output from full to 1/128, in whole-step increments. (If you need an interim setting, try diffusing the flash or moving the flash further away from the subject to decrease output, moving it closer to increase.) Manual mode should ideally be used in conjunction with a flash meter, but you can play around and arrive at usable settings without that handheld accessory. 
​Wireless Flash Modes: Non-Radio Triggering
Next we have the wireless settings that come into play with the Di700A as the sole off-camera flash or in tandem with other flash units positioned off camera. There are two modes for use with conventional (non-radio) wireless triggering. The first is SD (“D” for Digital). Use this setting when you use any TTL flash system that emits a pre-flash, which would typically be any camera-dedicated TTL-flash. The triggering pulse is infrared or optical/infrared. When it comes to Nikon, the Di700A supports Nikon CLS for non-radio-triggered TTL flash exposure control. The camera can be set to any of these modes: Manual, Aperture-priority, Shutter-priority. You should manually set ISO.
 
SF (which I take to mean “Standard Flash”) wireless mode is for use with non-dedicated strobes that are used to trigger the Di700A, such as a studio flash (for instance, in this setup you might use the Nissin flash as a kicker for a highlight or as a hair light). That said, the built-in flash on my Nikon D610 did also trigger the remote Di700A. The triggering pulse for SF is photo-optical. Set the camera to Manual shooting mode for SF triggering, so that you have full control over both flash and ambient light components, via, respectively, F-stop and shutter/sync speed. You should also manually set ISO.
​Radio-Frequency Wireless TTL Flash
The final, and newest for Nissin, wireless flash mode is radio-frequency wireless TTL-controlled remote, or simply TTL radio (radio TTL) remote. For this mode there is an icon, which kind of looks like the more familiar podcast icon. The working distance is about 100 feet, about three times the reach of typical infrared or optical triggering. What’s more, radio signals are not blocked by trees or walls, in contrast to infrared and photo-optical signals. So you can trigger a flash in another room, to prevent the space from being seen as a black void if it shows in the picture. However, electrical wiring, steel beams, and electronics may interfere with the signal. I’m told that even an intervening snow bank can limit the effective reach.
 
Important: this radio remote system operates at 2.4GHz and, according to industry sources, can be used around the world without interfering with other devices. (But when in doubt, check with local authorities.) Devices that use other frequencies may be restricted and categorically illegal overseas.
 
When in radio remote mode, the Di700A is not typically triggered by a camera flash. However, if there's no radio signal, Nikon CLS kicks in with the built-in flash on my Nikon D610, triggering the Di700A for full TTL flash control.

As with all radio systems, a triggering device, or transmitter, is required. For radio-controlled TTL flash, that trigger is the Air 1, which sits in the camera’s hot shoe, electronically carrying on a conversation between camera and flash. (Note that the foot on the Air 1 has all the needed pins to coincide with those in the camera’s hot shoe.)
 
When I first set up the system, I wondered why my Nikon D500 had the radio setting grayed out. Typically, when using Nikon’s own dedicated radio transmitter, this setting must be activated. Well, I learned that Nissin’s system, as with other third-party TTL wireless radio systems, bypasses such settings. In fact, you still get full TTL flash control. More to the point, in contrast with Nikon’s own system, which currently limits wireless radio TTL flash control to Nikon’s own system and the D500 and D5 bodies, the Nissin system can be used with any Nikon DSLR that supports TTL flash control. Which is why I ended up using it with the Nikon D610 – and did so without any hassles. It worked every time.
​In Use
I tested the Nissin radio-controlled TTL flash system with both the Di700A and with a Nikon SB-900, in conjunction with my Nikon D610 DSLR. The only difference: the Di700A was triggered directly, without requiring any accessories, as it has a radio receiver built in. To trigger the Nikon flash, I had to attach the SB-900 to an optional Nissin Air R module.
 
The Nissin Air 1 is the radio trigger that was seated in the camera hot shoe, triggering both off-camera strobes – the Di700A and, via the Air R, the SB-900. Everything worked fine, with the setup reliably delivering usable TTL flash exposures.
 
When testing the flash in SD (pre-flash digital) wireless remote mode, I used the built-in flash on the D610 as the trigger, setting the flash internally so it wouldn’t fire and contribute to the flash exposure, but instead would simply trigger the remote unit. No problems here either, with everything working smoothly.
  
In short, when it came to shooting with my Nikon D610, I’d call my tests with the Nissin Di700A and Nissin dedicated Air system a resounding success. I’ll put the next Nissin flash – the compact i60A – to the test with my Nikon D500 when that flash arrives.

PRO TIPS – Keep These Things in Mind
- The shutter speed controls the amount of ambient light (background or surrounding existing illumination) that you allow into the picture; the F-stop controls the amount of flash illumination hitting the subject.
 
- If you want subtle fill-flash, use a small F-stop to limit the reach of light; if you want to overwhelm or balance the surrounding available light, use a large F-stop.
 
- If you use one of the camera’s autoexposure shooting modes with TTL flash, you’ll likely end up with balanced fill flash or even a brightly lit subject, but watch that bright backgrounds don’t underexpose (they may need a boost in ambient exposure compensation).
 
- When using TTL flash, you can also control the amount of flash hitting the subject with the flash AE/FV override (+/-) settings either on the flash or in the camera, as applicable. When using both settings – on camera and flash – note that the effect is cumulative, but a negative setting on one will cancel out or reduce a positive setting on the other. For example, if you set +2 on the flash and -3 on the camera, the net effect is a loss of 1 stop in flash illumination, so watch your settings.
 
- When employing available-light AE override (AE exposure compensation) settings, these may affect the entire flash-plus-ambient TTL exposure or only the ambient TTL exposure, depending on the camera or your menu settings. These settings may also affect Manual shooting mode settings made with the camera, again depending on your system. You should test your setup beforehand.
 
- When using the flash in any TTL mode, flash output is read by the camera, through the lens, and so changes in distance are automatically compensated, as is the use of filters or lens extension.
 
- Keep in mind that when using the flash in M mode, flash exposure of the subject is tied directly to flash-to-subject distance. Any decrease or increase in that distance will affect the flash exposure for the subject, respectively increasing (with decreased distance) or decreasing (with increased distance) the amount of flash exposure for the subject. Also affecting flash exposure when setting the flash to Manual: the use of filters and lens extension, each requiring an increase in flash exposure (the amount varying with filter density and color and amount of lens extension).
 
- Very important: keep in mind that for photo-optical and infrared triggers to successfully trigger a remote flash, there must be a direct line of sight between them. This is critical outdoors. Indoors the signal can bounce around (although not a guarantee, so line of sight is recommended). If you position the flash behind a tree, it will not be triggered, unless something nearby happens to reflect the triggering beam in the direction of the flash receiving the triggering pulse. Also, outdoors the distance between transmitter and receiver may be limited to no more than 20 or 30 feet.
 
- Getting technical: the triggering device (which emits a photo-optical, infrared, or radio frequency pulse) is called the Master. The Master triggering pulse usually comes from a flash seated in the hot shoe, a built-in flash, or another device that’s seated in the camera’s hot shoe. The remote (off-camera) flash being triggered is called the slave. Remote flashes are said to be slaved to the Master flash or triggering device. With both infrared and radio remote triggering, you can assign different off-camera flashes to a group designation, which is commonly A, B, or C. The reason for doing that is so that you can independently set output for each group. This way you can have one or more flashes off-camera assigned to Group A as your key light at one output setting, and Group B could be one or more flashes at the same or different setting illuminating the background, with perhaps a Group C flash at reduced output as a hair light.

​Who Should Use This?
Any photographer from novice to advanced; even pros will find it does the trick for them.
 
Capsule Comments
Offers multi-mode remote operation, especially radio TTL flash, as well as other wireless TTL and non-TTL modes; user-friendly; consistent; supports various sync settings (verify for your camera); reliably worked with my Nikon D610 for TTL flash control on or off the camera. The only thing missing is a dome diffuser. (Why’d you leave that out of the package, Nissin?)
 
Conclusions
When choosing among Nissin strobes, if you want enhanced capability without unnecessary extras, the Di700A is the way to go. And for the difference in price compared with the Di600, the Di700A is well worth the investment. You’ll also find it much less intimidating than the top-of-the-line Di866 Mark II, with a much more user-friendly interface. And it’s more fun to use than any Nissin flash I’ve worked with to date. What’s more, you can start using this flash right out of the box, the moment you insert the batteries, with the full assurance that you’ll get the job done.
 
Set aside all the features, which include full radio TTL flash control, and you’re left with a friendly price, user-friendly operation, consistency, and reliability – and that alone marks the Nissin Di700A + Air 1 (radio controller) combo as a winner. Then add the Air R for your flashes without built-in radio TTL-flash control and you’ve got a full studio in a bag. What’s not to love about this system!
 
Compatibility
Dedicated versions for Nikon, Canon, Sony. Tested with Nikon.

Di700A SELECTED PRODUCT SPECIFICATIONS 
Type: shoe-mount flash
Shooting modes: Auto TTL, TTL (with onboard override settings); wireless operation (infrared, photo-optical, radio remote)
Guide no. (at ISO 100 in M): GN54 (at 200mm zoom head position); GN48 (at 105mm zoom head position); GN28 (at 35mm zoom head position)
Flash duration: 1/800 to 1/30,000 sec.
Color temp: 5600K
Bounce/swivel: Yes/yes
Control panel: digital color panel + control wheel/Set button
Wireless operation: 8 channels, 3 groups
Power source: 4 AA batteries
Included accessories: soft pouch, mini-stand
Dimensions: 140(H) x 75(W) x 115(D) mm/ 5.5 (H) x 3(W) x 4.5(D) inches
Weight: 380g/13.4 oz (w/o batt.)
 
Manufacturer
Nissin
 
Distributed by/Order From/More Info:
www.neidllc.com (order from authorized resellers)
 
How much is it?
$299/Di700A + Air 1 combo
$259/Di700A
$89.99/Air 1 (on-camera TTL-flash radio transmitter)
$69.99/Air R (TTL-flash radio remote receiver – attaches to off-camera flash other than Di700A, such as Nikon SB-700 or Nissin Di866 Mark II)

​Additional Reading
Read my review of the Nissin Di40 pocket-size flash here on this site.
 
Read my review of the Nissin D866 Mark II in Shutterbug Magazine (online). 
 
Read my review of the Nissin MF18 macro ringflash in Shutterbug Magazine (online). 
 
Read my introductory feature story on TTL wireless flash in Shutterbug Magazine (online).
 
Read my feature story on No Strings Attached With Wireless TTL Flash for multiple-flash photography in Shutterbug Magazine (online).
 
Read my roundup of the original group of Nissin flashes in Shutterbug Magazine (online).

2 Comments

Field Report: Think Tank Photo's StreetWalker Series Photo Backpacks Take to the Streets as Version 2.0

6/15/2017

1 Comment

 
PictureStreetWalker V2.0. Photo courtesy Think Tank Photo.
I used my original StreetWalker for a long while, eventually replacing it with MindShift Gear’s TrailScape 18L when that bag came along. What I liked about the StreetWalker (version 1.0) was its small size: It could easily fit under the seat of a commercial airliner and would be a comfy fit in a puddle jumper as well. But when the TrailScape came along, I figured, Hmm, a bit bigger and a roomy outer front pocket for a light jacket – OK, I’ll use this one when I need a smaller bag.
 
Now that the StreetWalker V2.0 (SW V2) is here, I find myself switching back to this smaller pack. After all, if I need something larger, capable of storing a jacket and some extras, I still have my MindShift BackLight 26L, which I recently discovered will snugly hold my Nikon D500 with attached Tamron 150-600mm G2 lens (look for a review of both products soon).
 
Think Tank also sent me the new StreetWalker Pro V2.0 (SW Pro V2) – the larger sibling in this family, but not the largest in this series by any means. There’s an even more spacious pack, the StreetWalker HardDrive V2.0 (which fits a full-size laptop), and new to the lineup, the StreetWalker Rolling Backpack V2.0 (roller and backpack in one). The two largest bags looked tempting, but I felt that two bags was enough to deal with for now.

​Inside and Out
The new SW V2 and SW Pro V2 are roomier on the inside than their original counterparts and slightly larger overall. Other than that, the new models add room for a 10” tablet on the bag. The tablet sleeve is the same size on both bags.
 
One of the problems I had with the original SW V2 (can’t recall if this also applied to the larger pack) was the small water-bottle pocket on the small bag. Think Tank addressed the issue in both V2 bags with an expanded, pleated zipped pocket behind the mesh pocket. Small water bottle? Use the mesh pocket. Large 32 oz Nalgene, use the zipped pocket.
 
I would have preferred that the pockets were pleated all the way around to the bottom. That would make an easier fit for a large water bottle and allow for a grommet at the base. A bottle with cold water subjected to a warm, humid environment will form condensation, and that condensation will pool at the bottom. A grommet allows the water to safely drip free of the bag.
 
The pocket on the left (with the bag on your back) has a small smartphone sleeve as well. I don’t know about you, but I carry my phone in a vest pocket, where I can easily reach it, not in the backpack, where it’s impossible to reach (unless you’re a contortionist) without taking the pack off your back. Some things appear cool on paper but are not very practical in the real world.
 
One of the more subtle changes revolves around the main padded partition. It’s now hinged toward the bottom to make room for a second camera with lens attached. Simply swing the hinged section over to the right to make room. When carrying two cameras with attached lenses, this provides for a well-balanced carrying situation, which your back will thank you for. Obviously, this reduces your ability to carry very long lenses, but, hey, you can’t have everything – unless you switch to a larger-size pack.
 
Any way you slice it, either bag is roomy enough to hold fast lenses attached to a DSLR, within limits. I would even venture to say that each bag could hold a medium-format camera, possibly with a lens, at the bottom. At the very least, the larger bag should hold two gripped DSLR bodies with attached lenses; the smaller one should accommodate one DSLR at the top and, on the bottom, one gripped body, each with lens.
​In Use
Air-flow mesh padding in the back and shoulder straps was welcome relief on a hot muggy day as I found myself walking around several popular birding areas in the Chicago area, wearing the StreetWalker Pro V2, on a bird photography outing with a friend.
 
I had the SW Pro V2 loaded with my Nikon D500 and Tamron 150-600mm G2 – lens attached, I might add, and resting comfy, cozy, and snug inside the pack. I also added a Nissin Di700A shoe-mount (which I’m also testing) and sling strap, that I sometimes left attached to the camera – or more correctly, the tripod mount for better balance.
 
And yes, I kept the tripod mount attached to the lens. Otherwise, you tend to forget these things when you need them, or misplace them entirely. I also find it much easier to carry the camera by grabbing onto the mount, although at times I may cradle the camera, varying with the moment or the situation.
 
The tripod mount was positioned fully downward inside the pack, an arrangement I found raises the entire assembly to the point where camera and lens practically hug the closed lid for a snug fit so things don’t bounce around. Still, as a further precaution, I tend to secure lens and camera with either an elastic band that attaches to either side surrounding and hugging the lens, or I position an unused padded divider over the lens barrel for this purpose. I should add that I left the lens shade reverse-mounted on the lens.
 
The lens being this new, I take one more precautionary step – I slide the packing Styrofoam collar that came with the lens in place beneath the hood, just as it arrived from the factory, to prevent distorting the hood. It’s probably overkill, I know, and I may discontinue this practice, but it stands for now.
 
One thing that bothered me about both bags: the lack of headroom above the camera. The D500 has a very deep grip. The Nikon D610 not so much, but it still had difficulty being comfortably seated in the smaller V2 pack. I almost gave up, till I realized I could reshape the central divider somewhat to make room. And that worked. I have the Tamron 24-70mm f/2.8 attached to the camera, and there appears to be room for a bulkier and longer lens in its place. The fit in the larger Pro V2 was also tight with the D500 in place, but not to the point where I had to make any further adjustments to the main divider.
 
As for comfort level, I’m not sure why – and this will no doubt differ with the individual – I found the smaller of the two packs rides more comfortably on my back. Perhaps it’s due to the heavier load packed into the Pro V2. Then again, I’ve loaded the BackLight with the same gear, and it was a smooth ride – as good as it gets. It may have something to do with the added depth of the SW Pro.
 
As a side note, I should point out that the added depth on the StreetWalkers offers one distinct advantage: It lets them stand upright easily, unassisted and without having to lean against something for support, without fear of the bag tipping over, which is certainly a plus.
​Conclusions
I’ve always admired the StreetWalker series and would have continued to use my StreetWalkers all these years if other bags hadn’t come along to replace them. Now the StreetWalker V2.0 (the smaller of the two new backpacks) will replace a MindShift pack of similar size and design.
 
I hold onto photo packs this size for air travel. But aside from that, they work for me and do the job I need them to do, protecting my gear and making it readily accessible, while allowing me to carry what I need most to meet practically any challenge.

​Who Should Use This?
Street photographers; travel photographers; photographers of all levels.
 
Capsule Comments
Well constructed, durable design, water-repellant (with rain cover for added protection); easily carries a tripod over the front, plus full-size water bottle in side pocket; room for tablet; best suited for DSLR outfits or larger mirrorless systems. Should keep you going for many years.

​How much is it?
$169.75/StreetWalker V2.0
$199.75/StreetWalker Pro V2.0
Manufacturer/Order From/More Info:
Think Tank Photo


FEATURES (per Think Tank Photo)
StreetWalker Backpacks V2.0
  • Tripod mount on front panel (tripod cup for larger tripods included on Pro and HardDrive versions)
  • Padded shoulder straps comfortable for all day trekking
    • YKK RC Fuse zippers, ballistic nylon, high density Velex and closed-cell PU foam are the highest quality materials in the industry
    • Seam-sealed rain cover included
    • Adjustable dividers allow you to customize the fit of your DSLR or Mirrorless gear
    • Two side water bottle pockets and two side zippered pockets
    •  Dedicated smartphone pocket fits today’s large phones with a 5.5” (14cm) screen size
    • Removable webbing waist belt detaches easily (applicable to SW Pro V2)
    • Interior clear zippered pockets for accessories
    • Organizer pocket
    • Shoulder harness pockets, D-rings, daisy chain and adjustable sternum strap
 
WHAT FITS (per Think Tank Photo)
StreetWalker Pro V2.0
  • Holds 2 gripped DSLRs, 4–6 standard zoom lenses, and a 10” tablet
  • Holds 1 gripped DSLR, 5–7 standard zoom lenses, and a 10” tablet
  • Holds 2 large Mirrorless cameras, 4–6 lenses, a flash, and a 10” tablet
  • Maximum lens size: 400mm f/2.8
Examples:
  • Nikon D4s with 70–200mm f/2.8 attached, 24–70mm f/2.8, 14–24mm f/2.8, 105mm f/2.8, 50mm f/1.4, SB900 flash and a 10” tablet
  • Canon 1DxII (x2), 24–70mm f/2.8 attached, 70–200mm f/2.8 attached, a 16–35mm f/2.8, and a 10” tablet
  • Sony a7mII with 70–200mm f/4 attached, 4–6 additional lenses and a 10” tablet
StreetWalker V2.0
  • Holds 1 standard DSLR, 1 gripped DSLR, 3–4 standard zoom lenses, and a 10” tablet
  • Holds 1 standard DSLR, 4–5 standard zoom lenses, and a 10” tablet
  • Holds 2 large mirrorless cameras, 4–5 lenses, a flash and a 10” tablet
  • Maximum lens size: 300mm f/2.8
Examples:
  • Nikon D810 with 70–200mm f/2.8 attached, 24–70mm f/2.8, 14–24mm f/2.8, 105mm f/2.8 macro and a 10” tablet
  • Canon 1DxII with 24–70mm f/2.8 attached, Canon 5DMIII with 70–200mm f/2.8 attached and 16–35mm f/2.8 and a 10” tablet
  • Sony a7mII with 70–200mm f/4 attached and 4–6 additional lenses and a 10” tablet
 
MATERIALS (per Think Tank Photo)
Exterior:
  • Durable water-repellant (DWR) coating
  • Polyurethane coating
  • 1680D ballistic nylon
  • YKK RC Fuse (abrasion-resistant) zippers – lockable (lock not included)
  • 420D velocity nylon
  • 550D poly-spun
  • 320G air mesh
  •  Ultra-stretch pockets
  • Y-buckles
  • Antique plated metal hardware
  • Nylon webbing
  • 3-ply bonded nylon thread
Interior:
  • Closed-cell foam and PE board reinforced dividers
  • 200D polyester
  • Polyurethane backed “super-stick” Velex liner and dividers
  • 2x polyurethane coated nylon 210T seam-sealed rain cover
  • Laminated clear mesh pockets
  • 3-ply bonded nylon thread
 
PRODUCT SPECIFICATIONS (per Think Tank Photo)
StreetWalker Pro V2.0
Internal Dimensions: 9.4” W x 17.3” H x 7.5” D (24 x 44 x 19 cm)
Exterior Dimensions: 9.8” W x 18.5” H x 8.3” D (25 x 47 x 21 cm)
Tablet: 7.7” W x 10.4” H x 0.4” D (19.5 × 26.5 × 1 cm)
Phone Pocket: 3.9” W x 7.5” H x 0.6” D (10 × 19 × 1.5 cm)
Weight: 3.5 lbs (1.6 kg)

StreetWalker V2.0

Internal Dimensions: 9.4” W x 16.1” H x 6.3” D (24 x 41 x 16 cm)
Exterior Dimensions: 9.8” W x 17.3” H x 7.1” D (25 x 44 x 18 cm)
Tablet: 7.7” W x 10.4” H x 0.4” D (19.5 × 26.5 × 1 cm)
Phone Pocket: 3.9” W x 7.5” H x 0.6” D (10 × 19 × 1.5 cm)
Weight: 3.3 lbs (1.5 kg)
1 Comment

    Reviews

    TECHNICAL EDITOR
    Jack Neubart


    Archives

    December 2019
    September 2019
    August 2019
    July 2019
    May 2019
    April 2019
    February 2019
    November 2018
    September 2018
    August 2018
    May 2018
    January 2018
    November 2017
    September 2017
    July 2017
    June 2017
    May 2017
    April 2017
    February 2017
    December 2016
    November 2016
    October 2016
    August 2016
    July 2016
    May 2016
    April 2016
    March 2016
    February 2016
    January 2016
    December 2015
    August 2015
    December 2014
    August 2014
    July 2014
    April 2014
    November 2013
    October 2013

    Categories

    All
    13x19-inch Printers
    35mm-style Digital Cameras
    Acratech
    Adobe Software
    Austin
    Backpacks
    Ballheads
    Camera Backpacks
    Camera Bags
    Camera Cases
    Camera Holsters
    Camera Luggage
    Camera Supports
    Canon Cameras
    Canon Lenses
    Compact DSLRs
    Compact Photo Printer
    Compact System Cameras
    Desktop Printers
    Digital Projectors
    Digital Retouching
    Digital SLR
    DSLR
    Epson
    Exposure Control
    Fashionable Bags
    Fast Lenses
    Film Emulation
    Flash Photography
    Hawaii
    HDR Plug-in
    HDR Software
    HD SLR
    HD-SLR
    High-resolution DSLR
    Holster Bags
    Image-editing Software
    Image-stabilized Lenses
    Inkjet Printers
    L Bracket
    L-bracket
    Lens Cases
    Lenses
    Lens Pouches
    Leveling Base
    Long-lens Bags
    Macphun
    Macro
    Macro Flash
    Manfrotto
    Mega-zoom Digital Camera
    MindShift Gear
    Mirrorless Cameras
    Nikon Cameras
    Nikon Digital Cameras
    Nikon Mirrorless
    Nikon Pro Digital Cameras
    Nissin
    Nodal Rail
    Nodal Slide
    Olympus
    Outdoor Photography
    Panorama Head
    Panoramas
    Panoramic Photography
    Photo Accessories
    Photo Backpacks
    Photo Belts
    Photo Luggage
    Photo Rollers
    Plug-ins
    Point-and-shoot Zoom
    Portrait Retouching Software
    Printer
    Pro Cameras
    Pro Digital Cameras
    Radio Remote Flash
    Radio TTL Wireless Flash
    Rain Covers
    Rain Hoods
    RAW Conversion Software
    Review: Photo Accessories
    Review: Phottix Odin Radio Remote
    Review: PocketWizard ControlTL
    Review: Software
    Ring Flash
    Rolling Cases
    Samsung Cameras
    Shimoda Designs
    Shoe Mount Flash
    Shoulder Bags
    Shutterbug.com Review
    Shutterbug Magazine
    Sigma Lenses
    SKB Cases
    Sling Bag
    Sling Bags
    Sling Pack
    Snapshot Printer
    Software
    Software Effects
    Super Wide Lenses
    Super-wide Lenses
    Superzoom
    Tamron Lenses
    Telephoto Zooms
    Tenba
    Texas
    Think Tank Photo
    Tripod Heads
    Tripods: Carbon Fiber
    TTL Radio Wireless Flash
    TTL Wireless Flash
    Ultra Wide Lenses
    Ultra-wide Lenses
    Ultra-zoom Digital Camera
    Wide Format Printers
    Wireless Flash
    Zoom Lenses

    RSS Feed

    All products and services are the trademarks or registered trademarks of their respective owners.
    Use or mention of any product or service is not an endorsement - compensated or otherwise.
    However, manufacturers, distributors, vendors & services may provide products or services for use.

    Your purchase and/or use of any product or service tested, reviewed, listed or mentioned is solely at your discretion and you release us from any and all liability associated with such purchase and/or use.

Your satisfaction, our expertise. They go hand in hand.
Bringing over 35 years' experience into everything we create.

Entire contents of this website is comprised of original works created by Jack Neubart, including but not limited to photographs, digital work, musical compositions, stories, humor, poetry, and any other artistic or textual material. 
All work Copyright ©2021 Jack Neubart and is protected under United States and International laws and treaties.
All rights reserved. None of the contents may be copied, extracted, abstracted, adapted, transmitted, digitally altered, or otherwise used or published without express permission of the Copyright owner.
Webmaster: Jack Neubart (building on a Weebly.com template).