
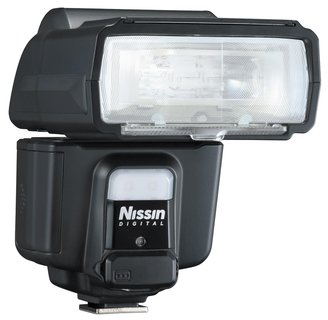
 Nissin i60A. Courtesy NEIDLLC.
 Nissin introduced TTL radio wireless capability with the Di700A shoe-mount and Air 1 transmitter (reviewed here). Now this same wireless capability comes to Nissin’s latest flash, the i60A.
What sets the i60A apart from the Di700A is the new shoe-mount’s compact size and more extensive feature set. Does this mean it’s a better fit for you and your style of shooting? Let’s see…
What sets the i60A apart from the Di700A is the new shoe-mount’s compact size and more extensive feature set. Does this mean it’s a better fit for you and your style of shooting? Let’s see…
But First a Few Words about Nissin TTL Radio Wireless Flash
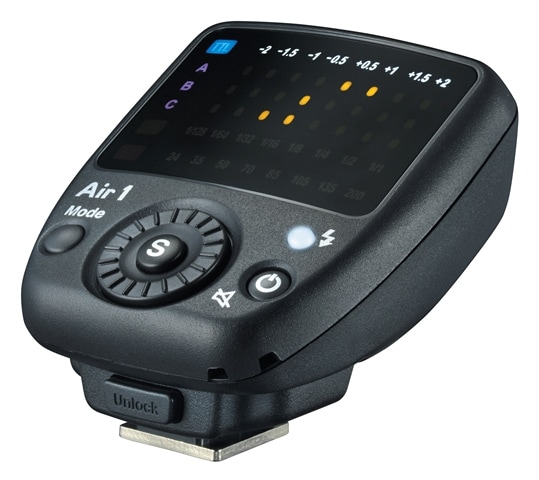
Nissin labels its proprietary 2.4GHz TTL radio wireless technology NAS, for Nissin Air System (not to be confused with NAS, or network-attached storage, drives). Hence the “A” designation in both the Di700A and i60A – for Air-compliant. Out of the box, and without accessories, both shoe-mounts support on-camera and wireless TTL operation – but without radio triggering. It takes one key additional component to activate radio triggering, the Air 1 transmitter.
“Air” represents a key link in the system. An integral component (albeit optional) is the Nissin Air 1 transmitter, which sits in the camera’s hot shoe. The Air 1 controls and triggers the Air-compliant off-camera flashes, which are said to be slaved to the Air transmitter, or master.
All output and zoom settings are made on the Air 1. Only Group (and, where applicable, channel) settings are made on the remote units. You might want to designate different remote flashes under separate groups for better lighting control of subject and background. (Channel settings are rarely required and usually only come into play to prevent interference with devices on the same channel.)
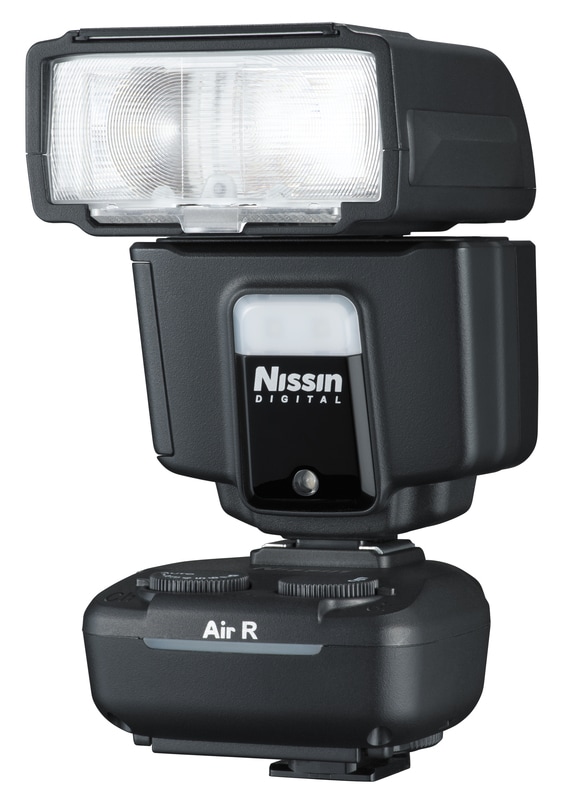
If you use a TTL-dedicated, non-Air-compliant flash, whether Nissin or another brand, simply attach the optional Nissin Air R remote receiving module to the flash by way of the hot shoe and you’re in business, with camera, Air 1, and all remote components talking to each other to deliver reliable TTL flash exposures.
Radio control in this wireless system, according to Nissin’s specifications, will work with off-camera flash units to roughly 100 feet. Typically, radio triggering has the added advantage that it works even when those remote strobes are situated around corners or behind obstacles, in contrast to photo-optical and infrared triggering, which require a direct line of sight. And radio triggering is more reliable outdoors.
Keep in mind that these A-designated flashes will not trigger TTL dedicated strobes in any fashion (not even other Nissin strobes). They require a separate Master module, whether radio or optical/infrared, to trigger them in order to produce TTL flash exposures. However, they will trigger any flash that has a built-in photo-optical sensor, for conventional flash operation using manual exposure control.
Nissin labels its proprietary 2.4GHz TTL radio wireless technology NAS, for Nissin Air System (not to be confused with NAS, or network-attached storage, drives). Hence the “A” designation in both the Di700A and i60A – for Air-compliant. Out of the box, and without accessories, both shoe-mounts support on-camera and wireless TTL operation – but without radio triggering. It takes one key additional component to activate radio triggering, the Air 1 transmitter.
“Air” represents a key link in the system. An integral component (albeit optional) is the Nissin Air 1 transmitter, which sits in the camera’s hot shoe. The Air 1 controls and triggers the Air-compliant off-camera flashes, which are said to be slaved to the Air transmitter, or master.
All output and zoom settings are made on the Air 1. Only Group (and, where applicable, channel) settings are made on the remote units. You might want to designate different remote flashes under separate groups for better lighting control of subject and background. (Channel settings are rarely required and usually only come into play to prevent interference with devices on the same channel.)
If you use a TTL-dedicated, non-Air-compliant flash, whether Nissin or another brand, simply attach the optional Nissin Air R remote receiving module to the flash by way of the hot shoe and you’re in business, with camera, Air 1, and all remote components talking to each other to deliver reliable TTL flash exposures.
Radio control in this wireless system, according to Nissin’s specifications, will work with off-camera flash units to roughly 100 feet. Typically, radio triggering has the added advantage that it works even when those remote strobes are situated around corners or behind obstacles, in contrast to photo-optical and infrared triggering, which require a direct line of sight. And radio triggering is more reliable outdoors.
Keep in mind that these A-designated flashes will not trigger TTL dedicated strobes in any fashion (not even other Nissin strobes). They require a separate Master module, whether radio or optical/infrared, to trigger them in order to produce TTL flash exposures. However, they will trigger any flash that has a built-in photo-optical sensor, for conventional flash operation using manual exposure control.
Nissin i60A: A Closer Look
The i60A is rather odd-looking. Seated in the camera’s hot shoe with head down (default position), the i60A presents a remarkably low profile. It manages to fit 4 AA batteries and all the circuitry into a squat little form factor.
So, what’s odd about it. Sitting on that compact battery housing/control center is a ginormous flash head. At least that’s how I’d describe it. The base of the i60A measures roughly two-thirds that on the Di700A in height. But the flash head itself is a tad longer than the head on its older sibling – by about 1cm. The depth of the head on the i60A (measured at the face, top to bottom), is about 2cm less (not including that odd bump toward the back of the i60A - possibly housing the capacitor). But when you add it all up, the head looks out of proportion, judging by its size relative to the base. Nothing wrong with that, but the overall size does warrant closer examination.
Small, Yet Packs a Punch
Getting past the look of the flash, let’s see what this little shoe-mount is all about. For starters, the i60A is pimped up with all the shooting modes found on the Di700A, but with even more control. That means full TTL flash operation on camera and remotely. Remote operation extends to optical/infrared TTL wireless, photo-optical non-TTL wireless, and TTL wireless radio operation.
While we rarely use Guide Numbers (GN) in this day and age of TTL dedicated flash, the GN does give us a sense of the effective reach and power of the unit. And in that sense, it serves as a practical guide, hence “Guide” Number.
At ISO 100, the i60A will cover a distance of 89 feet (27 meters) at the 24mm zoom setting. At the 200mm setting (ISO 100), that jumps to 198 feet (60 meters). Compare that to any camera’s built-in flash. The i60A’s built-in diffuser panel and included dome diffuser will knock these numbers back a bit.
By the way, the i60A is a bit more powerful than the larger Di700A. At the 200mm zoom setting, the GN for the Di700A is 178/54 (ISO 100, ft/m). And the new flash is considerably more capable than the even smaller and older Nissin i40. The i60A is also the most expensive flash in the current Nissin lineup, even more than the flagship Di866 Mark II. The i60A draws on much of the functionality from the 866 Mk II while replacing more esoteric features and expanding on others.
The i60A adds one more feature not found on most shoe-mounts: a video light. This light, consisting of two LEDs (diffused), can be adjusted in brightness. And it’s bright! I didn’t realize it at first, but this video light would really come in handy at some point in a studio setup. And, if nothing else, it makes a great flashlight in a pinch. (You’ll also find this feature on the earlier i40.)
The Interface – User-Friendly… to a Point
The interface on the i60A consists of a color LCD panel, dials, and buttons. The LCD panel is small but easily readable, if you have fairly good eyesight, that is. It is, however, difficult to read under bright lighting. I recommend you shade the display outdoors when changing settings.
Somewhat disconcerting, the panel dims almost immediately and there’s no way around this. But you can bring it back to full brightness by a press of any button, except, obviously, the on/of switch, or when changing modes.
The control dials may be a bit harder to read for some, especially if you suffer from astigmatism. The lettering is tiny and the detent marker on the mode dial doesn’t precisely align with the mode settings - nor is it clearly marked (it's raised), so you may do better paying close attention to the LCD display to get a better sense of the flash mode than to the mode dial itself. And in dim light, that may be the only way to read flash modes, unless you bring a flashlight or a cell phone with you.
 Nissin i60A interface showing flash in full TTL mode (non-wireless), at -2 EV. To use the TTL wireless modes, shift the mode dial down to the Group settings: A, B, or C (with matching settings on the Master controller/transmitter/trigger). Courtesy NEIDLLC. |  Nissin i60A interface showing flash in Manual mode, at reduced output, with zoom set at 105mm (zoom setting uses dial on the right). Courtesy NEIDLLC. |
Speaking of Those Control Dials
The dial on the left is for flash modes, with the following options. For on-camera (hot-shoe) usage: the green “A” is for fully auto TTL flash, whereas “TTL” gives you more complete TTL flash control, with the added option of onboard flash exposure overrides (to +/-2, in 1/3-step increments).
For remote operation, the dial offers SD (for pre-flash digital), SF (non-TTL-flash exposures with any optical flash/trigger), and A/B/C. The A/B/C settings are used with the Nissin Air radio-controlled system. (More on wireless operation below.)
The dial on the right provides settings for wireless radio channels (1 to 8) and manual zoom. The other settings control audio (beeps) and high-speed sync for cameras that don’t have that option built-in (not applicable to Nikon DSLRs). The key problem with these controls is that they’re so small that you need a fingernail to access them. Hold down the button until the display changes to the required parameter, for example, zoom focal lengths. Then turn the outer wheel, which is also used to change output settings for the applicable modes. The central button locks in settings.
Wireless Operation
By the way, and this may confuse the issue somewhat, my D610’s built-in flash can be used to trigger the i60A in any wireless mode. In the absence of the Air 1 trigger, the A/B/C settings can also be used for non-radio (that is, optical/infrared) wireless TTL operation of either or both the i60A and Di700A, in the current example, with Nikon CLS controlling exposure.
You should also be aware that the i60A (and the Di700A) respond to the built-in flash on the Nikon D610 regardless of channel setting made in the camera or on the i60A. (There are no channel settings on the Di700A.)
In the final analysis, what’s really important is that TTL wireless control works reliably, whether via radio or optical/infrared control.
Now More on That Flash Head
The flash head itself raises, lowers, and swivels without the use of a release button. The detents appear to be well enough engaged that the head won’t drop easily when you’re running around with the flash head up at an angle. Adding heavy bounce panels or other accessories to the head may, however, cause a precipitous and unexpected drop if you jostle the flash too much. However, the flash appears constructed well enough to tolerate a bit of mistreatment.
We should point to one practical consequence of this disproportionate head on the i60A. When you raise the head fully erect and position it on the mini-stand, the flash will topple over backwards, owing to a high center of gravity. Either lower the head two or three notches or, better yet, reverse-mount the flash on the stand for better support while still maintaining the original stance.
Size Matters
The raison d’etre for this flash is its compact size. Compactness is one thing. But we do have to evaluate how this shoe-mount’s size affects performance. As it turns out, size does matter. But not as much as you’d think.
One of the reasons we avoid using the camera’s built-in flash with people (and sometimes animals) is because the on-axis light produced by the flash results in red-eye, where the pupils take on a pronounced blood-red color (due to bounce-back of light off the back of the retina). To mitigate against this possibility, we prefer to use flash off camera, or at the very least use a full-size shoe-mount flash. You could use a red-eye reducing pre-flash, but that destroys the spontaneity of the shot – not to mention the likelihood that your subject will move during that interval.
The i60A sits low enough that it could conceivably result in that same red-eye effect encountered with a pop-up flash. We can’t say that categorically, since numerous factors come into play – but I’m just throwing it out there as a possibility, perhaps even a strong probability.
We also have to consider the lens barrel and/or lens hood (lens shade) getting in the way and blocking the light. The good news is that tests with my Tamron 70-300mm lens, with and without lens shade, on my Nikon D610, bore out that, at normal shooting distances, you don’t get that arc-shaped shadow at the bottom of the screen, which would typically occur when the lens blocks the flash. So I decided to push it further. It proved to be true even when I moved in close with the lens.
I had even used a Tamron 90mm macro lens with attached lens shade on my Nikon D500 with no observable ill effects, shooting some very tight close-ups, I might add. I also tested the flash with my Tamron 15-30mm f/2.8 lens (with built-in lens shade), which has an 82mm filter diameter – a wide schnoz going up against a compact head – with no ill effects to report in terms of light blockage.
However, and this is not directly related to size, further tests revealed that light coverage was uneven at very wide lens focal lengths, as tests with the aforementioned 15-30mm lens on my D610 bore out. In fact, I’d recommend you shoot no wider than 24mm, even with the diffusion attachments. You may not notice this in everyday subjects, unless you’re shooting a wall or other uniformly toned flat surface.
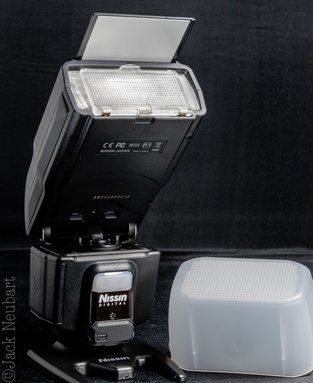 Nissin i60A shown seated atop the included mini-stand, in bounce mode, with both panels in place, along with the included soft box (dome diffuser). Photo @2017 Jack Neubart. All rights reserved.
 No Confusion about Diffusion
In contrast to the Di700A, the i60A does come with a dome diffuser (diffusion dome), or “soft box,” in Nissin’s parlance. There is also a built-in diffusion panel that you pull out of a slot (for use with ultra-wide lenses) – but, in contrast to other shoe-mounts, here this panel extends from the floor, as it were, not from the roof of the unit.
What’s more, Nissin cleverly separated the bounce/kicker panel so that it slides out from the top of the unit, somewhat like an awning. On most flashes, trying to extract this panel means first withdrawing both the diffusion and bounce panel together, then returning the diffusion panel to its default position. Much simpler this way when you quickly want to add a catch light to someone’s eyes when using bounce flash.
Take all this to the next level. Let’s say you want to diffuse the light further. Simply raise the diffusion panel in place, then snap on the diffusion dome.
Now let’s take this one step further. Shooting with bounce flash but feel you’re losing too much light? Simply slide the bounce panel in place – without even removing the plastic dome. This flash opens up a world of opportunities in lighting, and we haven’t even taken it off the camera yet or added other strobes to the mix.
In Use
Even after a few days, I’m learning new things about this flash. That’s not to say that there’s a long learning curve. Quite the contrary. I put the i60A to use as soon as I pulled it out of the box and installed batteries. But that may be easier for me, since I’ve only recently worked with the Di700A, not to mention a spate of Nissins in the past.
I first set about creating a tabletop set with a musical jewelry box in the form of a grand piano, with twirling ballerina on top. The initial setup used the i60A and Di700A as off-camera flashes triggered by the Nissin Air 1 transmitter seated in the Nikon D500’s hot shoe. I’d set the background flash – the Di700A – as Group B with a lower output setting, with the i60A at full power as the key light from in front and to the side. Everything worked as expected. Now came the next phase, capturing the ballerina performing a pirouette atop the piano. But, as is, there wasn’t enough ambient light to record the movement.
So the next day, I made a few changes. First, I draped black velvet inside the light tent. Black velvet has a way of catching the light as undulating waves, which adds depth to any still life set.
Then, just when I was about to set up the i60A as the key flash, with the Di700A again playing a supporting role, a voice in my head loudly chastised me, saying, Hey, use the video light! So I did. A few tests later and I had the light at the right brightness level.
I don’t know that I would call either shoe-mount the key light in this instance. After all, the contribution made by the video light was just as important to the shot as the flash illumination provided by the Di700A. By the way, to soften the light from the flash, which does not come with a diffusion dome, I added a small bounce panel.
What did the video light do? I set the exposure for slow-sync flash. That means, I used a relatively long exposure. At first I tried a half-second, then a full second. Still not quite what I wanted. So I pushed it to two full seconds – and that did the trick. The spinning figurine recorded as a soft blur of movement by the video light (which we’ll consider our ambient lighting) and was at the same time frozen in time by the flash.
I also added a silver panel directed at the front of the piano, notably for the legs and foot pedals (see the set shot). And if you’re wondering why I raised the piano lid all the way up, that’s because the ballerina kept bumping into it and getting knocked off balance – and the rod supporting the lid partially blocked the dancer.
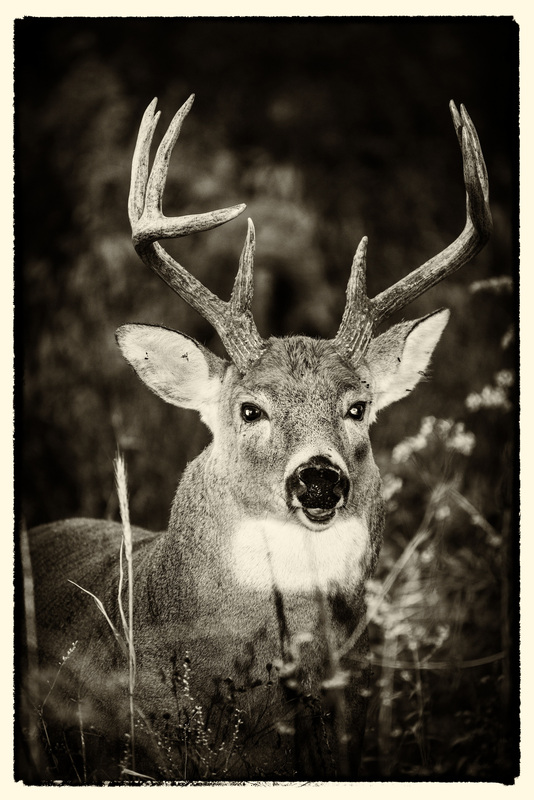
I also took the flash outdoors. But I’ll let the pictures and captions tell the rest of this story.
Even after a few days, I’m learning new things about this flash. That’s not to say that there’s a long learning curve. Quite the contrary. I put the i60A to use as soon as I pulled it out of the box and installed batteries. But that may be easier for me, since I’ve only recently worked with the Di700A, not to mention a spate of Nissins in the past.
I first set about creating a tabletop set with a musical jewelry box in the form of a grand piano, with twirling ballerina on top. The initial setup used the i60A and Di700A as off-camera flashes triggered by the Nissin Air 1 transmitter seated in the Nikon D500’s hot shoe. I’d set the background flash – the Di700A – as Group B with a lower output setting, with the i60A at full power as the key light from in front and to the side. Everything worked as expected. Now came the next phase, capturing the ballerina performing a pirouette atop the piano. But, as is, there wasn’t enough ambient light to record the movement.
So the next day, I made a few changes. First, I draped black velvet inside the light tent. Black velvet has a way of catching the light as undulating waves, which adds depth to any still life set.
Then, just when I was about to set up the i60A as the key flash, with the Di700A again playing a supporting role, a voice in my head loudly chastised me, saying, Hey, use the video light! So I did. A few tests later and I had the light at the right brightness level.
I don’t know that I would call either shoe-mount the key light in this instance. After all, the contribution made by the video light was just as important to the shot as the flash illumination provided by the Di700A. By the way, to soften the light from the flash, which does not come with a diffusion dome, I added a small bounce panel.
What did the video light do? I set the exposure for slow-sync flash. That means, I used a relatively long exposure. At first I tried a half-second, then a full second. Still not quite what I wanted. So I pushed it to two full seconds – and that did the trick. The spinning figurine recorded as a soft blur of movement by the video light (which we’ll consider our ambient lighting) and was at the same time frozen in time by the flash.
I also added a silver panel directed at the front of the piano, notably for the legs and foot pedals (see the set shot). And if you’re wondering why I raised the piano lid all the way up, that’s because the ballerina kept bumping into it and getting knocked off balance – and the rod supporting the lid partially blocked the dancer.
I also took the flash outdoors. But I’ll let the pictures and captions tell the rest of this story.
Who Should Use This?
Any amateur just starting to use flash or who wants to add something extra to an existing flash setup.
Capsule Comments
Fairly easy to use and compact; multiple operating modes for both on-camera and off-camera use, including TTL optical/infrared and TTL radio wireless flash; digital LCD plus an array of dials and buttons (which may be difficult to see/use for some); dome diffuser included, along with built-in diffusion and kicker panels; powerful for its size; built-in adjustable video light.
Conclusions
The i60A represents a step up for Nissin. This flash builds upon the flagship Di866 Mark II and improves upon it, while doing all that in a smaller form factor.
For starters, the i60A is a complete package. It offers full TTL flash operation on camera and TTL wireless operation off camera, including radio triggering (as a slaved unit). The only thing missing is being able to use this flash to trigger remote strobes in a TTL configuration. Hopefully that will come in the next generation Di866, which is due for a refresh, complete with that “A” (Air) designation and radio control (both transmitter and receiver).
A welcome first for a Nissin flash, when the i60A is set to a non-wireless mode, which includes the video light, the flash enters standby when the camera is switched off, and is re-animated when the camera comes back to life. Previous Nissins failed to be put to sleep or awakened by the camera. (Wireless operation mandates that the flash remain in a ready state.)
Complete mastery of the controls does involve a bit of a learning curve – considerably more so than with the Di700A – but you’ll get the hang of it soon enough. I’d say this unit is better suited to younger individuals. Those with failing eyesight and arthritic fingers would do better with the Di700A.
Finally, Nissin stands head-and-shoulders above those cheap knockoffs of OEM (original equipment manufacturer) shoe-mounts. Some may argue over whether these Nissin flashes can go toe-to-toe with gear from the original manufacturer. However, given a very inviting price point combined with a full feature set that includes every practical mode of TTL wireless flash operation, Nissin gear can’t be beat. And the Nissin i60A shoe-mount is certainly a step in the right direction.
Compatibility
The Nissin i60A is available for Nikon, Canon, Sony, Micro Four Thirds, and Fujifilm systems.
SELECTED PRODUCT SPECIFICATIONS (per Nissin)
Guide no. (at ISO 100): GN60 (in meters, at 200mm zoom head position)
Focal length coverage: 24mm – 200mm (16mm when using built-in diffuser)
Power source: 4 size-AA batteries
Recycling time: 0.1- 5.5 sec
LED video light operation time: 3.5 hours
Flash Duration: 1/800- 1/20,000 sec
Color temperature: 5,600K
Wireless mode: 2.4Ghz Nissin Air System radio wireless, Optical wireless TTL slave, non-TTL Slave (SD, SF mode)(*4)
EV compensation on flash: +/- 2EV in increments of 1/3 EV
Bounce/swivel: Up: 0°- 90°, left/right: 0°-180°
Operation panel: Color LCD with dial control
Manual mode power ratio: 1/256 - 1/1 (1/3-step increments)
Mode: Auto, Manual, SD, SF, Wireless with A, B, C & channel selection (2.4Ghz Nissin Air system & optical) (*4)
Dimensions: 112 (H) x 73 (W) x 98mm (D) / 4.4 (H) x 2.9 (W) x 3.6” (D)
Weight: 300g/ 10.8oz (excluding batteries and soft box)
Manufacturer
Nissin
Distributed by/Order From/More Info:
www.neidllc.com (order from authorized resellers)
How much is it?
$339.99
Nissin
Distributed by/Order From/More Info:
www.neidllc.com (order from authorized resellers)
How much is it?
$339.99
 RSS Feed