
 Courtesy MindShift Gear.
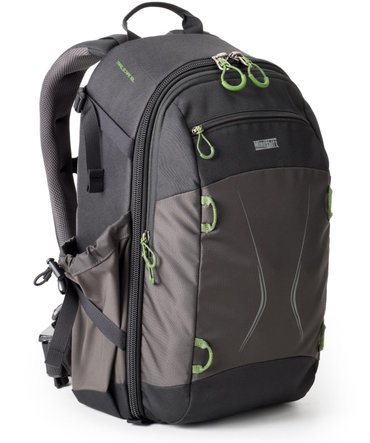
 The moment I unpacked this photo backpack and unzipped the main flap, I had a sense of déjà vu. I’d seen this bag before.
Then I took a look at my Think Tank Photo StreetWalker and realized where I’d seen this design.
The new TrailScape largely mimics the interior of the StreetWalker, or perhaps more correctly the StreetWalker Pro, since the dimensions more closely match that pack. But there are substantive differences. What are they? Read on.
The TrailScape – On the Outside
Gone are the two zippered side pockets found on the StreetWalker. They are wisely replaced by two roomier stretch pockets. Granted, some may lament the loss of these zip pockets, but I always found them a bit too cramped for my taste.
Instead, you now have room for a 32-oz. Nalgene water bottle on one side, counterbalanced by your tripod snugly secured by compression straps, with two feet (spikes retracted) resting inside the opposite stretch pocket.
On the front, there is a very spacious pocket that will hold a 13” laptop and a 10” tablet, not that I ever carry either into the field. But I do make use of these sleeves for maps, pads, and various accessories. There are also organizer pockets in this section.
In front of this large pocket sits another pocket, diminutive by comparison, designed to carry your sunglasses, with a very softly textured fabric lining that shouldn’t scratch. I’ve got a pair of those sunglasses that are so bulbous when closed that they require a custom case. They fit here. But I was so afraid they’d get crushed at some point, that I removed them and put them back in their hard case. In their place went my Giotto’s rocket blower.
The zippers run very smoothly. However, I would have preferred contrasting colors for the zipper pulls on the front pocket. Yes, the zip pulls, which are designed to be easily handled with gloves, are smaller on the pocket. But I did manage to grab them by accident. So my solution was to rest them on the side, with the main zips up top. Problem solved.
Because this is a trail pack, in contrast to the zips on the StreetWalker, the zippers are not interlocking (for the purpose of inserting a TSA lock). Besides, locking a bag only makes it that much more tempting to those looking to steal it.
There are four lash points on the front of the bag, but you’ll have to supply your own rope or bungee cord. If you need to carry stuff inside the front pocket to keep it safe from the elements, you can lash a jacket to the front of the bag. I keep a light jacket inside this pocket.
There’s a carrying handle on top – more of a strap, really, coming to rest on the back of the pack. While not nearly as substantial as the one on the StreetWalker, such straps have been used on other packs (I believe also from MindShift or Think Tank), and I’ve never known them to fail. Besides, in contrast to that other bag, this handle doesn’t add to the height of the bag – which could make a difference when you’re trying to squeeze into a tight overhead bin or under a seat. (By the way, if you’re going to carry the pack for any distance, by any means other than fully on your back with both straps, use one of the shoulder straps, not the carrying handle.)
On the Inside
This pack is not nearly as deep as even the original StreetWalker. What does that mean? Forget about carrying a pro-grip camera, unless you insert it face-up sans lens. That said, my Nikon D610 rides much more secure in this bag, because it’s less of a bouncy house (although, I must admit, I always secure the camera with a Velcro band over the dividers or I’ll seat another divider over the lens for a snug fit).
There are plenty of padded dividers. As is, this pack is fitted for a slew of lenses, accessories, and a flash. My dividers never sit in one place for very long, however. That’s the beauty of a customizable system.
There are also two mesh pockets inside the front lid for small, chiefly flat items.
In Use
The first thing I have to comment on is the backpack harness system and airflow/lumbar padding. In a trail pack, this is of utmost importance for your comfort and safety during long treks, especially over arduous terrain. While this pack is not meant for such outings, by its very nature, still, it’s comforting to know it will stand the test.
The harness system on the TrailScape feels better than the one found on the StreetWalker. The straps are wider at the shoulder. The straps on both packs are contoured top to bottom to fit the body nicely, but this one is decidedly a better fit.
As with the StreetWalker, the unpadded waist strap is removable. (Keep it inside the bag, or you’ll lose it. Better yet, leave it attached – reattaching can be a chore if you didn’t take notes on how the straps originally attached to the bag).
The sternum (chest) strap on the TrailScape is longer and a bit stretchy for larger chests or someone wearing lots of winter layers. On my initial outing, I didn’t find it necessary to use either the waist belt or chest strap. The pack rode comfortably on my back without requiring constant adjustments.
By the way, when you first get the pack, it’s important to loosen all straps. Tighten them when the pack is on your back, and adjust them once on the trail.
You’re probably thinking that it’s odd this pack doesn’t allow for a hydration bladder, whereas the more compact SidePath, which is essentially an enhanced daypack, will accommodate a bladder. I’m guessing, that, when you start with one basic design, namely the StreetWalker, it would be difficult to create a custom passageway for a drinking tube without destroying the solid fabric of that pack. And frankly, I’m not a fan of bladders, so this doesn’t bother me in the least. If you must use a bladder, MindShift has several alternatives available, currently the rotation 180 packs.
| Who Should Use This? Hikers and nature enthusiasts. Capsule Comments Comfortable; protective; durable construction; fully customizable; thoughtfully designed; room for a tripod and full-size water bottle; holds a small laptop and tablet; room in outside pocket for a jacket; won’t accommodate a hydration bladder (important only if you prefer this method of hydration). Conclusions Despite being built on the framework of the Think Tank StreetWalker or StreetWalker Pro, the TrailScape has a number of useful features that stand it apart from it progenitors. Essentially, this is a trail pack, not a city-slicker pack. You can, of course, wear the TrailScape around town. Compared to many of MindShift’s other trailworthy packs, this one has a more manageable footprint. That makes it easier to maneuver in tight spaces while wearing the pack, such as crowds and public transit. What most recommends this pack is the harness system. While I didn’t load the pack to capacity, walking around with it on my back never felt like a burden. The shoulder straps kept the bag in place without digging into my shoulders – and, I should point out, I was only wearing a t-shirt and photo vest (sans epaulets). So, in my book, this one’s a keeper. I know, I’ve said that before about bags I’ve later given away. But as new bags arrive, one has to make room. For now, this TrailScape 18L is the perfect size for my outings when I need to carry several lenses, with one attached to the camera, along with a flash, various accessories, and a light jacket. The only thing on my wish list for this bag: a snazzier design. The exterior is a bit bland. Why stop with basic black? I would really love to see some camouflage patterns on MindShift bags – say on the order of Mojave Desert and Amazon Rainforest. Something to think about, guys. Where can I get more info? MindShift Gear (order direct). Manufacturer (ordering info): MindShift Gear How much is it? $169.99 | FEATURES (per MindShift Gear)
MATERIALS (per MindShift Gear) Exterior: For superior water resistance, all exterior fabric has a durable water-repellant coating, plus a polyurethane coating on the underside of the fabric. The backpack also features the highest-quality abrasion-resistant YKK® RC zippers, 420D velocity nylon, 600D poly, 320G DuraStretch mesh, 350G airmesh, nylon webbing, and 3-ply bonded nylon thread. Interior: P200D lining, high-density nylex with stiffened backing, hexa-mesh pockets, high-density closed-cell foam, PE board reinforcement, and 3-ply bonded nylon thread. SPECIFICATIONS (per MindShift Gear)
|

 RSS Feed