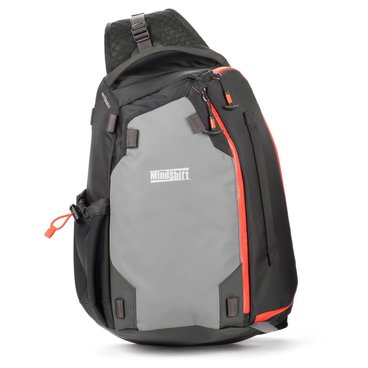
 PhotoCross 13 sling pack (orange ember). Courtesy MindShift Gear.
 I routinely prefer a backpack for my photo adventures into the wilderness, and even on the streets of Chicago. More to the point, I’ve never been one to wear or even favor a sling bag when carrying camera gear, except when testing these bags. They are favored by the younger generation, I’ll give you that.
Granted, when I wear a shoulder bag, namely the Signature 13, I do so largely sling-fashion, but that’s only because the strap on that bag lends itself to easy portage in this manner. And I carry a light load (read more on the Think Tank Photo Signature 13 here.)
The problem with bags that carry the moniker “sling” is, in my experience, that the strap always cuts into my neck, largely due to a shoulder pad that is too stiff and inflexible. And many of these bags try to be a photo pack minus the backpack harness, meaning they strive to fit as much gear as possible, to the point where your neck and shoulder will hate you 15 minutes into your trek.
So when MindShift announced the PhotoCross, I approached it with some trepidation. Little by little, the bag started to grow on me. In the end, I may have found the one sling that fits me to a tee.
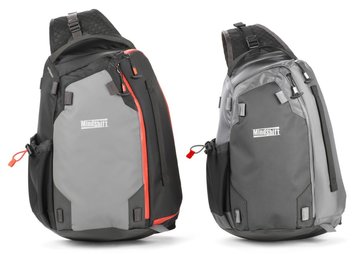
 PhotoCross 13 (with orange accents) on the left; PhotoCross 10 on the right. Courtesy MindShift Gear.
 I immediately opted for the larger of the two new PhotoCross sling bags. In determining what would be a good fit, I began with the product photographs on MindShift’s website – the pictures showing the bags decked out with a complete array of gear.
The second thing I did (and do routinely) before requesting a sample bag for testing and evaluation is to watch the product video. MindShift (as well as Think Tank) keeps the introductory video short and sweet. I try very hard to read between the lines, but, I have to admit, they keep the dialog tight and to the point. So the only thing left for me to do was to order the bag I felt would be the right fit. And that was the PhotoCross 13. It proved to be the right choice.
Aside from a choice in size, you have a choice in color schemes. More realistically, it comes down to a choice in color accents. I chose Orange Ember, the other choice being Carbon Grey (hey, MindShift – this is the USA; we spell it “gray”! No need to get hoity-toity on us.). I would have been happier still with a bag that was predominantly orange, with gray (not “grey”) accents.
The color accents around the front of the bag key us into the zipper locations. There is an outside pocket, which I wish would have been pleated to accommodate a light jacket. But, as is, it’s still functional enough to hold any non-bulky extras you may need. There’s also a pair of smaller pockets inside this outer pocket. The other zipper leads to the main camera section, with additional pockets.
There’s also some accent stitching on the back – not that anyone will notice while you’re wearing the bag. Still, a nice touch. And there are other subtle color accents besides.
Okay, color schemes aside, let’s get down to the nitty-gritty. The body of the bag maintains a fairly svelte appearance. That’s not a fashion statement. That’s a practical feature. In the woods there’s less likelihood that the bag will hinder your progress in tight spaces and it won’t bump into people on buses and trains. Well, the tripod hanging off the back might, but you can always hand-carry it till you reach a clear path.
This sling pack features a one-piece, adjustable shoulder strap, with thin, air-circulating, mesh-covered padding lining much of the strap. There’s a stretch of similar padding extending out from the base of the bag, which falls against your lower back. I wish this padding ran the entire length of the strap for added comfort.
That same mesh lines the back of the bag. However, lacking the raised shoulder and lumbar pads usually found on a backpack, this really didn’t provide much cooling. But there’s a way around that (read on).
The shoulder strap has no buckles to fasten and unfasten. While fasteners do make it easy to remove the bag when you’re seated, in every other conceivable situation, they’re a nuisance – and a potential hazard. With gravity and inertia taking over, you may lose your grip on one or both straps when trying to snap the ends together, or when unsnapping them, with the potential for the bag to come crashing to the ground.
And to sweeten the deal, there is even a set of compression straps – one at the top, another at the bottom – so you can better tailor the shoulder strap and ultimate fit to your comfort level. By this means you can separate the bag from your back a bit more for improved air circulation.
What’s more, there’s no sliding shoulder pad that you constantly have to readjust. The padding is part and parcel of the strap, so it moves with the strap. And, again, the soft padding on this bag ensures your neck won’t chafe from a stiff shoulder pad. You may still find yourself adjusting the strap to optimize your comfort level, but that’s something one does normally when wearing any bag.
There’s also a tuck-away waist belt. It’s largely there in case you’re negotiating treacherous terrain and want to prevent the bag from shifting and throwing you off-balance.
Couple that with a pair of hand straps to help you get a better grip on the bag. Add to that, the bag employs reinforced box-X stitching at stress points on the main handle. And the stitching on the bag overall is immaculate, with nary a loose thread that I could find.
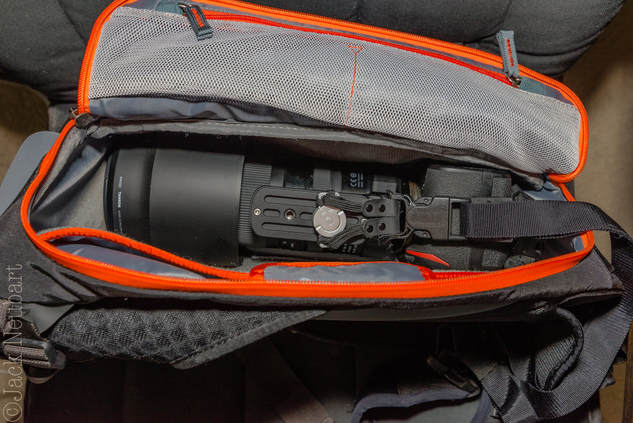
 PhotoCross 13. I pulled out the dividers, positioning one as a "floating cushion" beneath the lens, then parked the D500 with attached Tamron 150-600mm G2 cozily in the bag.
 The bag is meant for a casual walk in the woods or on city streets, with a modicum of gear. You’re not going to get a gripped DSLR and long, fast lenses in here.
The main camera section has three, fully adjustable modules, with movable padded dividers (via Velcro-type hook-and-loop fasteners). What will that fit? I’ve carried a 70-300mm attached to the camera, a flash in the second module, and various accessories including sling strap in the third. Actually, you’ll be surprised at how much you can squeeze into this bag.
What’s more, I was pleasantly surprised when I was able to load my D500 and 150-600 zoom into this bag. It was a tight fit and getting this combo back in the bag while I was wearing it required a bit more of an effort than when removing the gear. It was also fairly easy to load this combo into the bag before donning it. I also managed to fit the Nissin i60 in a soft pouch on top when I'd started out.
If you’re wondering, if I had to remove the tripod mount on the 150-600, the answer is no. I inserted the camera into the bag lens first, camera grip upwards (portrait mode). And I rotated the tripod mount so it rested facing upwards, making it easy to grab the mount as a handle and pull up. Once out of the bag, the tripod mount was returned to its original position.
There’s also a tablet sleeve inside the camera section, lying against your back. I say “tablet,” not “laptop,” because I can’t see anyone schlepping a laptop of any size, unless it weighs no more and is no bigger than a tablet (contrary to specifications). I’m not even sure I’d carry a tablet, certainly not with the long-lens rig just described. Perhaps I would with a smaller, lighter load.
Because I wear hats, the hat does get in the way, requiring its removal when donning the pack, or removing it. A sling camera strap proved equally annoying when wearing this sling pack. I may try to sling the bag to the left and carry the camera at my right (for a fast grab – really, the only way to use a sling strap) and see how that works. Although I’ll probably just keep things as they are, being right-handed.
Given that the bag’s hand strap on top falls naturally in position for an easy grab with your right hand when the bag is carried to the left, I’m beginning to wonder if that wasn’t the intended carrying method. I gave it a quick try, but it didn’t feel natural, so back to the tried and true (subject to change without prior notice).
A third strap on the bottom would equal the score in terms of making it easy to grab and swing the bag around, but that may interfere with the integrity of the bottom panel, which is designed to be better resistant against wear to vertical placement and scraping of the bag on rocks and dirt.
All that aside, what’s important is that the entire time I wore the PhotoCross, I never felt as if it were choking me or cutting into my neck.
One thing I should point out. It may take a bit of trial and error to get the shoulder strap just the right length, while adjusting the compression straps for maximum comfort. For now I have the bag flush against my back at the top, but looser at the bottom, which seems to work for me.
Look for a review of the Nikon D500 and Tamron 150-600mm G2 soon.
| Who Should Use This? Hikers and nature enthusiasts; tourists; amateur photographers on a regular basis and even pros on vacation. Capsule Comments Fairly comfortable and protective; durable construction; customizable; thoughtfully designed; room for a tripod and full-size water bottle; weather-resistance aided by included rain cover; barely room for a jacket in the outer pocket but can be carried in place of a tripod, or perhaps with the tripod; holds a small laptop (PhotoCross 13) or tablet (if you must); PhotoCross 13 was surprisingly roomy – carried my DSLR with attached 150-600mm zoom. Conclusions On one outing, after detaching the sling strap from the camera, I put the camera down in preparation for returning it to the bag. Then it dawned on me: Hey, this is a sling bag! No need to take that extra step. Of course, I could have left the camera attached to the strap, but who knows how the mind works sometimes? (Either way, I often prefer to separate strap and camera till I reach my destination.) Anyway, I brought the bag around to the front and unzipped it, picked the camera up, tucked it safely into the bag, followed by the sling strap, zipped the bag, and returned it to its resting place against my back. The story doesn’t end there. Going home I boarded a crowded Chicago “L” (subway) train, resigned to stand for much of the trip, when I spied a seat. I shifted the bag to the front, against my stomach, grabbed onto an overhead hand strap, and gingerly swung myself into the seat for a perfect landing that didn’t jostle the passengers on either side. Had I been carrying a backpack, this story would have ended quite differently. Now here’s my full itinerary for the first three days of testing. It went something like this. Day 1: Sweltering heat and humidity, but I managed a short walk around the neighborhood without feeling stressed out by the adverse conditions. Gear: Nikon D500, Nikon 18-200mm attached to camera, Nissin i60A shoe-mount; Custom SLR Glide One sling strap. Day 2: This day saw me on a walking tour of Chicago Riverwalk for several hours, in the evening – cooler, but considerably more walking. Gear: D500 with attached 18-200mm, ultra-compact Sirui T-025X carbon fiber tripod; Giottos compact head carried inside the bag (so the tripod wouldn’t extend out from the bottom); Nissin i60A flash; Glide One sling. Day 3: I headed into the woods sans tripod to photograph deer and wildflowers for a few hours – a mild hike on undulating paths, on a fairly muggy day. Gear: D500, Tamron 150-600mm G2 lens attached; Nissin i60A (although after packing away the camera with sling strap attached, couldn’t find room for the flash so ended up carrying it in a vest pocket); Glide One strap. On that last day, as I set out on the bus, it also dawned on me that I would never have to put the bag down while on a bus or train. I could simply slide it around so that it reposed gently, without the full weight falling on my knees, allowing me to sit comfortably. At this point, I’ve pretty much dedicated the PhotoCross to carrying my D500 and 150-600. Well, until this Sunday, when I hit Chinatown for a festival and will likely switch lenses – but not bags. MATERIALS Exterior: All fabric exterior is treated with a durable water resistant coating while fabric underside is coated with polyurethane for superior water resistance, YKK weather resistant zippers, 420D high-density nylon, heavy-duty nylon Tarpaulin, 350g air mesh, nylon webbing, 3-ply bonded nylon thread. Interior: Removable closed-cell foam dividers, P210D liner, polyurethane backed Velex liner, 2x polyurethane coated 210T seam-sealed taffeta rain cover, nylon binding tape, 3-ply bonded nylon thread. | Where can I get more info/order this product? (Click on highlighted link.) MindShift Gear (use this link to order direct) Manufacturer: MindShift Gear How much is it? $129.99/PhotoCross 13 $114.99/PhotoCross 10 FEATURES (per MindShift Gear)
SPECIFICATIONS PhotoCross 13
PhotoCross 10
|

 RSS Feed