pixelPERFEXION™
pixelPERFEXION.net
Site contents ©2021 Jack Neubart. All rights reserved.
  • Home
  • Reviews
  • News/Views
  • About
  • Contact

Field Report: Acratech Panorama System – Panoramic Head, Leveling Base, Nodal Rail, and Universal L-Bracket – Everything You Need for Wide-Ranging Panoramas

2/16/2017

3 Comments

 
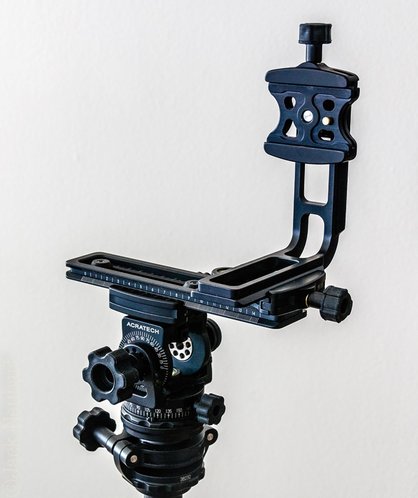
PictureThe complete Acratech panoramic rig, featuring pano head, leveling base (underneath head), nodal rail, and L-bracket. (Photo ©2017 Jack Neubart. All rights reserved.)
​Until now my forays into panoramic photography were limited to what I could do with my regular Acratech ballheads. When I first set out to shoot panos, I didn’t pay attention to a certain feature on these heads—that being that you can remove the quick-release clamp from the top of the head and re-mount it to the bottom. You then effectively attach the head to the tripod upside down. I’m not quite clear on what difference it makes except that you somehow create a more efficient, built-in leveling base that works in tandem with the head as a whole. This feature is available on most Acratech ballheads, the notable exception being the new Nomad.
 
Anyway, so when I first set out to shoot panoramas I ended up making do with the head in its original configuration. I would level the head and visually determine the overlap from frame to frame. It seemed to work – at least when generating panoramas in Lightroom, using its Photo Merge/Panorama feature. But I wanted more – I wanted tighter control over my panos and I wanted to try dedicated pano software for this process.
 
So my next step was to talk to Acratech about their pano gear. It’s still somewhat of a learning process, especially in terms of the software – I opted to use PTGui (review to come). But I now feel that I have a much better handle on it, with a greater understanding and appreciation for what’s involved. And that wouldn’t be possible without this Acratech gear.

Note: be sure to click Read More for a guide to Determining the Nodal Point and 10 Tips to Successful Panoramas.
Picture
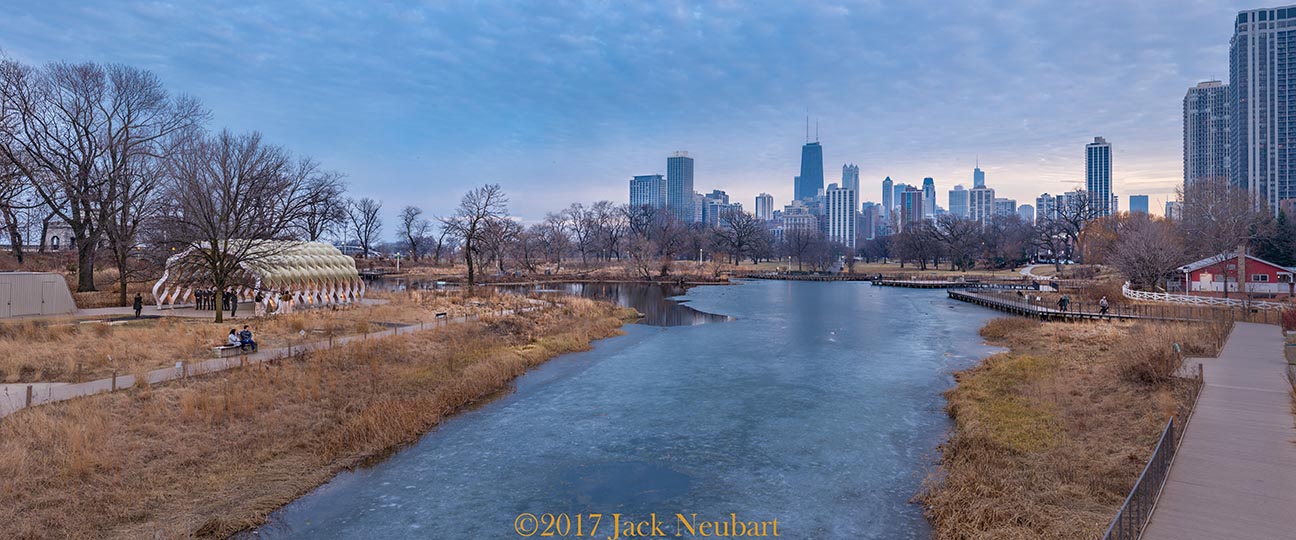
Chicago skyline viewed from Lincoln Park Zoo. To save on system resources, I didn't build this panorama as wide as I would have liked. It's constructed from vertical frames in 3 layers (top to bottom) - in PTGui pano stitching software (individual frames processed in Lightroom to restore the color and tonal depth to the scene and punch it up a bit, so it wouldn't look flat). All done using my Giottos carbon fiber tripod with Acratech panoramic head, Acratech leveling base, Acratech nodal rail, and Acratech L-bracket. I couldn't have done it without the Acratech gear! (Note the wedding party under that structure on the left.) ©2017 Jack Neubart. All rights reserved.
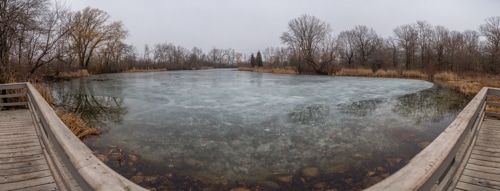
PictureEmily Oaks Nature Center, Skokie. Panorama with Nikon D610 and Tamron 24-70 f/2.8 lens at 24mm, employing full complement of Acratech panoramic gear. ©2017 Jack Neubart. All rights reserved.
The Acratech Armada
Acratech sent me their Panoramic Head, Leveling Base, L-Bracket, and Nodal Rail. Let’s address each in turn. While I could have added an Acratech QR plate as well, I opted to stick with my Giottos universal QR plate. I should add that Acratech makes plates custom designed around numerous camera bodies and lens tripod mounts with a special back lip that prevents accidental rotation.
 
Panoramic Head. This is a work of art in itself! Much like its siblings, it could easily be mistaken for a museum piece were it not so practical to work with. It’s sexy and solid. Movements are fluid and all the knobs work smoothly and effortlessly, locking firmly in place, with no fear that they’d come loose or shift my viewpoint upon tightening (something heads of lesser quality are known to do). Aside from etched markings for horizontal panoramic movement, there are also marked settings for vertical movement, so the head can easily be used for multi-row panos. For the horizontal panos, there is a movable indicator to notate your starting point. What’s more, the QR clamp rotates (for camera positioning as needed) but does lock in place. And the head is fully compatible with all tripods. This head easily fits on the Acratech Leveling Base (strongly recommended). Verdict: the Acratech Panoramic Head is the perfect tool for the job.
 
Leveling Base with stud. There are two types of leveling base that I’ve come across in researching the topic. One type uses three- or four-point leveling. The Acratech base uses one-point leveling, meaning, the base pivots around a central axis. Less to fuss with, as I see it. The base screws right onto the tripod. There is also a Large Leveling Base, for larger still heads and professional video heads, and a Leveling Base with QR Clamp, for direct mounting of a camera (with QR plate) to the base. A large bulls-eye spirit level makes it easy to level the base. Verdict: With the Acratech Level Base, I can get the camera level or at least to within a few degrees in a minute or two. May take a bit more finessing with the camera mounted, owing to greater torque, but certainly doable.
 
Universal L-Bracket. This bracket is a practical necessity to allow you to simply and effortlessly shoot vertical panos without throwing off camera alignment. It quickly lets you switch from vertical back to horizontal shooting. A larger version, the Extended Universal L-Bracket, is available for cameras with battery grip and oversize bodies. The bracket attaches to the nodal rail. For verticals, the raised L should be on the right, to allow enough room for the grip. When shooting horizontals, that part of the bracket resides on the left. Verdict: it’s so much easier to go from horizontal to vertical and back again with the Acratech L-Bracket, without spoiling the framing. My one concern – attaching the Nikon wired release MC-DC2 being hampered by the bracket – quickly dissolved, thanks to the open channel in the bracket.
 
Nodal Slide. This nodal rail is what you need to ensure accurate, parallax-free frame-to-frame alignment, regardless of which lens you use. There are two stops that you can lock in place to guide positioning of two separate focal lengths (the provided hex wrench lets you adjust them on the fly). Meaning, you don’t have to mark down the positions of the lens along the rail, as you’d ordinarily need to do with conventional rails. The camera, alone or on the L-bracket, just slides into the designated position marked by the stop. The clamp knob should be facing you. The clamp rotates by releasing the hex screw on the bottom (using the hex wrench) to orient the camera as needed. (Of necessity, the orientation changes when using the L bracket.) Verdict: those two stops along the Nodal Slide are a game-changer. Unless you use more than two focal lengths, you’ll find setting up for the lens’s sweet spot to avoid parallax is fast and effortless. And if you need to change it on the fly, that’s quickly doable as well.
​

​In Use
This was my first time working with a panoramic head, L-bracket, leveling base, and nodal rail, despite my many years as a photographer. They’re just not tools I found I needed till now. And now that I’ve found them, I wish I’d had them decades before, although I’m not sure I would have had the wherewithal to make the best use of them back then. What’s more, for many years I simply preferred to shoot handheld. So all this extra gear would just have been gathering dust.
 
Not today. I’ve got my MindShift Gear backpacks configured so they easily tote the Acratech panoramic components along with my Giottos carbon fiber tripod. By “configured,” I mean, I’ve made sure they’d fit easily in the bag without bumping up against other gear or me having to dig for them. Granted, owing to its L shape, the L-bracket is the most cumbersome to carry. I do leave the leveling base attached to the head, since they neatly and snugly fit in one modular section in the pack. (Your mileage may vary.)
 
What I don’t do is leave all this attached to the tripod, because it makes for awkward portage, especially when carried along the side of the pack. And whether side- or front-carried, the head alone (or seated on the leveling base) sticks up, so that it might catch on something or bump into things along the way. Leaving the rail and bracket attached on top of that just compounds the situation. Sure, if you’re going by car or hand-carrying, then leave everything in place on the tripod, although that awkwardness does manifest itself when schlepping the tripod by hand from one location to the other. Remember, the added gear does make the tripod considerably more top-heavy.
 
As to actual use, once I got past the intimidation factor, it was smooth sailing. I’m still mastering the art of the panorama, but I’m confident that I have a firm handle on it, thanks to this Acratech gear.
 
Acratech is a master at designing and machining components that fit well together and fit well in your workflow. I did have to go back to the company’s online tutorial videos once or twice before everything clicked, but now, even in extreme cold conditions, I can manage to rig the tripod in moments ready to shoot panoramas. I’m still getting the hang of the stitching process vis-à-vis the software (specifically, PTGui) but mastering that phase of it is next on my agenda.
 
Zeroing out the bubble level on the leveling base proved fairly effortless. I’d recommend carrying out this operation before attaching the head, but certainly before mounting the camera onto this rig. The greater torque with the added load works counter to making easy adjustments. 

Conclusions
A couple of points worth noting. When using my more stable tripods, I didn’t find it necessary, to lock down the panorama knob on the Acratech pano head as I panned with the camera. This way I could quickly move from one exposure or bracket set to the next. And you can avoid the nodal rail entirely when shooting fisheye panoramas. (Despite claims to the contrary, a fisheye lens can be used – just expect some distortion.)
 
Admittedly, when you add all the components together, shooting panoramas becomes an expensive proposition. But it also has potentially great rewards. And once you’ve got a handle on the mechanics of shooting panoramas, you next find yourself muddling over the software and trying to make heads or tails out of, why don’t these frames fit together the way they’re supposed to? Frankly, it’s a serious commitment in money, time – and patience.
 
There’s one thing in this Acratech gear that puts you on the right footing: Every component has a bullseye level, so you can start working on a level playing field – literally.
 
The pano head itself has a drag/friction knob. Ease back on this just a bit so it allows some movement as you twist the main knob and move the camera. It may take a while to find the sweet spot to control drag for your rig, but keep in mind that the amount of drag will have to be adjusted for different loads. Once locked in place, the camera stays put – there’s no shift when locking the knobs and no drift after the camera is locked in place.
 
In fact, if you’ve worked with any Acratech ball head, working with the pano head shouldn’t be much of a stretch. The only difference: the pano head tilts only front to back, not side to side, as would be the case with a regular ball head. This keeps you level. The forward/backward tilt, aside from leveling the head initially, is to allow you to build horizontal layers and add depth top to bottom so the panorama doesn’t begin to look like a strip mall.
 
Final word: the Acratech pano gear is an investment that will pay for itself before long. As with anything, mastering panoramic photography will take time and patience. But the Acratech gear will put you on the right path and put you on solid footing.

FEATURES (prices/features per manufacturer)
10-year warranty
Made in U.S.A.
Acratech Panoramic Head ($379.95)
  • Designed to work as a multi-row panoramic head and as a long-lens head
  • Easily holds over 25 lbs. (11.4kg) at any angle
  • Will solidly support 600 f4.0 lenses
  • Eliminates the need to carry a large, heavy gimbal head
  • Provides easy, smooth balance for long lenses
  • Weighs less than 1 lb. (.45kg) with quick release clamp
  • Fully adjustable tension control
  • Compatible with Kirk, Arca, and many other QR plates
  • Fits all standard tripods (1/4-20 and 3/8-16 threads)
  • Indexable quick-release clamp can be rotated in 90 degree increments
  • Weight: less than 1 lb.
 
Acratech Leveling Base ($149.95)
  • Weighs 1/2 lb. (.24kg)
  • Easily holds over 25 lbs. (11.4 kg)
  • Allows 10 degrees of movement in any direction
  • Fits all standard tripods (3/8-16 threads)
  • Fits all standard 3/8-16 tripod heads
  • Oil free and greaseless ball will not attract or hold dirt and debris
  • Precision bullseye level for accurate positioning
  • Low profile design, only 1.77" tall (not including stud)

​Where can I get more info & order this product?
Acratech
 
​Manufacturer:
Acratech
Acratech Universal L-Bracket ($229.95)
  • Adjusts to fit most SLR and DSLR cameras
  • Precision C.N.C. machined
  • Compatible with Kirk, Arca-Swiss, and many other Arca-Swiss style Quick release plates and clamps
  • Beautiful satin black anodized finish
  • Solid precision feel
  • Long lasting stainless steel hardware
  • Measures 4 3/4" tall x 4 3/4" wide  x 1 1/2" deep (NOT INCLUDING CLAMP)
 
Acratech Nodal Rail (Nodal Slide - $199.95)
  • Easily holds over 25 lbs (11.4kg)
  • Clamp indexes 90 degrees to accommodate lenses with tripod collars
  • Weighs less than ½ lb (0.2 kg) 
  • Precision C.N.C. machined
  • Beautiful satin black anodized finish
  • Laser engraved scale markings
  • Solid precision feel
  • Long lasting stainless steel hardware​

Who Should Use This?
Landscape photographers, travel photographers, and essentially any photographer who wants to create stitched panoramas. ​

​Capsule Comments
Fairly easy to use (small learning curve); relatively lightweight (all components combined); smooth movements; ultra-stable camera platform; durable and easy to maintain (not that I’ve had to do any maintenance to date); priced right – trademarks of Acratech gear; does add height to the tripod, so you may have to take that into account when extending the legs or choosing a tripod; avoid extending center column, since added weight/height raises center of gravity, which could add wobble to less sturdy tripods.

Read More
3 Comments

Field Report: Acratech Nomad Ballhead – Rugged, Lightweight, and Kinda Sexy Looking

12/1/2016

0 Comments

 
PicturePhoto courtesy Acratech.
​I’ve reviewed and worked with countless ball-and-socket heads on various tripods. These days my main tripod is a compact Giottos carbon fiber model – you know, one of those with the inverted legs. I love the tripod, but was never thrilled with the ballhead that came with. So I sought an alternative.
 
The nice thing about any quality tripod is that you can swap out the head that came with it. It stands to reason that this is a more prudent step when you just buy a set of legs sans head to begin with. But we don’t always think ahead, pardon the pun.
 
So I went on a quest for the ultimate head that would not break the bank. Well, let me start by saying that any good head will likely cost more than most aluminum tripods and will come with a reasonable expectation of doubling the cost of even a modest carbon fiber, or certainly adding substantially to the overall expense. Coming in at just under $300, the Nomad is no exception.
 
The real beauty of the Nomad is its dual functionality. It can also be used as a gimbal head with long lenses for wildlife photography.
 
Ever since owning the Giottos, I’ve principally relied on Acratech heads. So when Acratech introduced the new Nomad, I was curious to see how this head differed from earlier models, and if it would appreciatively affect how I’d work with my tripod, while providing the same level of confidence and stability.

About the Nomad
One key difference between an Acratech ballhead and ballheads from other manufacturers is the open architecture of the Acratech. What does that mean? The ball on an Acratech ballhead is exposed to the air, unlike other heads which enclose the ball inside the housing.
 
Translation: there’s no way for moisture, rain, and debris to get caught in the mechanism and gum up the works. This construction is also largely responsible for the lighter weight of these heads compared with heads of comparable size.
 
The lighter weight is in no way due to cheap construction or materials. Quite the contrary. Acratech heads reflect American know-how, craftsmanship, and quality control.

The Nomad vs. the GV2
If you’ve worked with Acratech ballheads before, you will notice a stark resemblance of the Nomad to existing heads, specifically the GV2. If you already own that head, then you probably won’t really need this one.
 
Acratech’s Scott Dordick had this to say about the new head: “The Nomad head has the same features as our GV2 head. The main difference is that the Nomad ballhead was designed to be machined on our (new) multi-axis machining centers. This has enabled us to perform more machining operations, faster and without having to handle the part between operations. We are actually able to do the turning (round  work) and much of the milling (contour work) on a single setup. This has lowered our costs and we are able to sell the Nomad for $299.95, which is $70.00 less than the GV2.
 
“When you see the Nomad and GV2 together there are some differences in the shape of the body and there are some steel locating pins in the sliding mechanism of the Nomad quick-release clamp. The steel pins in the clamp have sped up our manufacturing of the clamps and although it looks a little different than the GV2 clamp, the performance is almost identical. The Nomad weighs 40 grams less than the GV2. The Nomad is only available with a knob-type quick release clamp, whereas the GV2 does have a (quick-release locking) lever option.”
 
In Use
In order to use my BlackRapid sling strap with a tripod without first having to unscrew the connector from the camera, I opted to connect one of BlackRapid’s QR plates as a permanent fixture on my Nikon D610. Owing to the design of the head that came with my Giottos tripod, this BlackRapid QR plate and the Giottos head were incompatible. Hence my need for a more workable solution. That and the fact that the Giottos kit head couldn’t adequately handle unbalanced loads without undergoing the tripod head equivalent of lens creep. Specifically, the head I refer to is the Tamron 70-300mm on the Nikon.
 
With any QR plate, you have to make sure that the locking pin on a tripod head will provide a secure hold on the plate, preventing it from slipping off, taking the camera in tow. The pin on the Nomad is spring-loaded, so if the QR plate is solid, rather than hollowed out, it will simply be pushed down and out of the way. With the BlackRapid and several other plates at my disposal, including Acratech’s own Arca-compatible QR plates, the underside of the plate is hollowed out, allowing for the pin to do its thing.
 
That said, this won’t do anything for you if the QR plate is not properly and securely seated in the first place. Once the camera is seated, use the locking knob to secure it. Jiggle the camera side to side to make sure there’s no give. And do a visual inspection to check that the QR plate is correctly seated and fully level. If you’re not careful, it’s possible to tighten the knob and give yourself a false sense of security, but a visual inspection will quickly confirm your error, even if the camera appears firmly seated.
 
Be careful when using a Giottos QR plate. At least in the case of the one I own, the underside will prevent slippage off the head in only one direction.
 
Many of Acratech’s own QR plates are designed around different camera models, with versions for lenses with tripod collars. The benefit to these is a raised back lip that prevents the camera/lens from twisting around. Universal plates are also available from Acratech.
 
So far, I haven’t found any Arca-compatible QR plate to be incompatible with the Nomad. However, I should point out that when a manufacturer, distributor, or reseller claims the plate is universal and Arca-compatible, that does not necessarily make it so.
 
One thing I should further note. The base, where the head connects to the tripod legs, will fit a full-size leg assembly with a wide mounting plate. Even though this means the head slightly extends beyond the mounting plate on my compact tripod, I didn’t find this to be a problem. (If you’re looking for a more custom fit, then check out Acratech’s GPS or GPSS, each with a smaller-diameter base.)
 
One of the reasons I especially prefer to use my Giottos tripod when testing heads is the way the Giottos pod locks down the head. There is a tiny retaining hex screw under the base that, when tightened, comes to rest against the base of the head seated on the pod. So when you’re panning, the head won’t come loose, regardless of the direction of movement. What’s more, the Giottos center column has an anti-twist feature that further prevents or minimizes unwanted movement if you leave the column unlocked.

Using the Nomad as Gimbal Head
One of the really cool features of the Acratech Nomad is its dual functionality. The  Nomad can also be used as a gimbal head.
 
To use this feature, attach a long lens to the head via its tripod collar. Make sure camera and lens are fairly well balanced so gravity and inertia don’t take their toll. This is easily enough accomplished with the right-size QR plate or with an Acratech Nodal Rail. Then tighten the drag and locking knobs just enough to allow you to nudge the camera to its resting place, without the camera falling over on its own. Grab hold of the camera as you make these adjustments. It doesn’t take long to achieve the right balance. Note: the drag, or friction, knob is the smaller circular knob. The main locking knob is larger, rubberized, and shaped like a flower. Below these two is the panning knob, and at the very top, the QR locking knob.
 
Is this head as effective as a true gimbal head? Not having used a gimbal head myself, I can’t say with any certainty, but I doubt it would compete one on one. Still, this does beat having to carry around that bulkier head if you only use this function occasionally.
 
Unlike the GP head, the Nomad can’t be used as a leveling head. I misread the instructions and spent countless moments trying to figure out what I did with the hex wrench, only later to be made aware this function was not available and that the QR base could not be removed. The same goes for using the Nomad as a leveling base. It may be easier and preferable to use a dedicated leveling base (also available from Acratech). But if you only shoot panos occasionally, then why carry the added weight, and take up valuable space in your camera bag.
 
To use the head as a leveling head (and keep in mind, it’s still a head, not a leveling base to which another head is attached), simply remove the QR clamp at the top of the head. Use the supplied hex (Allen) wrench for this purpose. 

​Conclusions
As with Acratech’s other ballheads, I found the Nomad a pleasure to use. Other than not being usable as a leveling head, I found no practical difference. All the knobs locked securely. The camera didn’t drift even with an unbalanced load on top.
 
Yes, the base was a bit wider than the optimum for my Giottos carbon fiber pod. What that meant was that I couldn’t invert the legs and collapse the tripod fully. Was that a problem? No, because I often find myself carrying the pod with the legs down but fully retracted to speed setup, and it makes it easier to carry the pod in one of my Think Tank or MindShift Gear photo backpacks.
 
Whatever the situation, the Nomad came through with flying colors. If you need the leveling feature, then either get a GP head or add a separate leveling base. And while I didn’t test the gimbal feature fully, a quick test did show this head to be capable in that regard.
 
So, would I hesitate to recommend this new head? Not in the least. You and a good carbon fiber tripod will go a long way with the Acratech Nomad ballhead. It’s a long-term investment. I’ve never found an Acratech head to falter or fail. More to the point, they always deliver. And the Nomad is no exception.
​Who Should Use This?
Wildlife and nature photographers, landscape photographers, travel photographers, and essentially any photographer working with a DSLR or mirrorless camera.
 
Capsule Comments
Very easy to use; lightweight; durable and easy to maintain; also usable as gimbal head; priced right.

​Matching a Ballhead to a Tripod
Aside from the overall quality and build of the head, you have to consider the relative weight of the tripod. A lightweight tripod must be matched up with a head that will not make the tripod unduly heavy and especially not top-heavy, or make it unbalanced while carrying the pod.
 
When toting my Giottos tripod, I generally grab one leg—they’re all sheathed in foam for a more comfy grip. I don’t use the bag that came with the pod to avoid the extra strap on my shoulder or around my neck. A heavy head, I’ve found, puts undue strain on the arm holding the tripod.
 
FEATURES
Rugged ballhead
Constructed of aircraft-quality aluminum and stainless steel
Laser etching
Weighs less than 1 lb.
Max. load: 25 lb.
Ball diameter: 1.5”
Arca-Swiss compatible QR clamp/base
Control knobs: QR, main, tension/drag, panning
Built-in spirit level (bullseye type)
Open-air architecture does not retain moisture
Oilless/greaseless ball does not attract dirt or dust
Knobs do not vibrate loose or fall off if you over-loosen them
Can be used as gimbal head
10-year warranty
Made in U.S.A.
 
Where can I get more info/order this product?
Acratech Nomad
 
Manufacturer:
Acratech Inc.
 
How much is it?
$299.95

0 Comments

    Reviews

    TECHNICAL EDITOR
    Jack Neubart


    Archives

    December 2019
    September 2019
    August 2019
    July 2019
    May 2019
    April 2019
    February 2019
    November 2018
    September 2018
    August 2018
    May 2018
    January 2018
    November 2017
    September 2017
    July 2017
    June 2017
    May 2017
    April 2017
    February 2017
    December 2016
    November 2016
    October 2016
    August 2016
    July 2016
    May 2016
    April 2016
    March 2016
    February 2016
    January 2016
    December 2015
    August 2015
    December 2014
    August 2014
    July 2014
    April 2014
    November 2013
    October 2013

    Categories

    All
    13x19-inch Printers
    35mm-style Digital Cameras
    Acratech
    Adobe Software
    Austin
    Backpacks
    Ballheads
    Camera Backpacks
    Camera Bags
    Camera Cases
    Camera Holsters
    Camera Luggage
    Camera Supports
    Canon Cameras
    Canon Lenses
    Compact DSLRs
    Compact Photo Printer
    Compact System Cameras
    Desktop Printers
    Digital Projectors
    Digital Retouching
    Digital SLR
    DSLR
    Epson
    Exposure Control
    Fashionable Bags
    Fast Lenses
    Film Emulation
    Flash Photography
    Hawaii
    HDR Plug-in
    HDR Software
    HD SLR
    HD-SLR
    High-resolution DSLR
    Holster Bags
    Image-editing Software
    Image-stabilized Lenses
    Inkjet Printers
    L Bracket
    L-bracket
    Lens Cases
    Lenses
    Lens Pouches
    Leveling Base
    Long-lens Bags
    Macphun
    Macro
    Macro Flash
    Manfrotto
    Mega-zoom Digital Camera
    MindShift Gear
    Mirrorless Cameras
    Nikon Cameras
    Nikon Digital Cameras
    Nikon Mirrorless
    Nikon Pro Digital Cameras
    Nissin
    Nodal Rail
    Nodal Slide
    Olympus
    Outdoor Photography
    Panorama Head
    Panoramas
    Panoramic Photography
    Photo Accessories
    Photo Backpacks
    Photo Belts
    Photo Luggage
    Photo Rollers
    Plug-ins
    Point-and-shoot Zoom
    Portrait Retouching Software
    Printer
    Pro Cameras
    Pro Digital Cameras
    Radio Remote Flash
    Radio TTL Wireless Flash
    Rain Covers
    Rain Hoods
    RAW Conversion Software
    Review: Photo Accessories
    Review: Phottix Odin Radio Remote
    Review: PocketWizard ControlTL
    Review: Software
    Ring Flash
    Rolling Cases
    Samsung Cameras
    Shimoda Designs
    Shoe Mount Flash
    Shoulder Bags
    Shutterbug.com Review
    Shutterbug Magazine
    Sigma Lenses
    SKB Cases
    Sling Bag
    Sling Bags
    Sling Pack
    Snapshot Printer
    Software
    Software Effects
    Super Wide Lenses
    Super-wide Lenses
    Superzoom
    Tamron Lenses
    Telephoto Zooms
    Tenba
    Texas
    Think Tank Photo
    Tripod Heads
    Tripods: Carbon Fiber
    TTL Radio Wireless Flash
    TTL Wireless Flash
    Ultra Wide Lenses
    Ultra-wide Lenses
    Ultra-zoom Digital Camera
    Wide Format Printers
    Wireless Flash
    Zoom Lenses

    RSS Feed

    All products and services are the trademarks or registered trademarks of their respective owners.
    Use or mention of any product or service is not an endorsement - compensated or otherwise.
    However, manufacturers, distributors, vendors & services may provide products or services for use.

    Your purchase and/or use of any product or service tested, reviewed, listed or mentioned is solely at your discretion and you release us from any and all liability associated with such purchase and/or use.

Your satisfaction, our expertise. They go hand in hand.
Bringing over 35 years' experience into everything we create.

Entire contents of this website is comprised of original works created by Jack Neubart, including but not limited to photographs, digital work, musical compositions, stories, humor, poetry, and any other artistic or textual material. 
All work Copyright ©2021 Jack Neubart and is protected under United States and International laws and treaties.
All rights reserved. None of the contents may be copied, extracted, abstracted, adapted, transmitted, digitally altered, or otherwise used or published without express permission of the Copyright owner.
Webmaster: Jack Neubart (building on a Weebly.com template).