pixelPERFEXION™
pixelPERFEXION.net
Site contents ©2021 Jack Neubart. All rights reserved.
  • Home
  • Reviews
  • News/Views
  • About
  • Contact

​Field Test: Tenba Roadie Backpack 20 – Built Tough for the Adventure Photographer

9/10/2019

0 Comments

 
Picture
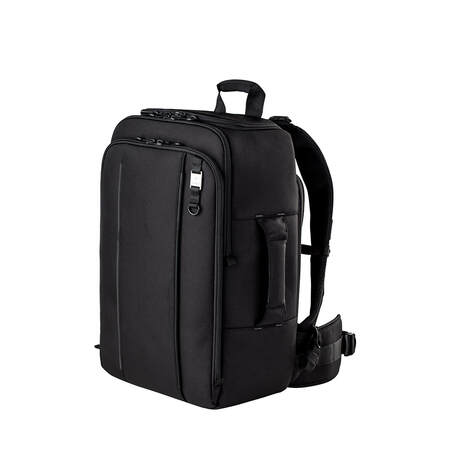
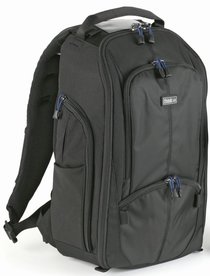
The Tenba Roadie Backpack 20 is designed to safely carry the gear you need for practically any wildlife excursion. Photo courtesy Tenba.
​Long ago, and seemingly in a galaxy far away (from where I now live, in Chicagoland), Bob Weinreb had set out to design a photo backpack that would be utilitarian and stand up to the rigors of adventure travel. That resulted in the Tenba backpack, one of a select few soft-sided photo luggage product lines that would hit dealer shelves back then.
 
I recall visiting Weinreb’s shop when it first opened in New York City and being impressed by him, the quality of his bags and his dedication. As a professional photographer, he was well aware of what pros needed – and he'd delivered.
 
It’s been awhile since I’d reviewed a Tenba backpack. So I thought a review was long overdue, and chose the Tenba Roadie Backpack 20. Unofficially, this is version 3.
 
How has my impression of the Tenba pack changed over the years, or, for that matter, did it change at all? Read on…


Read More
0 Comments

​Field Test: Shimoda Designs Explore 30 – My New Go-to Photo Backpack

7/28/2019

0 Comments

 
PictureThe Explore 30 photo pack, from Shimoda Designs, is designed for practically any outdoor photo adventure. Photo courtesy Shimoda Designs.
I’ve worked with photo backpacks of every design imaginable, big and small, and always managed to find one thing or another that bothered me about the pack. Perhaps I’m nitpicking, but I like comfort, especially on a long, hot day, and I like a pack that fits my outdoor shooting style – whether that be on remote trails or in more familiar surroundings. Is that too much to ask? In particular, I like shoulder straps that don’t slide off the shoulder and to store gear so that it’s not only well-protected but also immediately visible and readily accessible. And I believe I found just that pack in the Shimoda Designs Explore 30.
 
Still, backpacks come and go in my photo arsenal. So let’s see how the Explore 30 measures up inside and out - and whether or not it has staying power for the long haul.


Read More
0 Comments

​Field Test: MindShift Gear’s PhotoCross 15 Backpack – Lightweight and Fun to Use

5/15/2019

1 Comment

 
PictureMindShift Gear's PhotoCross 15 Backpack. Courtesy Think Tank Photo.
​There’s no question that, when it comes to outdoor photography, whether close to home or far away, my go-to camera bag is a backpack. Which is why I welcomed the opportunity to field-test MindShift’s new entry in their PhotoCross lineup, the PhotoCross 15. So, did the PhotoCross 15 meet all my expectations? Will it become my go-to camera bag on outdoor adventures? And what features set it apart from the traditional sling or backpack? Let’s see…


Read More
1 Comment

Test Report: MindShift Gear Impresses Us with Two New Outdoor Bags - BackLight 18L Photo Backpack and Exposure 15 Shoulder/Sling Bag

5/6/2018

0 Comments

 
When it comes to outdoor photography, we’re used to seeing photo backpacks from MindShift Gear, but we usually turn to sister company Think Tank Photo for our shoulder bags. Think Tank does have some nice shoulder bags, but they’re really not optimized for the great outdoors, which is also true of their backpacks – great utility and construction, but aimed more at the streetshooter, than the nature photographer, which also applies to their shoulder bags.
 
Well, not surprisingly MindShift decided to divert a little bit of their attention to the shoulder bag, while not sitting idle where backpacks were concerned, and introduced a one-two punch in the new Exposure bag, practically alongside the smaller BackLight.
 ​

Where can I get more info, tech specs & order this product? (click on a bag)
BackLight 18L 
Exposure 15 
 
Manufacturer:
MindShift Gear
 
How much is it?
BackLight 18L: $199.99
Exposure 15: $169.99

A Quick Look at the New MindShift BackLight 18L
I’ve previously written extensively about the BackLight series, which, until now, consisted of two larger bags, first the 26L, followed by the 36L – the model number reflecting capacity, in liters. That makes this bag half the size of the largest version, at least in carrying capacity.
 
I still use the 26L, having gifted the 36L to a friend who routinely carries a load of gear, and when the 18L arrived, I thought it would be too small for my Tamron 150-600mm G2. I first tried the 18L out with my Nikon D500 attached to the new Tamron 100-400 (look for a review of this lens shortly). It was a perfect fit. Next came what I thought would be the impossible task.
 
On its own, the 150-600 settled in comfortably. But could I say the same when attached to the camera? Well, I did have to move a couple of the padded divers out of the way, but I managed a good fit. Of course, that shift in the partitions negated the use of the other half of the bag for a second camera with attached lens. Well, I could always carry a second body and lens separately – plenty of room for that.
 
In the backpack's factory configuration, when situating the camera with 100-400 attached (at the top of the bag, lens downward), there was plenty of room for that second body with attached lens (cradled from the bottom of the bag, lens upward). Long and short, I’ll still use my 26L for that monster glass and relegate the 18L for the D500/100-400 combo riding side-saddle with, say, a D610/90mm macro attached – and still have room for a Nissin flash.
 
You can read my earlier reviews by clicking these links:
 
BackLight 26L review 
 
BackLight 36L review 
 
I should point out that I was so happy with the BackLight 18L that I gave my trusty TrailScape 18L to a friend in favor of the new bag. I prefer the interior layout of the BackLight 18L, considering it will hold two cameras with attached lenses right from the get-go.

MindShift’s Exposure 15 Shoulder Bag
When it comes to shoulder bags, my preference runs to smaller bags. I find it more fatiguing when wearing even a small shoulder bag or sling bag than when carrying a fully loaded backpack. Still, a shoulder bag does come in handy on occasion. You won't carry a backpack to a formal occasion, or even when visiting friends. Not to mention, it's so much easier to stow a shoulder bag on the floor underneath  or alongside your seat when dining.
 
I already own and use the perfect shoulder bag, Think Tank’s Signature 13 – elegant styling, functional, and small enough to carry just what I need for streetshooting. So I wasn’t about to make that bag redundant with the Exposure 13. Besides, the larger Exposure bag sported more spacious pockets – and I love pockets.
 
Still, the Signature bag lacks one thing that, to my mind, would have made it perfect: a waist belt to take the weight off my shoulder. It would have been very easy for Think Tank to have fitted the bag with a removable waist belt, but that probably would have run counter to the fashion statement that bag makes.
 
Fast forward to the Exposure series. These bags don’t feature a waist belt, but they come with the next best thing: a security tether, or what MindShift calls a "cross-body stabilizer strap." This keeps the bag from slipping off your shoulder – or swinging around and in your way when you bend down to shoot something low to the ground. It also prevents someone from pulling the bag off your shoulder. You can also wear the bag sling-style, which is how I’d been using it, and how it was primarily designed to be worn. The neoprene shoulder pad is sewn in and runs much of the length of the strap, rendering the strap well suited to either mode of portage.
 
This bag also features new materials that make it practically impervious to the elements, and the lid has flaps at either end to keep out dust, flying debris, and rain/snow. It does not have a zipped inner lid, a trademark of the Signature bags. However, the Exposure uses only a single plastic buckle for fast access. Some Velcro-type closure system wouldn’t have hurt, so you wouldn’t have needed to constantly snap the buckle shut. It’s a noisy prospect when you’re trying to remain quiet while focusing on birds or other wildlife.
 
As for the interior of the bag, it too lacks the finesse of the Signature bag, but, having said that, it does provide the needed protection. I was able to fit my D500 with attached 100-400, standing the rig lens downward inside the bag. With a shorter lens, the camera could have been supported by the dividers along both sides. Still, even with this long lens, the flap closed without any unruly bulge. BTW – carrying this combo was another reason, perhaps the main one, I’d opted for the larger Exposure 15. The Exposure 13 would have been too small.
 
I should also note that the Exposure 15 will carry a 15” laptop, along with a tablet. There are numerous other pockets, along with a luggage-handle pass-through so you can piggyback the bag on your roller luggage. A tripod is carried at the bottom – straps included. Also included is a rain cover, not that you’ll need it in a light rain, since the bag is sufficiently weatherproofed on its own. Oh, and if that’s not enough, there’s also a water-bottle pocket that will comfortably hold your average-size water bottle.

​Conclusions
One advantage a shoulder or sling bag has over a backpack is that it allows immediate access to your camera gear. That precisely is what drives me to use a bag such as the Exposure 15 on occasion. With a backpack, you normally have to find a place to lay the bag down when it comes time to access or stow gear.
 
Well, not so with the BackLight series. You can still wear the bag, open the rear (main) flap, and access your gear. On paper, at least. As I found out with the earlier iterations of this design, this doesn’t really fit my shooting routine – and a reader concurred vis-à-vis her style of shooting. I find it faster and easier to lay the bag down. And if the ground is wet or muddy, then I’ll simply stow the lenses and flash I may later need in accessory pouches or in the pockets of a photo vest. MindShift may not have a photo vest (why not, guys?), but they do have a full line of pouches for pretty much anything you need to access on the trails.

I found myself using both bags in a variety of situations, not least of which was for bird photography. Both bags are thoughtfully designed, practical and durable, to say the least. And each should easily fit in the overhead bin, if not under the seat, on most commercial aircraft.

Who Should Use the BackLight 18L and Exposure 15?
Travel, nature, and wildlife photographers.
 
Capsule Comments
When traversing rough terrain or for long, strenuous hikes, the BackLight 18L is the clear choice, with its extra-comfy backpack harness system. On public conveyances, crowded streets, and travel involving a lot of walking on sidewalks or dirt paths in city, town, or village, the Exposure 15 shoulder bag would be my choice, for fast access, along with added security thanks to the tethered strap.

A rain cover is included with each bag, and both bags will carry a tripod, as well as a laptop (13" in BackLight 18; 15" in Exposure 15), plus tablet. And for those hot days, don't worry - each bag holds a water bottle.

​And, they are very reasonably priced for the top quality you're getting.
​
0 Comments

Test Report - MindShift Gear's BackLight 36L Photo Backpack - The BackLight Supersized

11/17/2017

3 Comments

 
Picture
​It was nearly a year ago that I tested the progenitor to the BackLight series, the BackLight 26L, from MindShift Gear. That pack has become a staple in my stable of carrying gear, which includes a variety of MindShift and Think Tank Photo products. I’ve grown to rely on them for their utility and durability. And these days, I’ve been leaning toward smaller bags that limit what I carry. I prefer to arrive home after spending hours on my feet little worse for wear, and lighter loads allow me to do that. I also find I work faster and more efficiently if I can work economically.
 
Anyway, so this BackLight 36L arrives on my doorstep. It’s a full 10 liters bigger than the previous model, which I use mainly when shooting with my Tamron 150-600mm G2. In fact, what that translates to is, the 36L is taller, wider, and deeper. So the question you have to ask yourself when choosing between the two versions is, how much backpack do you really need?
 
But even before you go there, take a closer look at the pack and you’ll notice something different – something that sets it apart from other MindShift (and competitor’s) backpacks. Hint: it has to do with camera access. The name should give you a hint.

The Design - The Good and the Bad
In contrast to typical backpack designs, the BackLight employs a rear-access panel, rather than a front panel. (Front outer pockets hold a variety of other stuff, as we’ll see.). It’s a zipped, drop-down panel, but by giving you access to your gear from the rear, you keep prying hands away from your precious cameras and lenses. It may take a little getting used to at first if you’ve been using a more traditional pack, but, provided you’re not switching back and forth, as I am wont to do, you should have a firm handle on it after one or two outings.
 
MindShift will try to tell you that you can change lenses on the fly, without removing the bag from your body, thanks to this rear panel and a short neck cord found inside the bag. I tried it with the 26L. It didn’t fly. And with an even bigger and heavier bag, I’m not even going to attempt it. Frankly, I wish they would have removed that cord, since it always came undone on the smaller bag. And it was not very comfortable.

​The Backpack Harness - Designed for Comfort
As is true with every component of each bag they make, MindShift doesn’t skimp when it comes to shoulder straps and other parts of the harness system. The shoulder straps are contoured and well padded for a comfortable fit.
 
Another feature of a well-designed backpack, the contoured and padded waist belt hugs your hips, ensuring a stress-free ride. The waist belt is supposed to take much of the weight off your shoulders, while preventing the bag from shifting around, which is important when negotiating rough, uneven terrain, but even simply for long stretches without a break. And there’s also a sternum (chest) strap, which further prevents the bag from moving around. A stable bag means you’re less inclined to lose your balance and tip over.
 
Another nice aspect of this bag, given its relatively large size, the bag reaches from your hips to your shoulders, with shoulder compression straps for added comfort and stability. I see too many people wearing backpacks that hang down like a loose sack. No chance of that happening here, since the bag just naturally lends itself to being worn properly.
​

Where can I get more info?
MindShift Gear
 
 
Manufacturer (use this link to order):
MindShift Gear

​ 
How much is it?
$289.99 (in woodland green or charcoal)
 

​Who Should Use This?
Hikers and backpackers, bird photographers, wildlife photographers, nature and landscape photographers; professionals and serious amateurs.
 
Capsule Comments
Well designed; solid construction – made with high-quality hardware and materials; weather-resistant; customizable to fit around your gear; protective; comfortable.
 
​The Customizable Interior
Inside, there’s plenty of room for two bodies with lenses attached (a 70-300mm or maybe a 70-200mm on one, a 24-70mm or fast 50mm on the other, for example). If you attach a long, fast lens or something like the aforementioned 150-600mm, sorry, you’ll only have room for one body/lens combo. But you can store a second body by itself, or with a pancake lens.
 
I should point out that the bottom of the bag is a bit more spacious than it needs to be. You might want to stick some foam at the bottom to take up the slack. You may be able to use the included rain cover, but I tend to think the material is a bit on the scratchy side for the LCD. Besides, a better place for the rain cover is in an external pocket, where it’s easily and quickly accessible.
 
The depth of the bag easily accommodates gripped DSLRs. More than that, you can stow some lenses on end. If you’re a glutton for punishment, that means you can carry more gear. There’s plenty of room. While the padded dividers employ a hook-and-loop system so you can customize the interior around your gear, I wish MindShift had used hook-and-loop-covered padded dividers here, as they do in some other bags. That system just gives you an added edge in fitting the bag exactly to your needs.
 
And again, let me point out that my fantasy dividers are closed-cell foam sandwiched between open-cell foam layers, for the ultimate in shock and vibration protection. But no manufacturer is paying attention.
 

KEY FEATURES per MindShift Gear
  • Daisy chain, ice axe loops and additional lash points for expanding carry capacity
  • Includes tripod/monopod mounting system on front or side
  • Padded waist belt for all day comfort with webbing rail for attaching MindShift accessories
  • Quick-fit waist belt adjustment for rapid and convenient fitting
  • Side compression straps with locking SR buckles for additional lash points
  • Air channel and lumbar support on rear-panel for all-day comfort
  • Ergonomic zipper pulls are easily gripped with gloves or chilled fingers
  • Highest quality YKK RC Fuse zippers, 420D Velocity and 420D high-density nylon for long lasting durability and strength
  • Front stuff pockets for trail essentials: headlamp, gloves, chargers
  • Adjustable dividers for large telephoto lenses, traditional photo gear, or personal items
  • Top zippered pocket for quick access to essentials
  • Interior mesh pockets for storing filters, batteries, cables, etc.
  • Seam-sealed rain cover included
  • Compatible with MindShift’s Tripod Suspension Kit, Filter Nest, Filter Hive and Switch Case
​Room for a Laptop, a Tablet – and a Tripod
Rear access means you can carry a tripod centered over the front of the bag for better balance on uneven terrain. All the accoutrements are in place, but neatly tucked away top and bottom. Or you can carry the tripod on either side, with a water bottle on the opposite side. If you’re mostly traveling over flat terrain, side-carry is not a problem.
 
Keeping the tripod over the center makes more sense for the long haul, but it does get in the way when laying the bag down to get at gear. And if you carry a tripod, you definitely do not want to use that neck cord to change lenses while still wearing the bag.
 
I don’t know about you, but I never take my laptop into the field. Still, if that’s your preference, this bag lets you do that – inside a padded sleeve. Not only that, but you can also carry a tablet. The tablet sleeve isn’t padded, but the surrounding pocket is so voluminous that you’ll likely keep a jacket and other stuff in there to cushion against bumps.
 
​Conclusions
This bag has a lot going for it. Added features not covered above include side compression straps and a padded carry handle – more a padded loop, than a handle, really. The hardware is, as always, uncompromising. And the airflow cushioned back with lumbar support ensures comfort under trying conditions. Plus, there are additional pockets outside and inside.
 
Some may argue, and justifiably so, that carrying the laptop up front is not the best way to go, especially on long treks. Where’s the best place? At the rear of the pack, against your back – and this is something that MindShift fails to recognize, with one or two bags being the exception. Granted, that would be extremely difficult in a bag of this design, but I do think it’s doable. On the other hand, perhaps wiser heads prevailed here.
 
If you think you’d be comfortable with a backpack that grants access to camera gear from the rear, and you need something bigger than the 26L, then the BackLight 36L is your ticket to ride. You’ll find it comfortable and your gear will be well-organized and thoroughly protected. It’s a win-win!
 

MATERIALS per MindShift Gear
Exterior: For superior water resistance, all exterior fabric has a durable water-repellant coating, plus the underside of the fabric has a polyurethane coating. Features the highest-quality abrasion-resistant YKK RC-Fuse zippers, 420D velocity nylon, 420D high-density nylon, 320G UltraStretch mesh, 350G airmesh, nylon webbing, 3-ply bonded nylon thread.
 
Interior: 210D silver-toned nylon lining, hexa-mesh pockets, high-density
closed-cell foam, PE board reinforcement, 3-ply bonded nylon thread.
 
 
PRODUCT SPECIFICATIONS per MindShift Gear
Exterior Dimensions: 13.8” W x 22.4” H x 10.2” D (35 x 57 x 26 cm)
Interior Camera Compartment: 12.6” W x 21” H x 7.1” D (32 x 53.5 x 18 cm)
Laptop Pocket: 11.2” W x 16.1” H x 1” D (28.5 x 41 x 2.5 cm)
Tablet Pocket: 10.6” W x 10.2” H x 0.6” D (27 x 26 x 1.5 cm)
Total Volume: 36L
Weight: 4.9 lbs (2.2 kg)
3 Comments

Test Report: Manfrotto Pro Light Bumblebee-230 Photo Backpack

6/24/2017

0 Comments

 
PictureManfrotto Pro Light Bumblee-230. Courtesy Manfrotto.
When Kata first introduced the Bumblebee photo backpacks (distributed by Manfrotto), they soon became a favorite – at least for a time. What I liked about one bag in particular – and forgive me for not recalling the exact name – was its light-gray reflective exterior and the bright yellow (or yellow-orange?) interior that revealed every piece of gear stored.
 
Fast forward to the present. These bags no longer come under the Kata brand, being instead not just distributed by Manfrotto, but manufactured under the Manfrotto brand as well. The Bumblebee backpack I received kind of resembles the old Bumblebee, but that’s largely superficial. So has Manfrotto improved the backpack in the redesign? (Spoiler alert: read past the first few paragraphs to find out how I really feel about the bag. Don’t be dissuaded by my introductory comments.)

​Preliminary Observations: New Pro Light Bumblebee-230
The reason I’d requested the larger Bumblebee-230 was because the 130 was touted for CLC mirrorless systems. And since I’d planned to use the pack with either with my Nikon D500, possibly with battery grip, or D610 and various lenses, the larger bag seemed the logical choice.
 
So the bag arrives. And now I remembered one thing that had always bothered me about the original bag. The design of the backpack harness adds depth to the bag and it extends out in front like someone who’s had a few too many beers. What that means is, this bag will very likely not fit in the overhead bin on any aircraft I’ve been on, despite claims to the contrary. OK, technically it may fall under carry-on guidelines. However, you can’t argue with airport personnel or airline crew, especially if you’re among the last to board – what they say goes, and if they say it’s not a good fit, it’s not a good fit. And this is not the time when you can turn around and shift gears to a sleeker, more airline-user-friendly bag.
 
Okay, forget about air travel. What about everyday use? Well, try using public transit with a backpack that sticks out as far as this one does. You won’t get many smiles from the people you’ve jostled. Then let’s head to the woods. As you attempt to negotiate narrow trails and dense thickets you realize it’s going to be a tight squeeze and you approach the hike with some trepidation.
 
That aside, the interior design is a bit odd. There’s an upper shelf with an aperture for a lens to stick through. But the aperture is not centered over the central channel in the lower part of the bag, so how exactly do you fit things properly? You have to shift one of the main dividers over to align everything.
 
What’s more, the interior is dark. And the foam is thick – too thick, in my opinion. Yes, I like my gear cushioned and cuddly in a pack, but the thick foam kind of imposes itself and gets in the way. It takes on a cavernous appearance.
 
Okay, you’re saying, pull out the upper shelf and stretch the two main red dividers to their full length. Well, guess again. These were apparently fitted for the 130 and they’re too short to extend fully top to bottom in the larger 230.
 
So, where does this leave us? Well, all is not lost. In fact, there’s quite a lot to be said for this backpack.
​Now, What I liked About the Bumblebee-230
The pack is well constructed and will deliver years of good use. The backpack harness works admirably. I especially like the padded pocket in the padded waistbelt – keep a lens or flash here (a 70-300 will fit, although a flash would be a better choice, just in case you hit a lot of bumps in the road).
 
And the bag is comfortable. Which brings us back to the backpack harness. The waist belt does a beautiful job of keeping the weight off your shoulders. More to the point, it puts it on the hips – exactly where it should be. Few photo backpacks (or I should say backpack manufacturers) understand this, or even among those that do, few follow it in all their backpack designs.
 
Carrying a tripod comes second nature to this bag. There’s even a laptop sleeve. And there are enough pockets to house all essentials. Well, except for a jacket. The outer front zippered pocket should have been pleated to allow more room. I tried getting a lightweight jacket in there without luck.
 
I should also mention that there are two ways to get inside the bag. The upper and lower sections zip open separately. However, there is a flap that stands between the zippers on one side. Lift this flap up (it uses Velcro-type hook-and-loop material) and you can gain access to the entire interior with one smooth zip movement.
​Who Should Use This?
Bumblebee-230: bird and wildlife photographers with long, fast lenses. (130: the smaller pack may be better suited to a wider range of applications, such as street and travel photography, as well as hiking).
 
Capsule Comments
Still a great concept, despite my nitpicking; comfortable harness system with airflow mesh back panel; protective; well padded throughout; water repellant, with rain cover providing added protection against torrential downpours; spacious but deceptively so since movable, padded dividers are quite thick; difficult to see inside bag, unless you zip it open fully; heavy for a Pro Light bag.
 
Conclusions
Manfrotto had an opportunity to take the Bumblebee and make it the photo backpack for the ages. They dropped the ball. At least when it came to the Bumblebee-230. I imagine the smaller 130 would have been more to my liking. Had I seen the bag up close or perhaps if I’d paid closer attention to the product pages, I would have realized that. The large bag is best if you have a fast, long lens attached to the camera. For anything else, I would likely choose the smaller 130 instead, which would have assuaged most, if not all, of my complaints.
 
So, is the Pro Light Bumblbee the photo backpack for you? Give it a shot. In the long term, you’ll find it has a lot going for it. Again, consider the size and fit (for your gear, as well as you) before you decide.
 
I will say one more thing for this pack. This is the most comfortable Bumblebee photo backpack of any I’ve used to date. More to the point, it should be easily wearable for an extended outing on the trails.

PRODUCT SPECIFICATIONS/Bumblee-230 (per Manfrotto)
Weight: 93.47 oz
Color: Black
Material: Nylon, RipStop, Synthetic Fabric
External Height: 20.9”
External Length: 12.6”
External Width: 10.2”
Internal main compartment height (H): 20.1”
Internal main compartment length (L): 11.8”
Internal main compartment width (W): 7.5”
Laptop Compartment H: 20.1”
Laptop Compartment L: 11.8”
Laptop Compartment W: 1.2”
 
Manufacturer
Manfrotto
 
Distributed by/Order From/More Info:
Manfrotto
 
How much is it?
$279.99/Bumblee-230

0 Comments

Field Report: Think Tank Photo's StreetWalker Series Photo Backpacks Take to the Streets as Version 2.0

6/15/2017

1 Comment

 
PictureStreetWalker V2.0. Photo courtesy Think Tank Photo.
I used my original StreetWalker for a long while, eventually replacing it with MindShift Gear’s TrailScape 18L when that bag came along. What I liked about the StreetWalker (version 1.0) was its small size: It could easily fit under the seat of a commercial airliner and would be a comfy fit in a puddle jumper as well. But when the TrailScape came along, I figured, Hmm, a bit bigger and a roomy outer front pocket for a light jacket – OK, I’ll use this one when I need a smaller bag.
 
Now that the StreetWalker V2.0 (SW V2) is here, I find myself switching back to this smaller pack. After all, if I need something larger, capable of storing a jacket and some extras, I still have my MindShift BackLight 26L, which I recently discovered will snugly hold my Nikon D500 with attached Tamron 150-600mm G2 lens (look for a review of both products soon).
 
Think Tank also sent me the new StreetWalker Pro V2.0 (SW Pro V2) – the larger sibling in this family, but not the largest in this series by any means. There’s an even more spacious pack, the StreetWalker HardDrive V2.0 (which fits a full-size laptop), and new to the lineup, the StreetWalker Rolling Backpack V2.0 (roller and backpack in one). The two largest bags looked tempting, but I felt that two bags was enough to deal with for now.

​Inside and Out
The new SW V2 and SW Pro V2 are roomier on the inside than their original counterparts and slightly larger overall. Other than that, the new models add room for a 10” tablet on the bag. The tablet sleeve is the same size on both bags.
 
One of the problems I had with the original SW V2 (can’t recall if this also applied to the larger pack) was the small water-bottle pocket on the small bag. Think Tank addressed the issue in both V2 bags with an expanded, pleated zipped pocket behind the mesh pocket. Small water bottle? Use the mesh pocket. Large 32 oz Nalgene, use the zipped pocket.
 
I would have preferred that the pockets were pleated all the way around to the bottom. That would make an easier fit for a large water bottle and allow for a grommet at the base. A bottle with cold water subjected to a warm, humid environment will form condensation, and that condensation will pool at the bottom. A grommet allows the water to safely drip free of the bag.
 
The pocket on the left (with the bag on your back) has a small smartphone sleeve as well. I don’t know about you, but I carry my phone in a vest pocket, where I can easily reach it, not in the backpack, where it’s impossible to reach (unless you’re a contortionist) without taking the pack off your back. Some things appear cool on paper but are not very practical in the real world.
 
One of the more subtle changes revolves around the main padded partition. It’s now hinged toward the bottom to make room for a second camera with lens attached. Simply swing the hinged section over to the right to make room. When carrying two cameras with attached lenses, this provides for a well-balanced carrying situation, which your back will thank you for. Obviously, this reduces your ability to carry very long lenses, but, hey, you can’t have everything – unless you switch to a larger-size pack.
 
Any way you slice it, either bag is roomy enough to hold fast lenses attached to a DSLR, within limits. I would even venture to say that each bag could hold a medium-format camera, possibly with a lens, at the bottom. At the very least, the larger bag should hold two gripped DSLR bodies with attached lenses; the smaller one should accommodate one DSLR at the top and, on the bottom, one gripped body, each with lens.
​In Use
Air-flow mesh padding in the back and shoulder straps was welcome relief on a hot muggy day as I found myself walking around several popular birding areas in the Chicago area, wearing the StreetWalker Pro V2, on a bird photography outing with a friend.
 
I had the SW Pro V2 loaded with my Nikon D500 and Tamron 150-600mm G2 – lens attached, I might add, and resting comfy, cozy, and snug inside the pack. I also added a Nissin Di700A shoe-mount (which I’m also testing) and sling strap, that I sometimes left attached to the camera – or more correctly, the tripod mount for better balance.
 
And yes, I kept the tripod mount attached to the lens. Otherwise, you tend to forget these things when you need them, or misplace them entirely. I also find it much easier to carry the camera by grabbing onto the mount, although at times I may cradle the camera, varying with the moment or the situation.
 
The tripod mount was positioned fully downward inside the pack, an arrangement I found raises the entire assembly to the point where camera and lens practically hug the closed lid for a snug fit so things don’t bounce around. Still, as a further precaution, I tend to secure lens and camera with either an elastic band that attaches to either side surrounding and hugging the lens, or I position an unused padded divider over the lens barrel for this purpose. I should add that I left the lens shade reverse-mounted on the lens.
 
The lens being this new, I take one more precautionary step – I slide the packing Styrofoam collar that came with the lens in place beneath the hood, just as it arrived from the factory, to prevent distorting the hood. It’s probably overkill, I know, and I may discontinue this practice, but it stands for now.
 
One thing that bothered me about both bags: the lack of headroom above the camera. The D500 has a very deep grip. The Nikon D610 not so much, but it still had difficulty being comfortably seated in the smaller V2 pack. I almost gave up, till I realized I could reshape the central divider somewhat to make room. And that worked. I have the Tamron 24-70mm f/2.8 attached to the camera, and there appears to be room for a bulkier and longer lens in its place. The fit in the larger Pro V2 was also tight with the D500 in place, but not to the point where I had to make any further adjustments to the main divider.
 
As for comfort level, I’m not sure why – and this will no doubt differ with the individual – I found the smaller of the two packs rides more comfortably on my back. Perhaps it’s due to the heavier load packed into the Pro V2. Then again, I’ve loaded the BackLight with the same gear, and it was a smooth ride – as good as it gets. It may have something to do with the added depth of the SW Pro.
 
As a side note, I should point out that the added depth on the StreetWalkers offers one distinct advantage: It lets them stand upright easily, unassisted and without having to lean against something for support, without fear of the bag tipping over, which is certainly a plus.
​Conclusions
I’ve always admired the StreetWalker series and would have continued to use my StreetWalkers all these years if other bags hadn’t come along to replace them. Now the StreetWalker V2.0 (the smaller of the two new backpacks) will replace a MindShift pack of similar size and design.
 
I hold onto photo packs this size for air travel. But aside from that, they work for me and do the job I need them to do, protecting my gear and making it readily accessible, while allowing me to carry what I need most to meet practically any challenge.

​Who Should Use This?
Street photographers; travel photographers; photographers of all levels.
 
Capsule Comments
Well constructed, durable design, water-repellant (with rain cover for added protection); easily carries a tripod over the front, plus full-size water bottle in side pocket; room for tablet; best suited for DSLR outfits or larger mirrorless systems. Should keep you going for many years.

​How much is it?
$169.75/StreetWalker V2.0
$199.75/StreetWalker Pro V2.0
Manufacturer/Order From/More Info:
Think Tank Photo


FEATURES (per Think Tank Photo)
StreetWalker Backpacks V2.0
  • Tripod mount on front panel (tripod cup for larger tripods included on Pro and HardDrive versions)
  • Padded shoulder straps comfortable for all day trekking
    • YKK RC Fuse zippers, ballistic nylon, high density Velex and closed-cell PU foam are the highest quality materials in the industry
    • Seam-sealed rain cover included
    • Adjustable dividers allow you to customize the fit of your DSLR or Mirrorless gear
    • Two side water bottle pockets and two side zippered pockets
    •  Dedicated smartphone pocket fits today’s large phones with a 5.5” (14cm) screen size
    • Removable webbing waist belt detaches easily (applicable to SW Pro V2)
    • Interior clear zippered pockets for accessories
    • Organizer pocket
    • Shoulder harness pockets, D-rings, daisy chain and adjustable sternum strap
 
WHAT FITS (per Think Tank Photo)
StreetWalker Pro V2.0
  • Holds 2 gripped DSLRs, 4–6 standard zoom lenses, and a 10” tablet
  • Holds 1 gripped DSLR, 5–7 standard zoom lenses, and a 10” tablet
  • Holds 2 large Mirrorless cameras, 4–6 lenses, a flash, and a 10” tablet
  • Maximum lens size: 400mm f/2.8
Examples:
  • Nikon D4s with 70–200mm f/2.8 attached, 24–70mm f/2.8, 14–24mm f/2.8, 105mm f/2.8, 50mm f/1.4, SB900 flash and a 10” tablet
  • Canon 1DxII (x2), 24–70mm f/2.8 attached, 70–200mm f/2.8 attached, a 16–35mm f/2.8, and a 10” tablet
  • Sony a7mII with 70–200mm f/4 attached, 4–6 additional lenses and a 10” tablet
StreetWalker V2.0
  • Holds 1 standard DSLR, 1 gripped DSLR, 3–4 standard zoom lenses, and a 10” tablet
  • Holds 1 standard DSLR, 4–5 standard zoom lenses, and a 10” tablet
  • Holds 2 large mirrorless cameras, 4–5 lenses, a flash and a 10” tablet
  • Maximum lens size: 300mm f/2.8
Examples:
  • Nikon D810 with 70–200mm f/2.8 attached, 24–70mm f/2.8, 14–24mm f/2.8, 105mm f/2.8 macro and a 10” tablet
  • Canon 1DxII with 24–70mm f/2.8 attached, Canon 5DMIII with 70–200mm f/2.8 attached and 16–35mm f/2.8 and a 10” tablet
  • Sony a7mII with 70–200mm f/4 attached and 4–6 additional lenses and a 10” tablet
 
MATERIALS (per Think Tank Photo)
Exterior:
  • Durable water-repellant (DWR) coating
  • Polyurethane coating
  • 1680D ballistic nylon
  • YKK RC Fuse (abrasion-resistant) zippers – lockable (lock not included)
  • 420D velocity nylon
  • 550D poly-spun
  • 320G air mesh
  •  Ultra-stretch pockets
  • Y-buckles
  • Antique plated metal hardware
  • Nylon webbing
  • 3-ply bonded nylon thread
Interior:
  • Closed-cell foam and PE board reinforced dividers
  • 200D polyester
  • Polyurethane backed “super-stick” Velex liner and dividers
  • 2x polyurethane coated nylon 210T seam-sealed rain cover
  • Laminated clear mesh pockets
  • 3-ply bonded nylon thread
 
PRODUCT SPECIFICATIONS (per Think Tank Photo)
StreetWalker Pro V2.0
Internal Dimensions: 9.4” W x 17.3” H x 7.5” D (24 x 44 x 19 cm)
Exterior Dimensions: 9.8” W x 18.5” H x 8.3” D (25 x 47 x 21 cm)
Tablet: 7.7” W x 10.4” H x 0.4” D (19.5 × 26.5 × 1 cm)
Phone Pocket: 3.9” W x 7.5” H x 0.6” D (10 × 19 × 1.5 cm)
Weight: 3.5 lbs (1.6 kg)

StreetWalker V2.0

Internal Dimensions: 9.4” W x 16.1” H x 6.3” D (24 x 41 x 16 cm)
Exterior Dimensions: 9.8” W x 17.3” H x 7.1” D (25 x 44 x 18 cm)
Tablet: 7.7” W x 10.4” H x 0.4” D (19.5 × 26.5 × 1 cm)
Phone Pocket: 3.9” W x 7.5” H x 0.6” D (10 × 19 × 1.5 cm)
Weight: 3.3 lbs (1.5 kg)
1 Comment

Field Report: MindShift Gear’s TrailScape 18L – A Trail-worthy Pack for Nature Outings

11/6/2016

0 Comments

 
PictureCourtesy MindShift Gear.
The moment I unpacked this photo backpack and unzipped the main flap, I had a sense of déjà vu. I’d seen this bag before.

Then I took a look at my Think Tank Photo StreetWalker and realized where I’d seen this design. 

​The new TrailScape largely mimics the interior of the StreetWalker, or perhaps more correctly the StreetWalker Pro, since the dimensions more closely match that pack. But there are substantive differences. What are they? Read on.

The TrailScape – On the Outside
Gone are the two zippered side pockets found on the StreetWalker. They are wisely replaced by two roomier stretch pockets. Granted, some may lament the loss of these zip pockets, but I always found them a bit too cramped for my taste.
 
Instead, you now have room for a 32-oz. Nalgene water bottle on one side, counterbalanced by your tripod snugly secured by compression straps, with two feet (spikes retracted) resting inside the opposite stretch pocket.
 
On the front, there is a very spacious pocket that will hold a 13” laptop and a 10” tablet, not that I ever carry either into the field. But I do make use of these sleeves for maps, pads, and various accessories. There are also organizer pockets in this section.
 
In front of this large pocket sits another pocket, diminutive by comparison, designed to carry your sunglasses, with a very softly textured fabric lining that shouldn’t scratch. I’ve got a pair of those sunglasses that are so bulbous when closed that they require a custom case. They fit here. But I was so afraid they’d get crushed at some point, that I removed them and put them back in their hard case. In their place went my Giotto’s rocket blower.
 
The zippers run very smoothly. However, I would have preferred contrasting colors for the zipper pulls on the front pocket. Yes, the zip pulls, which are designed to be easily handled with gloves, are smaller on the pocket. But I did manage to grab them by accident. So my solution was to rest them on the side, with the main zips up top. Problem solved.
 
Because this is a trail pack, in contrast to the zips on the StreetWalker, the zippers are not interlocking (for the purpose of inserting a TSA lock). Besides, locking a bag only makes it that much more tempting to those looking to steal it.
 
There are four lash points on the front of the bag, but you’ll have to supply your own rope or bungee cord. If you need to carry stuff inside the front pocket to keep it safe from the elements, you can lash a jacket to the front of the bag. I keep a light jacket inside this pocket.
 
There’s a carrying handle on top – more of a strap, really, coming to rest on the back of the pack. While not nearly as substantial as the one on the StreetWalker, such straps have been used on other packs (I believe also from MindShift or Think Tank), and I’ve never known them to fail. Besides, in contrast to that other bag, this handle doesn’t add to the height of the bag – which could make a difference when you’re trying to squeeze into a tight overhead bin or under a seat. (By the way, if you’re going to carry the pack for any distance, by any means other than fully on your back with both straps, use one of the shoulder straps, not the carrying handle.)
​On the Inside
This pack is not nearly as deep as even the original StreetWalker. What does that mean? Forget about carrying a pro-grip camera, unless you insert it face-up sans lens. That said, my Nikon D610 rides much more secure in this bag, because it’s less of a bouncy house (although, I must admit, I always secure the camera with a Velcro band over the dividers or I’ll seat another divider over the lens for a snug fit).
 
There are plenty of padded dividers. As is, this pack is fitted for a slew of lenses, accessories, and a flash. My dividers never sit in one place for very long, however. That’s the beauty of a customizable system.
 
There are also two mesh pockets inside the front lid for small, chiefly flat items.
 
In Use
The first thing I have to comment on is the backpack harness system and airflow/lumbar padding. In a trail pack, this is of utmost importance for your comfort and safety during long treks, especially over arduous terrain. While this pack is not meant for such outings, by its very nature, still, it’s comforting to know it will stand the test.
 
The harness system on the TrailScape feels better than the one found on the StreetWalker. The straps are wider at the shoulder. The straps on both packs are contoured top to bottom to fit the body nicely, but this one is decidedly a better fit.
 
As with the StreetWalker, the unpadded waist strap is removable. (Keep it inside the bag, or you’ll lose it. Better yet, leave it attached – reattaching can be a chore if you didn’t take notes on how the straps originally attached to the bag).
 
The sternum (chest) strap on the TrailScape is longer and a bit stretchy for larger chests or someone wearing lots of winter layers. On my initial outing, I didn’t find it necessary to use either the waist belt or chest strap. The pack rode comfortably on my back without requiring constant adjustments.
 
By the way, when you first get the pack, it’s important to loosen all straps. Tighten them when the pack is on your back, and adjust them once on the trail.
 
You’re probably thinking that it’s odd this pack doesn’t allow for a hydration bladder, whereas the more compact SidePath, which is essentially an enhanced daypack, will accommodate a bladder. I’m guessing, that, when you start with one basic design, namely the StreetWalker, it would be difficult to create a custom passageway for a drinking tube without destroying the solid fabric of that pack. And frankly, I’m not a fan of bladders, so this doesn’t bother me in the least. If you must use a bladder, MindShift has several alternatives available, currently the rotation 180 packs.
​Who Should Use This?
Hikers and nature enthusiasts.
 
Capsule Comments
Comfortable; protective; durable construction; fully customizable; thoughtfully designed; room for a tripod and full-size water bottle; holds a small laptop and tablet; room in outside pocket for a jacket; won’t accommodate a hydration bladder (important only if you prefer this method of hydration).
 
Conclusions
Despite being built on the framework of the Think Tank StreetWalker or StreetWalker Pro, the TrailScape has a number of useful features that stand it apart from it progenitors. Essentially, this is a trail pack, not a city-slicker pack.

You can, of course, wear the TrailScape around town. Compared to many of MindShift’s other trailworthy packs, this one has a more manageable footprint. That makes it easier to maneuver in tight spaces while wearing the pack, such as crowds and public transit.
 
What most recommends this pack is the harness system. While I didn’t load the pack to capacity, walking around with it on my back never felt like a burden. The shoulder straps kept the bag in place without digging into my shoulders – and, I should point out, I was only wearing a t-shirt and photo vest (sans epaulets).
 
So, in my book, this one’s a keeper. I know, I’ve said that before about bags I’ve later given away. But as new bags arrive, one has to make room. For now, this TrailScape 18L is the perfect size for my outings when I need to carry several lenses, with one attached to the camera, along with a flash, various accessories, and a light jacket.
 
The only thing on my wish list for this bag: a snazzier design. The exterior is a bit bland. Why stop with basic black? I would really love to see some camouflage patterns on MindShift bags – say on the order of Mojave Desert and Amazon Rainforest. Something to think about, guys.

Where can I get more info?
MindShift Gear (order direct).
 
Manufacturer (ordering info):
MindShift Gear
 
How much is it?
$169.99
FEATURES (per MindShift Gear)
  • Dedicated quick access smartphone/sunglasses pocket
  • Tripod/monopod/hiking pole mounting system on sides
  • Two large water bottle pockets with cinch cord
  • Seamless rain cover included for downpour conditions
  • Side compression straps for additional lash points
  • Adjustable dividers to customize the interior for DSLR or mirrorless kit
  • Interior zippered pockets for batteries, cards, filters and other accessories
  • Easy-grip zipper pulls for wet or cold conditions
  • Organizer pockets for pens, flashlight and business cards
GEAR CAPACITY (per MindShift Gear)
  • Holds 1 standard-size DSLR and 4 to 6 standard zoom lenses
  • Holds 2 large mirrorless bodies and 5 to 7 lenses plus a flash
  • Maximum lens size: 300mm f/2.8
Examples:
  • Nikon D810 with 70-200mm f/2.8 attached to a body and the hood in the shooting position and 2-3 additional lenses
  • Canon 5DMIII with 24-70mm f/2.8 attached and 4-6 additional lenses
  • Sony a7mII with 70-200mm f/4 attached and 5-6 additional lenses
 
MATERIALS (per MindShift Gear)
Exterior: For superior water resistance, all exterior fabric has a durable water-repellant coating, plus a polyurethane coating on the underside of the fabric. The backpack also features the highest-quality abrasion-resistant YKK® RC zippers, 420D velocity nylon, 600D poly, 320G DuraStretch mesh, 350G airmesh, nylon webbing, and 3-ply bonded nylon thread.
​
Interior: P200D lining, high-density nylex with stiffened backing, hexa-mesh pockets, high-density closed-cell foam, PE board reinforcement, and 3-ply bonded nylon thread.
 
SPECIFICATIONS (per MindShift Gear)
  • Exterior: 9.8” W x 18.1” H x 7.1” D (25 × 46 × 18 cm)
  • Interior: 9.4” W x 17.3” H x 4.8” D (24 × 44 × 12 cm)
  • Laptop: 8.9” W x 14.2” H x 1.2” D (22.7 × 36 × 3 cm)
  • Tablet: 8.5” W x 9.8” H x 0.8” D (21.5 × 25 × 2 cm)
  • Weight: 2.8 lbs. (1.3 kg)
0 Comments

Field Report: MindShift Gear’s UltraLight Dual 25L Photo Backpack – Light in Weight, Heavy in Functionality

2/1/2016

2 Comments

 
PictureMindShift Gear's UltraLight Dual series: 36L (far left), 25L (middle), 16L. Courtesy MindShift Gear.
​I've had a love affair with MindShift Gear photo backpacks from the first. Over time, with the introduction of newer packs, I’ve had to displace older ones – not because I disliked those older packs but because the newer packs more closely addressed my needs and style of shooting. Not to mention, I just didn’t have the space for all of them.
 
The Rotation180 Panorama pushed aside the Pro size pack, but was in turn replaced by the Horizon because this pack was of the right size to hold the camera/lens combos I often use stored ready for fast retrieval in that built-in rotating waist pack.
 
Then along came the FirstLight 20L, which I really liked, but it did not meet my needs for a pack I could use in the snow or in muddy conditions without laying the pack on the ground. So the Horizon stood its ground, even though I found it (and the Panorama) a bit on the heavy side.
 
More recently, MindShift Gear introduced the BackLight 26L, which lets you work out of the bag while still wearing it – hence a workaround when negotiating snowy or muddy terrain. But that pack wasn’t enough to push the Panorama and FirstLight out of contention. I still wanted a pack that would only carry a limited amount of gear while I was running around Chicago yet would also let me carry some extras - more than would fit in an outside pocket, as spacious as the one on the BackLight is.

Specifically, I often challenge myself to make the most of a one-camera-one-lens combo, which usually means my Nikon D610 with attached Tamron 15-30mm f/2.8 primarily for landscapes and architecture, Tamron 24-70mm f/2.8 for landscapes and street shooting, or Tamron 70-300mm for wildlife, or sometimes the Tamron 90mm f/2.8 macro for the obvious, but also for wildlife and scenic views with a different perspective.
 
Enter the UltraLight Dual 25L. Would I now being saying goodbye to my Horizon and FirstLight packs as well?

Light Weight But Not a Lightweight
The UltraLight Dual is not MindShift Gear’s first dual-tier system, since technically the Rotation180 series would also fall into that category. Then again, the Dual is not your typical two-tier pack either.

Two-level packs traditionally have separate top and bottom compartments – the bottom compartment thoroughly padded to accommodate a variety of camera gear, including one camera with attached lens; the top compartment unpadded for personal items (lunch, books, jacket, etc.), as is true here. Often, and applicable in this pack, the partition separating the two sections opens to let you extend one compartment into the other, for whatever reason (converting the entire pack to a daypack, for example).

Traditional two-tier packs feature either a clamshell camera section (opens like a clamshell) or a camera section that opens from the front. I used to like either design until I realized that opening a clamshell can become rather inconvenient if it’s top-heavy. And when the camera section opens from the front, the view or access inside was often obstructed in some way. And both designs required you to put the pack down.
 
MindShift’s UltraLight Dual builds upon a combination of two concepts: the dual-tier combined with a side-access panel. The side-access panel means you don’t have to put the bag down to get at your camera. Instead you sling the bag off the left shoulder, lift the bottom up so the bag is level, and reach over with your right hand, unzip the panel, and grab the camera. And to make things even sweeter, that camera compartment is actually a removable bag that comes with its own shoulder strap. You can even loop a belt through the back so it doesn’t shift as you’re moving about. The internal bag has its own zippered lid as added security (I usually leave this zipped only partially for faster access to the camera, unless negotiating rough terrain). If you keep the removable bag inside the pack, which makes more sense to me, rather than toting it on your shoulder, make sure to keep the outer panel zipped. 
 
How I Use the UltraLight Dual 25L
First, I begin with a lens attached to my D610. That really doesn’t leave room for an extra lens or flash, so I do the next best thing. The Nikon SB-700 came with a nice, semi-rigid, padded pouch, which I now use so I can store the flash in the upper compartment. When I get where I’m going, I can transfer the flash to a pocket in my photo vest.
 
Now, with regard to extra lenses. That’s where the MindShift Switch Case comes in handy. I added some extra padding on the bottom of the Switch Case. This also goes into the top compartment. I can transfer this pouch to the outside of the backpack when needed. And if I need more lenses, I’ll find a workaround. For now, this is fine. As I said, I don’t usually run around with a slew of lenses. If I’m traveling, then I’d likely use one of my other backpacks. Which pack? Depends on where I’m going (Think Tank's StreetWalker is often my go-to pack for travel). Then again, I may just decide to take this one. You have to remain flexible, and owning more than one photo backpack allows me to do just that.
 
Features (my comments in parentheses)
  • Dedicated compartment for laptop, tablet or hydration reservoir. Fits 2.5L hydration or 15” laptop.
  • Large capacity for personal gear: extra layers, a light jacket, food, etc. (ya gotta love this – don’t forget maps, guide books, instruction manuals for gear or functions you don’t use often).
  • Removable camera compartment converts to a chest pack with the optional Tripod Suspension Kit (I prefer keeping this inside the pack, but don't forget that it can also be worn as a shoulder bag with the included shoulder strap).
  • Integrated tripod/monopod mounting system on front (since this pack doesn’t open from the front, no fear of the pod getting in the way).
  • Trap door platform allows you to use the entire bag for personal gear (in other words, you have two packs in one - daypack or photo backpack, although I'm keeping this as a photo backpack).
  • Seam-sealed rain cover included (nice touch).
  • High quality YKK RC Fuse zippers, 420D high-density nylon reinforced stress points for long lasting durability and strength (MindShift build quality is second to none and better than most).
  • Highly breathable three-layer shoulder straps with daisy chain for additional gear (they’re comfy).
  • Internal compression strap and drawstring collar maximize capacity and minimize bulk.
  • Stretch side pocket (fits a standard-size water bottle).
  • Internal zippered mesh pocket for small items.
  • Zippered lid pocket and zippered waist belt pocket for quick access to small items (I would also have liked a pleated, outside front pocket).
  • Accessory loop for mountain axe or hiking poles mounting.
  • Lid closure doubles as a lash point for a large jacket or other bulky items (adds to capacity of pack).
  • Ergonomic zipper pulls are easily gripped with gloves or chilled fingers.
  • Adjustable dividers for different camera gear configurations (doesn’t apply to the way I carry my gear, since I just carry the camera with sizable lens attached – a configuration that completely fills this compartment; I can comfortably fit a Nikon D610 with attached Tamron 15-30mm f/2.8 or Tamron 70-300mm).
  • Adjustable sternum strap.
  • Camera compartment lid tucks into side opening lid for quick access.
  • Nylex LCD protector provides a place for your camera strap while covering your LCD (I even managed to squeeze a BlackRapid sling strap in here, with a hand strap attached to the camera as well; the camera's hot shoe may catch on this lid where it attaches to the bag, but you can simply nudge the obstruction out of the way).
  • Compatible with the Filter Nest/Hive and Switch Case, Tripod Suspension Kit and Panorama/Horizon photo insert (snug fit with photo insert).
​Gear Profile (as determined by MindShift Gear)
UltraLight Dual 25L:
  • Holds one standard-size DSLR (5DM3 or D810) and one standard zoom lens or two primes
  • Holds one large (un-gripped) Mirrorless body and two to three lenses
  • Fits up to a 15” laptop or most 2.5 liter hydration reservoirs
  • Fourteen liters of capacity for personal gear
  • Maximum lens size attached to body/DSLR: 24-70mm f/2.8 (in my experience, a 15-30mm f/2.8 or a 70-300mm – both Tamron - attached to a Nikon D610)
  • Maximum lens size attached to body/Mirrorless: 70-200mm f/2.8 equivalents

​MATERIALS
Exterior: For superior water resistance, all exterior fabric has a durable water-repellant coating, plus the underside of the fabric has a polyurethane coating. It also has high-quality YKK Fuse zippers, 100D nylon shadow rip-stop, 420D high-density nylon, 210D velocity nylon, 320G UltraStretch mesh, 350G airmesh, nylon webbing, 3-ply bonded nylon thread.
 
Interior: 200D poly, velex, high-density closed-cell foam, belly-o mesh, 3-ply bonded nylon thread.
 
PRODUCT DIMENSIONS, VOLUME & WEIGHT
UltraLight Dual 25L
Exterior Dimensions: 10.2” W x 19.5” H x 6.7” D (26 x 49.5 x 17 cm)
Camera Compartment: 9.1” W x 7.5” H x 5.1” D (23 cm x 19 cm x 13 cm)
Laptop/hydration compartment: 10.2” W x 15.7” H (26 x 40 cm)
Weight: 2.8 lbs. (1.3kg)
Volume: 25 Liters
 
Where can I get more info?
MindShift Gear
 
Manufacturer:
MindShift Gear
 
How much is it?
Direct: $169.99 l ($169.99 at B&H). 
Who Should Use This?
Travel photographers who like to travel light, hikers, nature enthusiasts, street shooters.
 
Capsule Comments:
Superbly designed, practical and lightweight, highly durable photo backpack.
 
Conclusions:
You won’t pack the kitchen sink into this photo backpack, but, then again, it wasn’t meant for that. Photo gear mainly goes into the bottom section (which, on the two larger sizes, the 25L included, consists of a padded, removable shoulder bag), while personal items fit in the spacious top section. More than that, the pack offers quick side-panel access to photo gear, which for me is essentially a full-frame DSLR with attached f/2.8 zoom or longer lens (up to 70-300). There’s plenty of room in the top section for my flash in its padded case and a MindShift Switch Case with one or two extra lenses (or one lens plus one flash, if I want to condense things even further). Not surprisingly, MindShift’s UltraLight Dual 25L rides comfortably on my back. By the way, I chose the black (over the blue) version – the color scheme just seemed to have a classier feel to it.
2 Comments

Field Review – MindShift Gear’s BackLight 26L – A Photo Backpack with a Difference

12/14/2015

3 Comments

 
​I’ve made a few things clear in past reviews of photo backpacks and in magazine features I’ve written on the subject. One is that I favor a backpack over a shoulder bag for most of my photography. Second, I’ll only use a backpack that’s a good fit – feels comfy and rides well on my back, holds the gear I need to carry securely and in an organized fashion, and lets me get at my gear relatively easily and quickly. Third, I prefer a backpack that lets me carry a water bottle and a few extras, such as a light jacket – in other words, has pockets where and in a size I need them.
 
All of which has led me in recent years to MindShift Gear photo backpacks. I’ve become increasingly enamored of these products. And the fact that this company continues to innovate without compromising the integrity or functionality of their bags speaks volumes.
 
However, when MindShift Gear announced the BackLight 26L, my first thought was: I have enough photo backpacks already. I’ll skip this one.
 
Glad I didn’t. But I also had to reconcile where this new photo backpack stood in relation to my other backpacks, especially the FirstLight, which had previously moved to the front of the pack, so to speak.

​Fast forward, from the day it arrived, the BackLight has become my go-to photo backpack – and for good reason. 

The following are some of the images I shot while wearing the BackLight 26L. As you can see, this pack lends itself nicely to a wide range of situations.
Picture
BackLight 26L (green version). Courtesy MindShift Gear.
BackLight 26L: Key Features
These are features outlined by MindShift Gear in a press release (with my comments and observations).
  • Includes tripod/monopod mounting system on front or side. (I love having choices, and these work well.)
  • Padded waist belt for all day comfort on the trail, with webbing rail for attachment of additional MindShift accessories. (I always prefer a padded to an unpadded waist belt when it comes to a pack of this size/carrying capacity or larger.)
  • Quick fit waist belt adjustment for rapid and convenient fitting. (A properly fitting waist belt can make the difference between a comfortable hike and a tortuous journey. This one is on the money. When not needed, the waist belt wraps around the front, a feature MindShift introduced with the FirstLight series. However, this means you can’t access the bag while wearing it, because the waist belt must be cinched. So use this wraparound feature when transporting the bag in a vehicle and restore the waist belt to its intended function once you hit the trails or the streets.)
  • Adjustable neck strap keeps the back panel against your chest, providing unencumbered access to your gear. (This is for when you keep the bag on your person as you access the back panel. I removed this bungee cord – it kept coming undone - although I should perhaps learn to tie a better knot. Besides, I found it just as easy to hold the bag open with one hand. But try the bag with the cord and see for yourself. More on this below.)
  • Integrated insert with customizable dividers allows you to maximize the space for photo gear, personal gear, or a combination of the two. (Nothing beats a well-organized interior. Keep batteries inside in extreme temperatures, since the bag acts as an insulator.)
  • 2 large water bottle pockets with cinch cord fit a 32 oz. Nalgene. (I can appreciate a good-size water bottle pocket such as found here, although I still may attach a separate insulated pouch in hot weather. You can use one of these pockets for a tripod, or alternately carry the tripod over the front of the bag – everything you need for the tripod is built in, although an optional mode of tripod transport is also available.)
  • Side compression straps with locking SR buckles for additional lash points. (These come in handy when securing a tripod to the side of the bag.)
  • Air channel and lumbar support on rear-panel for all-day comfort. (Yup, agree whole-heartedly. Comfy! I should point out that I started working with the bag in warmer weather, so this feature definitely helped.)
  • Ergonomic zipper pulls are easily gripped with gloves or chilled fingers. (I love these zippers!)
  • Highest quality YKK RC Fuse zippers, 420D Velocity and 420D high-density nylon for long lasting durability and strength. (Highest quality materials and workmanship are important to this type of bag, and that’s what you get. The bag is made to last and should endure numerous adventures.)
  • Front stuff pockets for trail essentials: headlamp, gloves, and chargers. (I keep the outside front pockets filled with lightweight stuff, such as a light jacket. I don’t like keeping a laptop or anything heavy in the front pocket – throws the pack off balance.)
  • Top zippered pocket for quick access to essentials. (It’s small, but you can keep a pack of lens tissue or a lens cloth and a small screwdriver kit in there. When the temperatures are moderate, I may keep spare batteries in this pocket.)
  • Seam-sealed rain cover included; folds flat for use as a ground cover. (Haven’t had to use it yet, but glad to have it included. On its own, the bag is water-resistant – just not to a drenching downpour, hence the rain cover.)
BackLight 26L vs. FirstLight 20L
  • Going green. I was getting tired of black and gray backpacks, so I welcomed the green BackLight. I figured this color would blend in fairly well in woodland environments. Yet, at the same time, this pack would be easily spotted by cyclists on bike paths that traversed some of the woodlands I frequent – so far, so good. (In the evening, I attach a strobing LED flashlight to the pack as a precaution).
  • Bigger volume, not overall size, is important. The BackLight 26L adds nearly a full inch to the depth, which means you can store some lenses on end, making room for more gear while letting you more easily get at the lenses you need. With the 20L, that was not the case. (Of course, you could move up to a FirstLight 30L, but for me, that was too spacious).
  • Large water bottle pockets on the BackLight. I had to use an accessory water bottle pouch on the FirstLight 20L.
  • Spacious front pocket on the BackLight. Big enough to carry a light jacket comfortably, in place of a laptop, which I never carry into the field.
  • Less complicated can make a difference. The BackLight is a simpler bag to use overall. Unlike the FirstLight, there’s no torso length adjustment on this pack (yes, this could make a difference to a very tall person). Also unlike the FirstLight, there are no compression straps on the shoulder straps and waist belt of the new BackLight (that should only make a vital difference for a really rugged outdoor excursion – and even then, it’s arguable). MindShift also got rid of the whistle on the chest strap, but I can see the reasoning behind this: Put the bag on the ground and the whistle lands there as well. I leave the rest to your imagination. The airflow back panel is also different on the new pack, but I didn't see any practical difference while wearing either pack.
  • A simpler carry handle. The carry handle, while not a key feature, can make a difference. The BackLight uses a more basic, flexible loop-like carry handle, which I find eminently satisfactory and easy to grab when needed. The FirstLight has a substantially padded handle that adds to the height and makes it feel as if I’m carrying a suitcase – you can’t just quickly slip a couple of fingers into it; you need to grab it.
  • Gear access panel. The gear access panel affects the way you work and how secure you feel. The new BackLight features a rear access panel – away from prying fingers. The FirstLight uses the more conventional front panel. But what MindShift Gear is mostly touting about the BackLight is that you can wear the bag while accessing gear and changing lenses on the fly. I tried it, and my assessment follows below (see In the Field).
​In the Field
I loaded the bag (not fully) with a Nikon D610 and several lenses, including a Tamron 15-30 f/2.8, Tamron 90mm f/2.8 macro, and Tamron 70-300mm, plus Nikon SB-700 flash, and had plenty of room to spare. I could easily have carried a 300mm f/4 attached to my trusty old Canon EOS 5D, together with other Canon lenses instead. There was even a special space for my Giotto’s Rocket Blower and room to store a sling strap. And there was definitely space for a second camera body.
 
For the most part, I didn’t notice I was wearing the bag. However, I did find that the FirstLight 20L did ride a bit better on my back, without me having to readjust the position of the shoulder straps as I was walking about. That said, this was not a concern when shooting while wearing the BackLight 26L, which remained firmly and comfortably on my back. (I should point out that everyone will have a different experience with any backpack, so you’d do well to try it on, preferably filled with gear, and walk around a bit – something more easily done at home, when ordering online.)
 
Now, as to that thing about accessing the interior while wearing the pack. Okay, here’s the unvarnished truth. It’s doable – but mostly if you’re not wearing an open jacket or open photo vest, which tends to get entangled or snarled in the process of shifting the pack around. When I wear a vest as the outer layer, it’s always open. Ditto for a jacket as the outer layer, with an open vest underneath (or the other way around – depends on the situation). Open outer garments just make a mess of things, and I'm not about to zip up and then unzip afterwards, which only wastes time.

But when I did successfully manage to access my gear while wearing the pack, I found it best to position one knee under the pack for added support (set your foot on a step or mound). You can also try leaning the bag against a wall or tree. I didn’t feel entirely comfortable allowing the pack to float tethered to the waist belt, although I’ve done it with a light load.
 
And as I mentioned, I didn’t like using the neck tether. I should add the reason for that is, my hat kept getting in the way. (I keep the neckband in the pack in case I change my mind, or in the event I might need it to tie off something.)
 
I did try attaching a spare, lightweight, clip-on shoulder strap (a camera strap can also be used) to the carry handle as a means of supporting the bag. But again, my hat got in the way, and since this became such a production, hence counterproductive, I gave up on the idea. Besides, it also meant that I ended up with something dangling off the pack when the added strap was not in use. Still, you might try it. Just don’t wear a hat.
 
So, in the end, I found myself using the bag more conventionally. It just meant I had to find a convenient spot to lay the bag down. Which is not as easy as it sounds in many situations. Still, I expect that I'll go back and try using the pack as intended. Whenever I hit a stumbling block, I always try and try again. It's who I am.
Special Usage Note
Make sure to keep the waist belt securely cinched before attempting to rotate the bag around your waist.
 

The waist belt should tightly hug the waist, but not so tight as to hinder the bag’s movement.

On the other hand, if it’s too loose, like loose-fitting trousers, it will start sliding downward as you remove the shoulder straps.

​The process can get a bit tricky, which is why you should practice with a fully loaded pack until you’re confident you’ve got it.

​
​Conclusions
You may be asking, what about the Rotation180 Horizon 34L you gushed about in an earlier review? Clearly, any of the Rotation180 packs will give you fast access to your gear, much more so than the BackLight. However, the Horizon won’t fit long lenses in the rotating section. And it is bigger and bulkier overall. Plus it’s clearly intended for rigorous excursions.
 
The BackLight is tamer, by comparison. It lends itself to a wider variety of environments, from city streets to woodland and is less of a nuisance on a crowded subway.
 
Which brings me back to my earlier comment: The BackLight 26L has become my go-to photo backpack. It carries what I need and in a fashion that is protective, makes my gear readily accessible, and it's smart-looking. I simply and utterly refuse to look at another photo backpack. That is, at least until MindShift Gear comes up with yet another winner.
 
Once you’ve got the hang of using the BackLight 26L, you can be assured of retrieving the camera and grabbing that shot when the opportunity to photograph a 10-point buck presents itself or ducking the camera back in the bag when that buck starts eyeing you suspiciously. There are definitely times when you do not want to put a pack down on the ground and turn your back on an animal just to get inside the bag.
 
So, the next time I find myself ankle-deep in mud or knee-deep in fresh powder, you can bet I’ll figure out a way to work around the hat, vest, and jacket I’m wearing and keep the BackLight 26L on my person as I retrieve the camera, change lenses, or return the camera to the bag. 
Capsule Comments
Sturdy, well crafted, stylish yet practical, does a great job protecting my gear.

Where can I get more info?
MindShift Gear BackLight 26L
 
Manufacturer:
MindShift Gear
 
How much is it?
Direct: $249.99 (same price at B&H, Adorama). 
 
Specifications
Exterior Dimensions: 11.4” W x 20.3” H x 7.9” D (29 x 51.5 x 20 cm)
Interior Camera Compartment: 10.2” W x 19.3” H x 5.9” D (26 x 49 x 15 cm)
Laptop Pocket: 10” W x 15.3” H x 1”D (25.5 x 38.8 x 2.5 cm)
Tablet Pocket: 9.3” W x 10.2” H x 0.6” D (23.5 x 26 x 1.5 cm)
Total Volume: 26L
Weight: 3.9 lb (1.8 kg)

3 Comments

Field Review - MindShift Gear's FirstLight 20L and rotation180° Horizon 34L & Think Tank Photo's StreetWalker - Photo Backpacks Worth Owning & Using

8/10/2015

0 Comments

 
I'm a big fan of photo backpacks, and always have been. I find them eminently suited to practically every type of shooting I do away from my home base. In fact, I keep specific gear packed in individual backpacks so I'll be ready to go, with just minor tweaks, as needed. 

Over the past few years, I've grown to love packs from Think Tank Photo, and more recently from their affiliated younger sibling, MindShift Gear. In fact, packs from these two companies have been my go-to bags for practically every photo outing and are the only backpacks I trust to do the job these days. Think Tank has packs geared more toward travel and location photography, whereas MindShift directs its efforts primarily toward the great outdoors, as well as travel. Bags from the two companies are distinctly their own - there's nothing else like them on the market. And each company's packs are easily distinguishable from the other.

Now, with regard to the packs we're reviewing, the newest are (with the latest first), MindShift's FirstLight 20L and rotation180 Horizon, followed by Think Tank's StreetWalker. The FirstLight series is geared toward DLSRs with physically long lenses attached, whereas the rotation series aims at instant readiness in any environment, with considerably shorter lenses on the camera, to put it simply. The StreetWalker has been around for awhile. As the name implies, it's primarily designed for use on the street, but is so compact and utilitarian, you'll want to take it everywhere. 

These three packs are water-repellant and constructed with an ultra-strong, ultra-durable nylon shell.  The MindShift packs in particular are designed to weather the harshest of conditions. All these backpacks are fully padded, with customizable interiors. What's more, they're relatively lightweight without compromising construction or their ability to protect my valuable gear.
FIRSTLIGHT 20L (Click highlighted text for more info.)
I loved this bag from the moment I laid eyes on it. First, it's sleek in appearance, with nice, clean lines. Second, there are two ways to carry a tripod built in--over the front or on either side. I carried a compact Sirui carbon-fiber pod, but my larger Giotto's would also have made a good fit. The side that's free can hold a water bottle (something in the order of a 16 oz bottle). The FirstLight 30L and 40L (L = internal capacity, in liters) will also hold a hydration bladder (optional), as well as more and bigger gear. Third, it comes with its own seam-sealed (translation: keeps water out) rain cover.

To further ensure your comfort, the pack comes with an aluminum stay. The backpack suspension system is especially noteworthy. Unlike most photo backpacks, this bag is adjustable for torso length. This affects how you carry the pack and your comfort level for the long haul. The only pack in recent memory that was arguably a better fit is the rotation180 Pro. To further ensure your comfort, the pack comes with an aluminum stay.

In addition to the heavily padded, contoured, breathable shoulder harness, the pack comes with airflow back padding with lumbar support, a fully adjustable sternum (chest) strap - with a whistle, no less, and fully padded and fully adjustable waist belt. In fact, the waist belt was designed to wrap around to the front so that it takes up less space in storage and to keep the padded wings (flaps) out of the way. There are also compression straps to further secure the bag and add to its comfort: load lifters attached to the shoulder straps on top, stabilizers on the waist belt. Remember, the basic idea behind all these adjustments is to take the weight off your shoulders during long hikes and to keep the bag stable on uneven terrain. The sternum strap also helps keep the shoulder straps from sliding off the shoulder. On city streets, you can make do with just the shoulder harness, as I did - makes removing the bag that much quicker. 

The only way they could have made this a more pleasurable experience is with an instructional video illustrating the torso adjustment and overall fit of the pack (I had to play around with it to get it just right). There is, however, a set of instructions inside the bag.

The pack has two roomy front pockets, plus one small one on top (I would have also liked an organizer pocket for a pen, pad, and other small stuff). The largest of these pockets will hold up to a 15-inch laptop, but you'll have to provide your own padded sleeve. I'd normally carry a light jacket in that pocket. There are additional see-through pockets inside. 

Now to the key feature of the FirstLight series. These packs are designed to hold a DSLR (HD-SLR) with long lens attached. For the FirstLight 20L, maximum lens size attached to the camera body, according to MindShift, is a 200–400mm f/4 or 300 f/2.8, with room to spare for additional lenses, shoe-mount flash, and accessories. Because of the bag's shallow depth, some lenses that I would have stored vertically (upright) in another pack had to be stored horizontally (lengthwise). Still, what I particularly liked is that the bag holds the camera snugly in place. I had to adjust one of the vertical (long) partitions to accommodate the width of my Nikon D610, but that was it.

The limited depth did have one other consequence: I had to detach the sling strap that I normally leave attached to the bottom of the camera (this may vary with sling strap design). The 30L should have no problem dealing with sling straps or with standing some lenses on end. That should be even less of a problem with the much more spacious 40L.


Street price/FirstLight 20L: $229.99 direct; $229.99 @B&H
PicturePhoto courtesy MindShift Gear.
ROTATION180 HORIZON (Click highlighted text for more info.)

There isn't that much more to say about this version of the rotation180 other than it's bigger than the Panorama (read that review here). 

Well, concomitant with that larger size comes a roomier rotating waist-belt camera pack. Aside from that, the Horizon accepts the same optional camera insert as the Panorama, but leaves room to spare, which is a big plus in my book. With the insert, the Panorama left practically no room for anything else. Now, with the Horizon, you can store that light jacket, some snacks, and a guidebook or two, and even make room for a tablet, plus additional pockets give you added space. There is a pocket on the side that will hold a water bottle, but it's not mesh, meaning the bottle could slip out on a rugged trail. To counter that, this pack will also hold a hydration bladder (optional). Rain covers for the main pack and belt pack are optional.

While not on the same level as the rotation180 Pro, the shoulder harness and related straps on this pack make for a comfortable and secure carrying system. Inexplicably, I found the waist belt release mechanism that governs the rotating belt pack easier to use on this backpack than on either the Pro or Panorama.

Suffice to say, this pack has replaced both the rotation Pro and Panorama packs. I do wish it stood on its own (which is true of the Pro, as well as the other packs reviewed here). Still, it awaits the next snowfall, when I won't need to put the pack down on a wet or muddy surface to get at my camera with lens attached - that's what the rotating belt pack is for. And if I do set it down, I'll know I can access the remainder of my gear through the top panel, without laying the bag flat on the ground.

Street price/Rotation180º Horizon: $259.99 direct; $259.99 @B&H

PicturePhoto courtesy Think Tank Photo.
STREETWALKER (Click highlighted text for more info.)

The StreetWalker proved the ideal choice for a recent trip to Hawaii. I wasn't initially certain whether I'd be checking any luggage or not, but, in case I didn't, I wanted to be sure my camera bag would be big enough to hold the needed gear yet would fit comfortably and unquestionably underneath the seat in front of me on each flight, going and coming. And all this without compromising the security of the gear or my comfort. What I didn't know at the time is that the bag would have to fit in the storage compartment on a helicopter and a storage locker on a boat.

Prior to this trip, I'd been using the StreetWalker Pro when tooling about town, but found it too spacious for my Nikon D610. Plus, as I mentioned, I wanted something small - something that would accompany me onboard as a "Personal" item if need be. When the smaller StreetWalker arrived, I inserted my D610 with a Tamron 15-30mm f/2.8 lens and Nikon SB-700 flash. That left room for the Samsung NX500 and any additional Samsung lenses I'd be receiving (on loan) during my Hawaii stay. And it all fit uncrowded yet snug enough so nothing would be bouncing around (I generally make use of unused dividers to ensure a snug fit, or add a couple of spares from an old bag).

Several pockets, including an organizer pocket, keep you organized, with additional pockets for a water bottle on either side. Carrying a tripod with this pack is not as convenient as with the larger StreetWalker Pro, but is certainly doable and without any major inconvenience. And it comes with a rain cover.

So, not only did the StreetWalker fit nicely underneath the seat on the plane, but it had no complaints when relegated to the storage area of either the sightseeing helicopter or the whale watching boat. And I was a happy camper - er, photographer.

Street price/StreetWalker: $169.75 direct; $169.75 @ B&H and Adorama

In Conclusion
I can't say enough good things about MindShift Gear's newest FirstLight 20L as well as the rotation180 Horizon and Think Tank Photo's older StreetWalker. They're all comfy, do a great job keeping my gear well balanced on my back and protecting my gear, and are a perfect fit for my various needs, whether it's communing with nature, walking the streets of Chicago, flying in a helicopter, or whale watching in a motorized inflatable craft. I always felt assured that my gear was secure, and I never felt worn out after any shooting experience with these packs.

(Click highlighted text for more info.)
FIRSTLIGHT 20L 
ROTATION180 HORIZON 
STREETWALKER
Which Backpack Should I Get?
Listed in order of preference under each criterion...
- If you carry a long, fast lens attached to the camera: FIRSTLIGHT 20L
- If you carry a short, fast or short zoom lens attached to the camera and need it ready to go at a moment's notice: ROTATION180º HORIZON
- If you're a wildlife, landscape, or travel photographer: FIRSTLIGHT 20L, ROTATION180º HORIZON
- If you expect to be on foot for long periods at a stretch: FIRSTLIGHT 20L, ROTATION180º HORIZON
- If you expect to be negotiating rugged terrain or spend extensive time in wilderness areas: ROTATION180º HORIZON, FIRSTLIGHT 20L
- If you expect to be on snowy, wet, muddy terrain (especially anywhere you can't conveniently put the bag down to access gear): ROTATION180º HORIZON**
- If you need a backpack that is airline-friendly*: STREETWALKER, FIRSTLIGHT 20L, ROTATION180º HORIZON
- If you carry a tripod: FIRSTLIGHT 20L, ROTATION180º HORIZON, STREETWALKER 
- If you carry a laptop: FIRSTLIGHT 20L 
- If you carry a tablet: FIRSTLIGHT 20L, ROTATION180º HORIZON
- If you want a backpack that's compact and cozy yet capable of carrying a small DSLR outfit comfortably: STREETWALKER
- If you want a backpack for light travel photography: STREETWALKER

*Subject to individual airline carry-on allowances.
**The FirstLight 20L has a ruggedized bottom panel, but does require it to be positioned on the ground for access to gear, whereas you can grab a camera and lens out of the Rotation180º rotating hip belt on the fly while still wearing the pack.

(Click highlighted text for more info.)
FIRSTLIGHT 20L 
ROTATION180 HORIZON 
STREETWALKER
0 Comments

    Reviews

    TECHNICAL EDITOR
    Jack Neubart


    Archives

    December 2019
    September 2019
    August 2019
    July 2019
    May 2019
    April 2019
    February 2019
    November 2018
    September 2018
    August 2018
    May 2018
    January 2018
    November 2017
    September 2017
    July 2017
    June 2017
    May 2017
    April 2017
    February 2017
    December 2016
    November 2016
    October 2016
    August 2016
    July 2016
    May 2016
    April 2016
    March 2016
    February 2016
    January 2016
    December 2015
    August 2015
    December 2014
    August 2014
    July 2014
    April 2014
    November 2013
    October 2013

    Categories

    All
    13x19-inch Printers
    35mm-style Digital Cameras
    Acratech
    Adobe Software
    Austin
    Backpacks
    Ballheads
    Camera Backpacks
    Camera Bags
    Camera Cases
    Camera Holsters
    Camera Luggage
    Camera Supports
    Canon Cameras
    Canon Lenses
    Compact DSLRs
    Compact Photo Printer
    Compact System Cameras
    Desktop Printers
    Digital Projectors
    Digital Retouching
    Digital SLR
    DSLR
    Epson
    Exposure Control
    Fashionable Bags
    Fast Lenses
    Film Emulation
    Flash Photography
    Hawaii
    HDR Plug-in
    HDR Software
    HD SLR
    HD-SLR
    High-resolution DSLR
    Holster Bags
    Image-editing Software
    Image-stabilized Lenses
    Inkjet Printers
    L Bracket
    L-bracket
    Lens Cases
    Lenses
    Lens Pouches
    Leveling Base
    Long-lens Bags
    Macphun
    Macro
    Macro Flash
    Manfrotto
    Mega-zoom Digital Camera
    MindShift Gear
    Mirrorless Cameras
    Nikon Cameras
    Nikon Digital Cameras
    Nikon Mirrorless
    Nikon Pro Digital Cameras
    Nissin
    Nodal Rail
    Nodal Slide
    Olympus
    Outdoor Photography
    Panorama Head
    Panoramas
    Panoramic Photography
    Photo Accessories
    Photo Backpacks
    Photo Belts
    Photo Luggage
    Photo Rollers
    Plug-ins
    Point-and-shoot Zoom
    Portrait Retouching Software
    Printer
    Pro Cameras
    Pro Digital Cameras
    Radio Remote Flash
    Radio TTL Wireless Flash
    Rain Covers
    Rain Hoods
    RAW Conversion Software
    Review: Photo Accessories
    Review: Phottix Odin Radio Remote
    Review: PocketWizard ControlTL
    Review: Software
    Ring Flash
    Rolling Cases
    Samsung Cameras
    Shimoda Designs
    Shoe Mount Flash
    Shoulder Bags
    Shutterbug.com Review
    Shutterbug Magazine
    Sigma Lenses
    SKB Cases
    Sling Bag
    Sling Bags
    Sling Pack
    Snapshot Printer
    Software
    Software Effects
    Super Wide Lenses
    Super-wide Lenses
    Superzoom
    Tamron Lenses
    Telephoto Zooms
    Tenba
    Texas
    Think Tank Photo
    Tripod Heads
    Tripods: Carbon Fiber
    TTL Radio Wireless Flash
    TTL Wireless Flash
    Ultra Wide Lenses
    Ultra-wide Lenses
    Ultra-zoom Digital Camera
    Wide Format Printers
    Wireless Flash
    Zoom Lenses

    RSS Feed

    All products and services are the trademarks or registered trademarks of their respective owners.
    Use or mention of any product or service is not an endorsement - compensated or otherwise.
    However, manufacturers, distributors, vendors & services may provide products or services for use.

    Your purchase and/or use of any product or service tested, reviewed, listed or mentioned is solely at your discretion and you release us from any and all liability associated with such purchase and/or use.

Your satisfaction, our expertise. They go hand in hand.
Bringing over 35 years' experience into everything we create.

Entire contents of this website is comprised of original works created by Jack Neubart, including but not limited to photographs, digital work, musical compositions, stories, humor, poetry, and any other artistic or textual material. 
All work Copyright ©2021 Jack Neubart and is protected under United States and International laws and treaties.
All rights reserved. None of the contents may be copied, extracted, abstracted, adapted, transmitted, digitally altered, or otherwise used or published without express permission of the Copyright owner.
Webmaster: Jack Neubart (building on a Weebly.com template).