
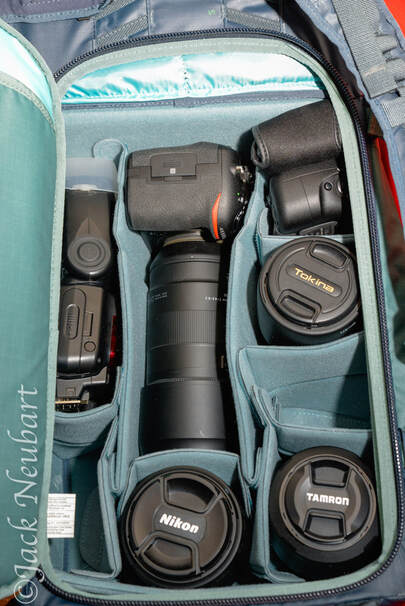
 This configuration may not look as pretty as the factory-installed version, but it was practical and served my needs. I refashioned the Shimoda large Core Unit so it could easily fit either zoom: the Tamron 100-400mm or 150-600 attached to my Nikon D500. Shown here: camera with 100-400, with room for an added lens (compared to the 150-600 configuration). ©2019 Jack Neubart. All rights reserved.
 When Shimoda originally sent me the Explore 30 for review, the pack arrived with a combination of the two smaller Core Units: the medium and small. Shimoda Core Units are interchangeable gear inserts, fully padded, entirely user-customizable, and of a proprietary design.
I was able to fit my Nikon D500 with attached Tamron 100-400mm zoom, a Nikon flash, and a few extras besides inside the medium DSLR Core Unit, which occupied the bulk of the pack’s interior. I also had room for extras that I tossed into the various pockets, including my large Nalgene water bottle in the outside water-bottle pocket (which tucks away when not needed). Since I couldn’t fit the small Core Unit in together with the medium insert, it remained at home, and was relegated to storing lenses for quick and easy access.
Enter the 150-600 Zoom
But there was one problem. I also own the Tamron 150-600mm G2 – which is a monster of a lens compared with the almost diminutive (by comparison) 100-400. On its own, the larger lens had no problem fitting in the medium insert – even with lens hood attached (in reversed position), with the camera body snuggled into its own module alongside it. (A “module” is simply a subdivision within the Core Unit, formed by the dividers and/or walls of the insert.)
However, I prefer keeping the lens attached to the body for ready access. Besides, you never know what dust and grit and even sand are kicked up when a wind gust kicks in – so I always feel it’s best to start my day on the right foot, as it were, with the lens fitted to the camera body from the outset. Granted, I do change lenses in the field, but I try to minimize these occurrences to when and where the situation allows or when absolutely necessary. But with my gear stowed in the medium insert, carrying and using the longer zoom would unquestionably require me to be a quick-change artist in the field. What to do?
After some hesitation, I again reached out to Shimoda, this time asking for the large DSLR Core Unit. After comparing measurements for the large Core Unit and long zoom, I felt assured this would be a good fit for my D500/150-600 combo.
Shimoda agreed to send the insert. With the large Core Unit in hand, it was now time to test my hypothesis… (See my earlier review – click here.)
| A Snug Fit Keep in mind that the Shimoda pack is designed with the bag tapering toward the bottom. So the Core Unit should be inserted accordingly, as it also features a tapered fit. All Core Units, by the way, are designed to fit all Shimoda packs currently available. More so than the medium-size insert, the large insert especially proved to be a very snug fit and required a bit of an effort to position. The trick is to insert the Core Unit first on the left, under the rim of the internal support frame. After that, I found that the insert settled into place on the right once gear was loaded into it. At least, that approach worked for me. (Leave the topmost section of the pack empty until you’ve inserted the Core Unit.) The thinking behind this, as Shimoda explained, is to ensure that the insert is seated firmly, without shifting. Other bags leave the inserts floating loosely or they require the insert to be anchored in place, albeit still loosely floating. Besides, packs from other manufacturers rarely even offer a choice of inserts, let alone design them with the diligence evident in these packs. Here, and thanks also to Shimoda’s proprietary modular system, gear remains firmly seated, efficiently organized – and well protected – thanks, in large measure, to the compression-molded EVA closed-cell foam construction. I should point out that when using the medium Core Unit, you would normally situate something such as a pouch, or even a light jacket, above or below the insert to act as a buffer and dampen any potential movement up or down. Although, as a practical matter, that isn’t even necessary, unless you’re trekking on treacherous terrain. Widthwise, the medium unit fit snugly enough to prevent sideward shifting. Oh, and what about that D500/150-600 fitting inside the large Core Unit? Well, it did take some rearrangement of the divider system from the factory-installed configuration – but it worked. There was just one proviso. | Where can I get more info and tech specs? Click here (scroll down page for info on large Core Unit) “Mail Bag” – Shimoda’s Product-Guide Videos Click here (video focusing on the Core Units) Manufacturer: Shimoda Designs Shimoda Large DSLR Core Unit - How much is it? $99.95 Large DSLR Core Unit (for DSLR outfit, accessed via the pack’s back-panel) Capsule Comments I love working with the Shimoda Explore 30, and now that it’s equipped with the large Core Unit that easily holds a DSLR with 150-600 (or equivalent) lens attached, putting any wildlife photo opportunity more readily in my grasp, I couldn’t be happier! I was able to fit a couple of extra lenses, shoe-mount flash, sling strap, and various accessories in the larger Core Unit, in addition to a rain parka, a first-aid kit, and the pack’s optional rain cover (and more) in other sections of the bag. And thanks to Shimoda’s well-fitting backpack harness, I could go for miles and hours without flinching. I was ready for any trek. And ready to go where I had never gone before. But first, lunch… |
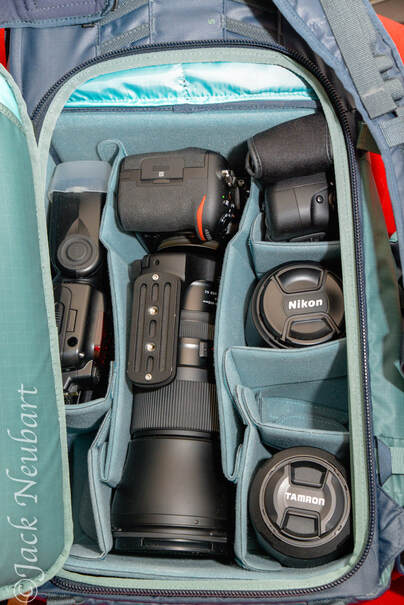 I reconfigured the Shimoda large Core Unit to hold the Tamron 150-600mm G2 zoom attached to Nikon D500 - and still had room for more. The flash is resting on a sling strip, although a second flash easily fit in place of the strap (which could go elsewhere, or left attached to the tripod mount on the lens). ©2019 Jack Neubart. All rights reserved.
 Final Evaluation
Okay, so I had to work at swapping out the Core Units, but once the large insert was in place, I repositioned some of the dividers and had a perfect fit for my D500 with 150-600 attached. I later reversed the position of the camera. My original configuration placed the camera body on the bottom of the pack, with the lens pointing upward. I later switched that around, so the camera rode at the top, lens pointing downward. Why? For a higher center of gravity and better balance, as a result. Did it matter in the end? I used the bag with both configurations and didn’t notice a practical difference. Much ado about nothing, to quote the bard? Perhaps.
By the way, in case you’re wondering, what happens if you insert the Core Unit with the deep end at the bottom of the pack? Well, I did just that when I first installed the medium Core Unit, with no untoward effects. The reason for the tapered design, as Shimoda explains, is to allow you to attach a battery grip or position the camera grip upwards, for faster access.
Of course, that begs the question, why not just design the insert uniformly, with added depth at the bottom? The simple answer may be, that would run counter to the cool, svelte design of the pack. And, in practical terms, I found my lenses fit nicely – standing on end or lying lengthwise and didn’t need more room. Gear doesn’t bounce around, but is instead held in place – and I believe the tapered fit goes a long way toward that end.
One thing to keep in mind. The large Core Unit, like the medium unit, is designed for use with the rear access panel on the Shimoda pack, not side-access, as with the small Core Unit.
So, What About That 150-600?
Here’s where I left you hanging a moment ago, when storing a DSLR with 150-600 attached, I didn’t feel comfy squeezing the lens-plus-shade into that tight space and found it necessary to store the hood separately, in the top section of the pack. That’s no biggie. In fact, some could argue there’s an advantage to that, since you don’t have to first remove the reverse-mounted hood from the lens. This way, I simply withdraw the shade from the pack and attach it. It actually turns out to be a much smoother operation.
Granted, I could have forced the issue and accommodated the lens with shade attached – and you may have no qualms working your own magic with the bag. But this was the arrangement that made me comfortable, especially given that I’d be swapping out the longer zoom for the 100-400 at some point and didn’t want to bother rearranging things each time I changed lenses.
Long and short of it – no pun intended, this arrangement allowed for all the gear I needed, when I needed it.
 RSS Feed